Start Visual Studio and New Web Site/Empty Web Site. Name it "BooksByCategory."

The first thing we will add is the Data Entities. Right click on the web site in the Solution Explorer and choose Add/ New Item.

You will get this warning

It just means that in ASP.Net code such as this must go in an App_Code folder. Just click "Yes." The Entity Wizard will start.

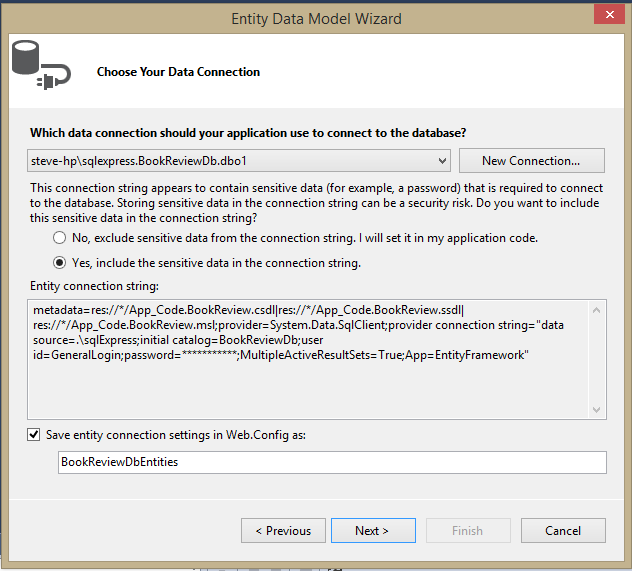
We want to generate the entities from an existing database. In the next dialog choose New Connection, even if a connection to the database already exists. Fill in the dialog box as in the following image. We want ".\sqlexpress" for the server. We want to use a SQL Server login. The Login name is "GeneralLogin." The password is "P@ssw0rd1". (Don't include the quotes.) Select the database BookReviewDB. This will give us a connection with limited priviledges. We will only be able to select data.

Click OK. The next screen contains a warning about the fact that our connection string will contain a password. Say Yes and click Next.
On the next screen, go with Entity data 6.0

In the next screen we choose what we want to include in our entities. Expand Tables dbo and select Author, AuthorBook, Book, BookCategory and Category. Leave the two check boxes checked. and click Finish.

You will get the following security warning.

You may get this several times. Each time just click OK. After you get through the security warnings it will generate a diagram.
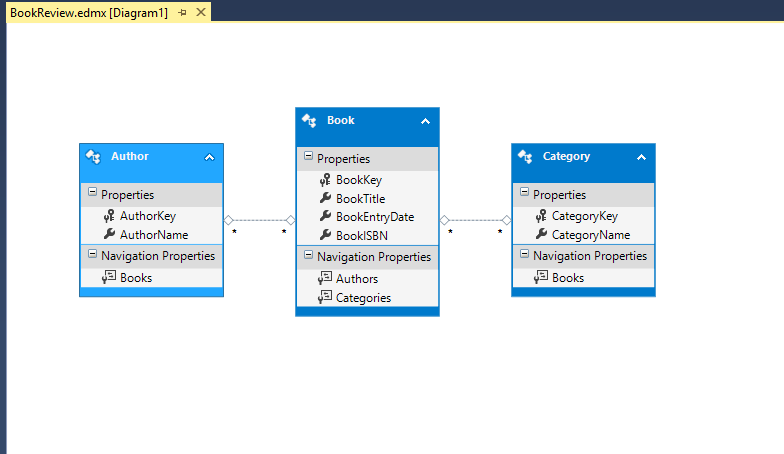
The linking tables are incorporated into the many-to-many relationship that it shows. Save the diagram.
Now right click on the web site in the Solution Explorer and choose Add New WebForm. The name can remain "Default".
We are going to add two controls to the form. A DropDownList and a GridView. For now we will let them keep their default name. We will add one attribute to the DropDownList: AutoPostBack="true"

Right click into the html source view and select View Code. We will add some code to the PageLoad event of the page. This method executes as the page loads, so we can use it to populate the DropDownList.
Instantiate the BookReviewDBEntities at the class level. This will connect us to the Data Entities code. Declaring it at class level lets us access it in more than one method.
We want to populate the DropDownList with the categories of books. To do so we use a LINQ query. The LINQ syntax declares a variable of the type var. This variable doesn't have a datatype until compile time. The basic LINQ syntax resembles, but is not quite the same as, SQL. After the query, we bind the results to the DropDownList. We want to show the CategoryName as the text in the DropDown and store the key for use in our next query. Here is the code.

You should run this to make sure the dropdownlisti is populated.
Click on the tab to open the Default.aspx in design view. Double click on the dropDownList to create the Index changed event. We will use Entities LINQ to create a query and return the books that match the one. To do this we use three froms to bring in the relevant table. ADO Entities keeps track of the relations. Here is the code for the Index changed event.

There are a few things to note about this code: One, notice the three from statements in which we bring in all the relevant tables. Notice also how we get the text from the DropDownList. Despite what I said above, we don't really need the value to be stored in the DropDownList this time. It works just fine with the name of the category. Also note how the fields are selected. When we bind it to the control we need to convert the var to a list type so that the grid view understands how to arrange and display it.
If you run the program right now you will notice that it still doesn't quite work. Every time you select a value in the DropDownList it returns to the top value. This is do to the nature of web pages. Whenever you make a change or invoke an event the page is completely redrawn from the server, and all variables are reinitialized. We will have to deal with this many times in our coding. To solve it this time we need to enclose the code in the Page Load event within an if statement. The statement says to only do what is in the if block when it is not a postback. Postback is a Microsoft term for a post back to the server from the page. ASP distinguishes the original posts from later re-posts of the page. Here is the adjusted code. Now it should work.

I am going to add one other little element--a style sheet. In a real web page this would be a major element. It is important to make the page attractive and functional. But I am only going to add a touch of CSS just to reinforce that you can and should. Again the Data Grid is essentially a table. By formating table elements you can format the grid. Here is my CSS.

Attach the stylesheet to the WebForm as shown in a previous blog. Here is a picture of the page running. (note: the grid will only show when there is data to match the selection.).

your code useful to all college students.
ReplyDeleteWcf Training In Chennai