Installing and Managing Databases
SQL Server has a Management Studio application that provides you with all the tools you need to manage SQL Server instances and databases, but you can also use Visual Studio to do almost all the same tasks. For our assignments we need to create two databases, one for the examples and one for the assignments. The one for examples is called BookReviewDB, the one for Assignments ShowTracker. I will go through the process of installing BookReviewDB. The process for creating and populating ShowTracker is the same with one minor detail that will be noted in place.
Installing Databases
First we need to get the SQL script for the database. You can find it in Files in Canvas, or at http://www.spconger.com/school/ITC172/BookClub.txt. Select all and copy the Text. If you haven’t already, open Visual Studio. You do not need to start a project. On the Top Menu Select Tools/SQL Server/NewQuery.

In the Connect to Database dialog key in “.\Sqlexpress”. The “.\” is a shortcut for the computer name. If the shortcut doesn’t work, key in the computer name, backslash and SqlExpress: “myComputer\SqlExpress.”

Click Connect. In the query window that opens, paste the script for BookReviewDB.

Click the Green Triangle in the query tool bar to run the script. You should see the following after a successful completion:

Mananging Databases
Now that you have installed the database you will want to see it and inspect its objects. To do this go to the View menu and select Server Explorer.

Pin the Server Explorer pane open:

Now we are going to create a connection to the server and the database. Right click on the Data Connections Icon at the top of the Server Explorer. Select Add Connection. In the Add Connection Dialog key in “.\SqlExpress for the server and then select BookReviewDB from the list of Databases. It is important to note that you must make a separate data connection for each database you wish to see in the Server Explorer. You can also make connections with different privileges and permissions. Our current connection will use the Windows Authentication which gives us Admin privileges in the database.

Click OK. Now you will see a connection in the Server Explorer. Click the little triangle to expand the node. Expand the Tables node and then the Book Table. You can see the columns in the table.
If you want to see the data in a table you can right click on the table and select Show Table Data.


Preparing the Data For Mixed Logins
By Default the SQL Server accepts only Windows authentication. That means a Windows account, usually from Active Directory, is mapped to SQL Server and given appropriate permissions. In our Virtual Machine our Windows account is mapped with Admin Permissions. We will want our assignments and examples to connect with lesser permissions. We could make numerous Windows accounts, but in class it is a pain to constantly have to log out and log in to different accounts. Instead we will enable SQL Server and Windows Accounts. SQL Server accounts are like most logins you know. They require a user name and a password. The script we ran set up these accounts, but we must make some changes on the server to enable them.
This is the one thing we want to go to the SQL Server Management Studio for. We need to change the login mode on the server and then restart it. Technically it is possible to do from Visual Studio, but it involves a registry edit. It is safer and easier to do the change in the Management Studio. This is something you only have to do once. Once the mode is reset it stays reset.
Open SQL Server Management Studio. In Windows 8.1 you can find it by going to the tile screen and typing SQL anywhere in an open space. This brings up the search and should list the management studio among its results.
Connect to the server with “.\SqlExpress” and Windows Authentication, just as you did in Visual Studio. Right click on the .\sqlexpress in the Object Explorer and choose Properties.

In the Properties dialog select Security and click on the Radio button beside SQL Server and Windows Authentication.

Click OK. You will be warned that for these changes to take place you must restart the server. Click OK to clear the warning. Now go back to the Object explorer and right click on the server again. Choose Restart.
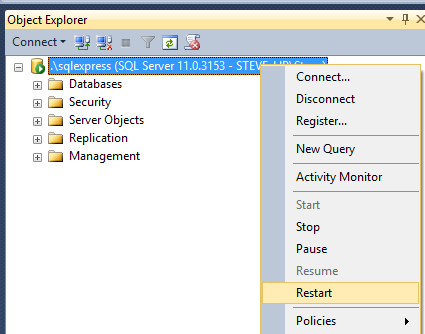
You will be asked twice whether or not you want to do this. Say Yes to both. Once the Server is restarted you can close SQL Server Management Studio. You can now use the mixed mode for logins.
No comments:
Post a Comment