Monday, December 29, 2014

Creating a Windows Communication Foundation (WCF) Service

WCF services


Tens of thousands of Web Services exist on the web. They are code that that is served up by a web services such as IIS or Apache at a user's request. They usually have an HTTP or IP address. These services have no visible interface in the sense of a web page or form. They just offer an Application Programming Interface (API), that is a set of methods that can be called, the parameters they require, and what they will return. It is up to the web developer who uses the services how to display the data they return.

Most of these services offer access to data from databases: Travel information, hotel vacancies, stock market transactions, etc. Many cost money to access. Services are a secure way to manage these transactions. The web developer never touches the database directly. Everything is passed through the service. The service can validate and ensure the safety and integrity of the data.

Designing software around services is known as "Service Oriented Architecture." This doesn't replace object oriented programming; it incorporates it. The service is designed using objects.

One more word on Services. Most fall either into one of two technologies: "Soap" or "Rest." Soap uses XML to transmit the data from the service to the client. The XML is complex. It uses a Soap envelope, that encloses an XML Schema that describes the class and its methods. Additionally a WISDL file is included or generated which can be used to 'Serialize' a class in the target language. Rest uses Javascript and is much simpler. It passes the information in JSON name value pairs. This is lighter weight, but includes less information. Still Rest is the more popular protocol. We will be using SOAP because that is what Visual Studio renders by default.

Finally, for this exercise we are not going to host the service in IIS proper. This would require a great deal of configuration and set up. Instead we will have to run two or more copies of Visual Studio at the same time. One will have the service and one the client.

The Register, Log In Service


For this exercise we will create a web service that allows the user Register as a reviewer, log in and add a new book and a review.

Start Visual Studio and open an Empty Web Site. Name it BookReviewRegistrationService

The first thing we will add is the ADO Entites. Name it BookReviewRegistraionModel

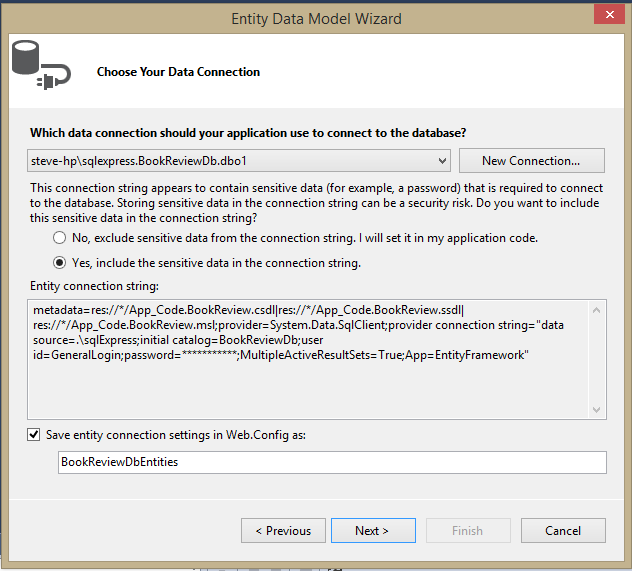
Choose Existing database and make a new connection using the SQL Server login "ReviewerLogin" with the password "P@ssword2."

Choose the tables "Reviewer" and "CheckinLog."

Before we go on add the PasswordHash, KeyCode, and LoginClass from the previous assignment. You can get them by right clicking on the project name, choosing ADD, EXISTING ITEM and scrolling to the project where the classes reside. Select them and click Open.

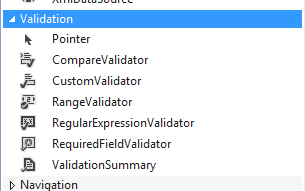
Next we want to add a WCF Service. Right Click on the project and select ADD new Item. Choose WCF Service--not Data Service or the Ajax enable service. Name it "ReviewerRegistrationService."

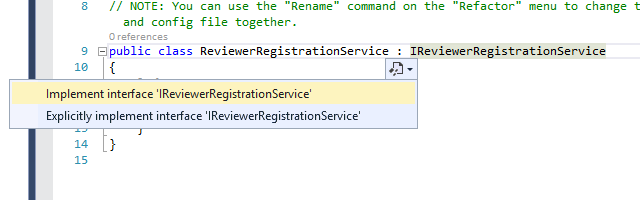
This will add two things to your App_Code Folder: an iterface IReviewRegistrationService.cs and the Service itself, ReviewerRegistrationService.cs. We must first deal with the Interface. It looks like this at this point.

A couple of notes: An interface is an abstract structure that only contains method signatures. It is sometimes referred to as a "contract." A class that implements an interface must give a body to all its methods. In our case we want to add methods to register a reviewer and to allow a reviewer to log in. Delete Void DoWork() and add our own methods. We also need to add a Data Contract a Reviewer lite class that we can pass from the WebPage. In fact, let's call it "ReviewerLite." Here is the code:

Now we will turn to the service itself. Open it. It will look like this.

Click the interface. This will put a small blue underline under the first letter of the interface. Mouse over it to expand it. It behaves like a smart tag in Word. When it is expanded select implement interface.

Now your Service class should look like this:

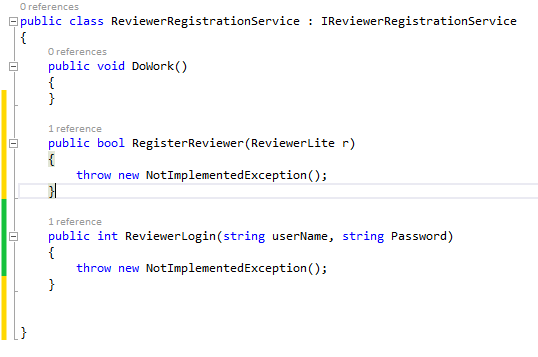
You can delete the public void do work. We will fill in the other two. First we will add a reference to the Data Entities:

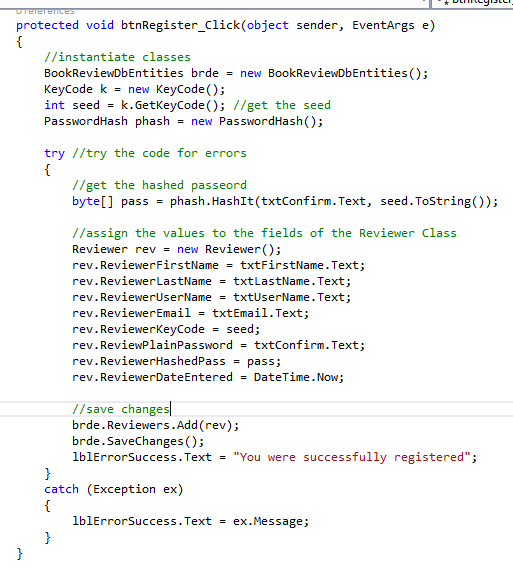
Next we will work out the Register Reviewers method. If you look at the logic of this method, it is a lot like what we did last assignment:

1. Instantiate PasswordHash()
2. Instantiate Keycode()
3. Pass the password and keycode to PasswordHash to get the hashed password
4. instantiate a new instance of the Reviewer class from the data entities
5. map the fields from ReviewerLite to Reviewer
6. assign the new hash and the seed to the Reviewer fields
7. add this instance of review to the collection Reviewers
8. save all the changes to the database

Here is the code:

I put the code in a try catch so that the calling web page can have some indication if the registration succeeded. If something goes wrong the boolean will return false.

The Log in method will also resemble the previous assignments log in. It is actually very simple, because the LoginClass does all the work.

Make sure you have service selected and run the program you should get something like the following

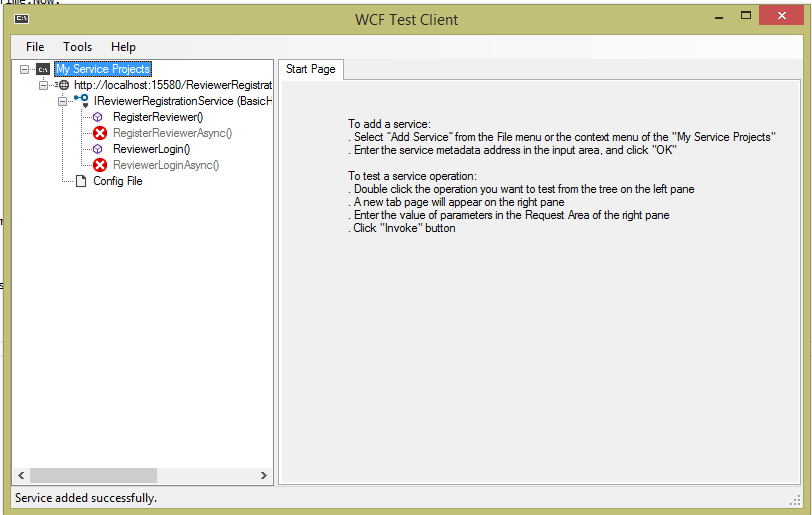
The x's are because we didn't implement asynchronous versions of the methods. Ignore them. It will be hard to test the registration, so lets test the Login method. Double click it. You should see something like this.

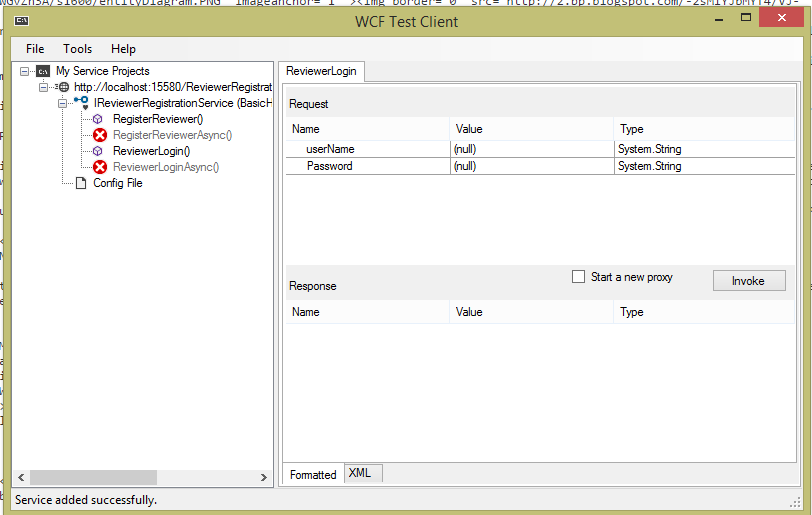
We need to provide a valid username and password. Use the one from the last assignment. In my case it was "spconger" and "pass." Click the Invoke button, and click through the security warning. Notice the method returns "1," which is the id of my user. If you enter an invalid user or password it should return "0."

Finally, click on the XML tab. It will show you the structure of the request and the response XML. These are generated for you by .Net, but in other languages you might have to code them by hand.

Now we will make another WCF service to Add a new Book, Author and review

New Review


Think about what is needed to add a review. First we must determine if the book is already entered. If not we need to enter it. The same with the artist. In the client app we can solve these by having lists of artists an books. The user can choose a book or enter a new one, same with the artist. So we need methods for entering a book, a review and an artist. They should also be able to select a genre. This all looks a bit complicated, but it's not as bad as it seems. Let's give it a shot.

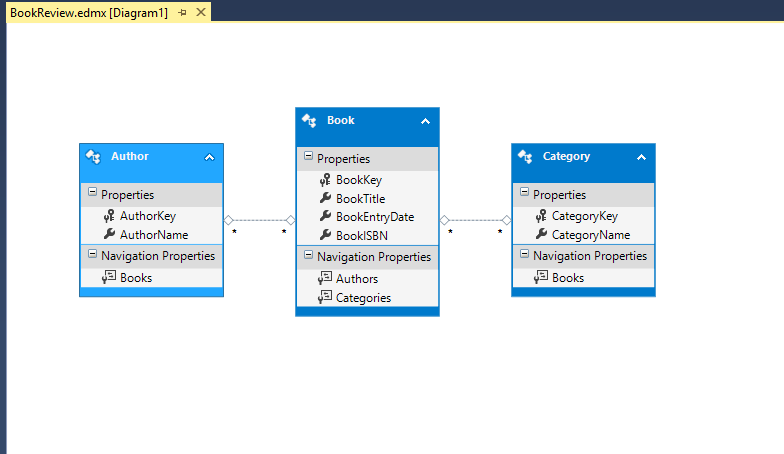
Leave the current visual studio open. Right Click on the visual studio icon in the tray and select visual studio 2013. It will open another instance of Visual Studio. Create a new empty web site. Call it "AddReviewService." Add the ADO Entities. Name the model "BookReviewDB." Use and existing database, new connection, Sql Login, ReviewerLogin, "P@ssw0rd2". Select these tables:

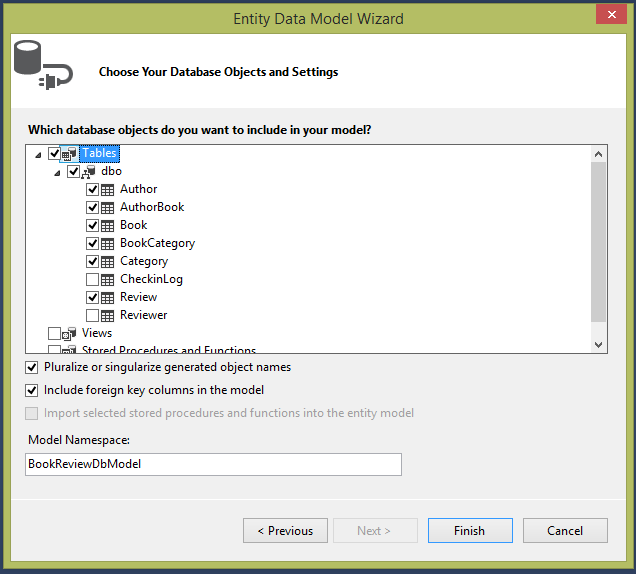
The diagram should look like this.

Now add the Service. Call it "NewReviewService."

We will have operation contracts for the following Add Review, Add Author, Add Book. We will also need methods for Getting books, getting Categories and getting authors.

Notice the Add books method. In it we take in a Book object, an author object and a string with the category name. This is because of the many to many relationships between Book and Author and Book and Category created by the Data Entities. For simplicity, I have implemented it so that we can only add one author and one category for a book. To make it work for multiple artists and multiple categories we would need to pass not an Author object and an array of Authors (Author[] a) and an array of Category names (string[] categories). That also would complicate our client application. Though you might try to implement it as a challenge exercise.

Open the service and implement the interface.

Here is the code for the AddAuthor method. Notice that the Entities Context was declared a class level.

Here is the add book method. Note that it takes advantage of ADO Entities ability to manage relations between entities. Also you might note the strange operator used in the Category and Author sections "=>." This is called a "Lambda" operator. Microsoft's definition is, as usual, a bit vague and only marginally helpful:

A lambda expression is an anonymous function that 
you can use to create delegates or expression tree types. 
By using lambda expressions, you can write local 
functions that can be passed as arguments or returned 
as the value of function calls. Lambda expressions 
are particularly helpful for writing LINQ query expressions.

But there are a few instances where we will need them. The Add review method which follows is one of them.

The Add Review Method.

Here the Lambda expression is used in a if statement. I had trouble making sure that the Book object had a valid key. This guarantees that it does.

We also need methods for returning Books, the names of the authors and categories. Here is the code for these three methods:

Run the service to make sure it works. Here I added an author "Neil Gaiman." It returned true.

If I go to the Tools menu and start a new query, I can confirm that the author was indeed written.

Saturday, December 20, 2014

Registration and login

Preliminary Logic

This web site is going to allow a new user to register and then log in. Before beginning to code it is a good idea to get a sense of what needs to be done--the logic of it. This is always a good idea. You should be clear about what needs to be done before worrying how to do it.

To register as a reviewer the user must enter their first name, last name, a username, their email and a password.

The program will need to generate a random integer and pass the password and the integer (as a string) to the password hash class where the two will be combined and hashed. This is considered the safest way to create a password. It helps protect against dictionary attacks and other hacking methods which search for words and word combinations.

After the password is hashed, the username, first name, last name, email, seed and hashed password need to be written to the database. We will also save the plain text password. In real life you would never do this, but it will help us test the log ins.

Here is a UML Activity diagram showing the steps

The next part is to allow the new user--or any user to log in. This is also more complicated than you might think. First the user enters their user name and password.

Using the username we check the database and retrieve the user key, seed number and hashed password for that user.

Then we pass the seed and password to the hash class to hash them. We compare the current hash to the one we got from the database. If they match we store the user Key in a session variable so that we can refer to it throughout the user's session. If they do not match we provide an error message and tell the user to try again.

Here is an Activity diagram for the log in

There are a couple of other things we will want to do to tidy up. We will want to validate the text boxes and make sure the password and the password confirmation match

Setting up the Environment

Create a new empty Web Site. Name it "ReviewerRegistration."

First we will add the ADO Entities. Make a new connection even if one exists. We want to use the ReviewerLogin. The password is "P@ssw0rd2".

We only really need to see the reviewer table and the check-in log tables for this exercise.

Finish. You should get a diagram like the one below.

Save everything.

Now we want to add another class. Right click on the App_Code folder and select ADD NEW Class. Name it "PasswordHash. " There is a version of this class stored as a text file in Canvas Files. You can also access it at https://github.com/spconger/PasswordHashExample/blob/master/PasswordHash.cs, though it you use the one from Github, you will need to remove the namespace. Copy the file and paste it over the code in your new class. Here is the code:

This class takes the password and the passkey or random seed as strings. It joins them and then converts them to a byte array. Once they are in a byte array it applies the SHA512 hashing algorithm to the array to create the new password. We will use this same class for all our password hashing.

Next let's add three web forms. The first will be named "Default" and will have the login and a link to register. The second will be the registration form. Name it "Registration.aspx." The third will be a welcome page that greets someone who has successfully logged in. Name it "Welcome.aspx:.

Here is the source for the Default Page:

Here is the Design view of Default

Let's make one little change to the linkbutton in the form. We will add an attribute PostBackUrl="Registration.aspx." This will make it so that when we click the link it will redirect the user to the Registration page. We are going to focus on it next. We will return to the login after we have completed the registration form.

Here is the source code for the Registration page.

<%@ Page Language="C#" AutoEventWireup="true" CodeFile="Registration.aspx.cs" Inherits="Registration" %>

<!DOCTYPE html>

<html xmlns="http://www.w3.org/1999/xhtml">
<head runat="server">
    <title></title>
</head>
<body>
    <form id="form1" runat="server">
    <div>
    <table>
        <tr>
            <td>First Name</td>
            <td><asp:TextBox ID="txtFirstName" runat="server"></asp:TextBox></td>
        </tr>
         <tr>
            <td>Last Name</td>
            <td><asp:TextBox ID="txtLastName" runat="server"></asp:TextBox></td>
        </tr>
         <tr>
            <td>Email</td>
            <td><asp:TextBox ID="txtEmail" runat="server"></asp:TextBox></td>
        </tr>
         <tr>
            <td>User Name</td>
            <td><asp:TextBox ID="txtUserName" runat="server"></asp:TextBox></td>
        </tr>
         <tr>
            <td>Password</td>
            <td><asp:TextBox ID="txtPassword" runat="server"  TextMode="Password"></asp:TextBox></td>
        </tr>
         <tr>
            <td>Confirm Password</td>
            <td><asp:TextBox ID="txtConfirm" runat="server" TextMode="Password"></asp:TextBox></td>
        </tr>
         <tr>
            <td>
                <asp:Button ID="btnRegister" runat="server" Text="Register" /></td>
            <td>
                <asp:Label ID="lblErrorSuccess" runat="server" Text=""></asp:Label></td>
        </tr>
       
    </table>
        <asp:LinkButton ID="LbLogin" runat="server" 
PostBackUrl="~/Default.aspx">Log in</asp:LinkButton>
    </div>
    </form>
</body>
</html>

Notice the pattern. A prompt and then a text box to take the entry. The table is just to give the entry form a more uniform look and structure. Notice also the password text mode. This keeps the letters of the password from showing in the text box. Here is how the page looks in the Design view.

Validating the Text Boxes

One thing you should never allow in a web page is open text boxes without any kind of validation. Open text boxes can be the source of errors, misinfomation, and even attack. You also need to make sure that all the required fields are filled out. There are several ways you can validate text boxe. You can write your own JavaScript functions to validate the boxes. You can write server side validation code in C#. Or you can use Microsoft's built in validation controls. These controls use JQuery to do the validation. To use them we need to download the JQuery libraries. Microsoft has a tool for this called Nuget. You can get it by right clicking your project in the Solution Explorer

Search for ASP.Net JQuery and Install the ASP.Net.ScriptManager.Jquery.

Once it has installed, you can close.

In your toolbox, under Validation, there are six controls and a pointer.

The Compare validator, allows you to compare the values in two different text boxes. It also has a method for checking the data type of the value in a text box. The Range Validator lets you set a range of acceptable values. The regular expression validator lets you apply a regular expression to a text box. The required field validator lets you set a field as required. The Validation Summary lets you place all the messages in one place.

For our little entry form we want to Require Last Name, Email, User Name, Password and confirm. We want to make sure that the email is structured as a valid email using regular expressions and we want to make sure the confirm password text matches the password text. We will display all the error messages below with the ValidationSummary control. Here is the source for the first required field control.

Note Three things. One: make sure to change the ErrorMessage field to reflect the control's purpose. Two: you must include the attribute "ControlToValidate." Third: I set the display to none. This is because I want to display it in the ValidationSummary control. Here are all the required field valdiations

Now we need to make sure the email is validly constructed. Add the Regular expression validator. Change its ID to "EmailRegularExpression," its ErrorMessage to "Enter a valid Email" and set its control to Validate as "txtEmail", then switch to design view. Select the text "Enter a Valid Email" and look in the Properties pane. (if you don't have properties, go to VIEW menu and choose Properties.) Find the property "ValidationExpression" Click into the box beside it and you should see three dots.

Click the three dots and it will open a regular expression dialog. Select Internet-e-email-address and click OK. The regular express will be added to the source code.

The final validation we need to add is the one that compares the confirm password with the password. In the source add the Compare validator. In this control the Control to validate is txtConfirm, the control to compare is txtPassword. Give the control a name and an appropriate error message. Now add the validation summary. You don't have to make any changes to it. Here is a picture of all the validation code.

Now run the program and see how the validation controls work.

The Registration Code

Now, at last, we are going to write some code. The first thing we need to make sure of is that we can hash their password when they enter it. We already have the hash class, but we also need to generate the random passkey or seed. I am going to write a small little class to do this. Add a new class to the project and name it "KeyCode." It isn't much of a class, but by making it a class I can reuse it wherever I need it.

Now we can register the new user. Double click on the Register button on the Register Web Form. This will open the click event. Here is the code for the Register button with some comments.

Run this and you should find you have successfully registered a new Reviewer.

Logging in

The final part of this is to allow the registered user to log in. To validate the login I am going to create a log in class called "LoginClass". Here is the Login class with comments.

using System;
using System.Collections.Generic;
using System.Linq;
using System.Web;

/// 
/// This class takes in the user name and password
/// retrieves information from the database
/// and then hashes the password and key to
/// see if it matches the database hash
/// 
public class LoginClass
{
    //class level variables-fields
    private string pass;
    private string username;
    private int seed;
    private byte[] dbhash;
    private int key;
    private byte[] newHash;
 
    //constructor takes in password and username
    public LoginClass(string pass, string username)
 {
        this.pass = pass;
        this.username = username;
 }

    //gets the user info from the database
    private void GetUserInfo()
    {
        //declare the ADO Entities
        BookReviewDbEntities brde = new BookReviewDbEntities();
        //query the fields
        var info = from i in brde.Reviewers
                   where i.ReviewerUserName.Equals(username)
                   select new { i.ReviewerKey, i.ReviewerHashedPass, i.ReviewerKeyCode };

        //loop through the results and assign the
        //values to the field variables
        foreach(var u in info)
        {
            seed = u.ReviewerKeyCode;
            dbhash = u.ReviewerHashedPass;
            key = u.ReviewerKey;
        }
    }

    private void GetNewHash()
    {
       //get the new hash
        PasswordHash h = new PasswordHash();
        newHash = h.HashIt(pass, seed.ToString());
    }

    private bool CompareHash()
    {
        //compare the hashes
        bool goodLogin = false;

        //if the hash doesn't exist
        //because not a valid user
        //the return will be false
        if (dbhash != null)
        {
            //if the hashes do match return true
            if (newHash.SequenceEqual(dbhash))
                goodLogin = true;
        }

        return goodLogin;

    }

    public int ValidateLogin()
    {
        //call the methods
        GetUserInfo();
        GetNewHash();
        bool result = CompareHash();

        //if the result is not true
        //set the key to 0
        if (!result)
            key = 0;
            

        return key;
    }

}

Here is the code for the login button also with comments

Try it. Register a user and then login with that user's username and password

Monday, December 15, 2014

Using Data Entities

Start Visual Studio and New Web Site/Empty Web Site. Name it "BooksByCategory."

The first thing we will add is the Data Entities. Right click on the web site in the Solution Explorer and choose Add/ New Item.

You will get this warning

It just means that in ASP.Net code such as this must go in an App_Code folder. Just click "Yes." The Entity Wizard will start.

We want to generate the entities from an existing database. In the next dialog choose New Connection, even if a connection to the database already exists. Fill in the dialog box as in the following image. We want ".\sqlexpress" for the server. We want to use a SQL Server login. The Login name is "GeneralLogin." The password is "P@ssw0rd1". (Don't include the quotes.) Select the database BookReviewDB. This will give us a connection with limited priviledges. We will only be able to select data.

Click OK. The next screen contains a warning about the fact that our connection string will contain a password. Say Yes and click Next.

On the next screen, go with Entity data 6.0

In the next screen we choose what we want to include in our entities. Expand Tables dbo and select Author, AuthorBook, Book, BookCategory and Category. Leave the two check boxes checked. and click Finish.

You will get the following security warning.

You may get this several times. Each time just click OK. After you get through the security warnings it will generate a diagram.

The linking tables are incorporated into the many-to-many relationship that it shows. Save the diagram.

Now right click on the web site in the Solution Explorer and choose Add New WebForm. The name can remain "Default".

We are going to add two controls to the form. A DropDownList and a GridView. For now we will let them keep their default name. We will add one attribute to the DropDownList: AutoPostBack="true"

Right click into the html source view and select View Code. We will add some code to the PageLoad event of the page. This method executes as the page loads, so we can use it to populate the DropDownList.

Instantiate the BookReviewDBEntities at the class level. This will connect us to the Data Entities code. Declaring it at class level lets us access it in more than one method.

We want to populate the DropDownList with the categories of books. To do so we use a LINQ query. The LINQ syntax declares a variable of the type var. This variable doesn't have a datatype until compile time. The basic LINQ syntax resembles, but is not quite the same as, SQL. After the query, we bind the results to the DropDownList. We want to show the CategoryName as the text in the DropDown and store the key for use in our next query. Here is the code.

You should run this to make sure the dropdownlisti is populated.

Click on the tab to open the Default.aspx in design view. Double click on the dropDownList to create the Index changed event. We will use Entities LINQ to create a query and return the books that match the one. To do this we use three froms to bring in the relevant table. ADO Entities keeps track of the relations. Here is the code for the Index changed event.

There are a few things to note about this code: One, notice the three from statements in which we bring in all the relevant tables. Notice also how we get the text from the DropDownList. Despite what I said above, we don't really need the value to be stored in the DropDownList this time. It works just fine with the name of the category. Also note how the fields are selected. When we bind it to the control we need to convert the var to a list type so that the grid view understands how to arrange and display it.

If you run the program right now you will notice that it still doesn't quite work. Every time you select a value in the DropDownList it returns to the top value. This is do to the nature of web pages. Whenever you make a change or invoke an event the page is completely redrawn from the server, and all variables are reinitialized. We will have to deal with this many times in our coding. To solve it this time we need to enclose the code in the Page Load event within an if statement. The statement says to only do what is in the if block when it is not a postback. Postback is a Microsoft term for a post back to the server from the page. ASP distinguishes the original posts from later re-posts of the page. Here is the adjusted code. Now it should work.

I am going to add one other little element--a style sheet. In a real web page this would be a major element. It is important to make the page attractive and functional. But I am only going to add a touch of CSS just to reinforce that you can and should. Again the Data Grid is essentially a table. By formating table elements you can format the grid. Here is my CSS.

Attach the stylesheet to the WebForm as shown in a previous blog. Here is a picture of the page running. (note: the grid will only show when there is data to match the selection.).