Software programs have grown increasingly complex over time. Many of them are almost impossibly complicated.
Object oriented analysis and object oriented programming are attempts to create a way to handle this complexity in a more natural way.
Object oriented analysis begins by identifying the objects involved in the solution. These objects map to the real world situation. You may have a customer object, an inventory object, a sale object etc. Next you define how these objects relate to each other and how they interact.
When it gets to the level of writing the programs there are certan object oriented principles that objects should adhere to. These principles are a bit difficult to get a hang of immediately. If fact, you will find obscure philosphical discussions of their meanings and implications in discussions of object oriented programming.
In code, a class is the definition of the object.
Abstraction
A class should be general, that is it should describe all customers not a single customer. It is an abstraction of an object. There are other more subtle consequences of this idea, such as seperating out common elements into a classes, or creating interfaces which contain collections of commen methods.
Encapsulation
Encapsulation incorporates two main ideas: one is that a class should be as complete and selfcontained as possible. It should not depend on other classes for its meaning or behavior. Second is the idea that the internal workings of a class should be private and invisible to other classes. Objects should be like legos, blocks that hook together. You just need to know what the holes and pegs are to get them to stick together. (in the case of classes these pegs and holes are properties and method signatures)
Polymorphism
Polymorphism means that the same object can behave differently in different contexts. Practically speaking it constists of few techniques. One is Operator and method overloading. That means making seveal operators or methods with the same name, but giving them different sets of parameters. You can call the same method but it will behave differently depending on the parameters you send it. A second technique is method overriding. This happens in inheritance. A child can override a method from the parent, giving it new featuresand functionaliry. A third technique also relates to inheritance. when initializing a class you can always substitute a child for the parent, thus getting a different behavior
Inheritance
Inheritance has to to with extending objects. When an object inherits from another object, it gets all the public properties and methods of the parent for free. It just adds its own special features. Inheritance usually follows a Generalization/specialization pattern. The parent is more generalized, the child more specific. For instance you might have a parent class called account, that holds all the information common to all accounts. Savings, Checking, Credit card could be children of account. All represent more specific types of accounts.
Elements of classes
Classes can contain the following elements:
Fields--these are class level variables that describe the class. Things like customerName, salePrice, etc. They are usually kept private to conform with the encapsulation principle.
Properties--these publicly expose fields. They usually contain a get method which returns the field value and a set method which allows a user to change the values. In non .net languages you have to write your own get and set methods called accessors and mutators.
Constructors--these are special methods that initialize the class. You can override constructors so that a class can be initialized differently in different situations.
Methods--these are things classes can do, such as perform calculations, retrieve data, etc.
Events--these are things a class can respond to such as a click of a mouse or a connection opening.
Sunday, March 27, 2011
Testing Plans
Testing is a crucial part of development. It should be incorporated from the beginning.
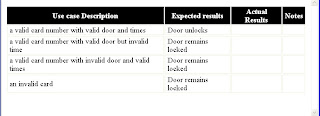
One way to set up a test plan is to look at the use cases. Your product should meet the requirements of each use case. Each use case should be tested systematically. One approach is to list each use case and the expected result from running the program. Run the program and check to see if the actual result is the same as the expected result. If it is, good. If not figure out why. Document any changes and test again.
You should test for exceptions as well as valid results. What happens if bad data is entered? What happens if a file is missing, or a database connection fails?
Thoroughly testing code is the only way to guarantee basic quality.
Here is a picture of a simple testing plan for the core use case of the card reader app.

Saturday, March 26, 2011
Alternatives and Feasibility
Alternates
Once the problem is identified, the search begins for ways to solve the problem. There are always multiple solutions available. Typically there is a minimal, least expensive solution, which fulfills the core requirements for a project but doesn't provide any extra or desireable features. It may also be less scalable and customizable and have a shorter projected life.
On the other end, there is a solution that provides all the requirements and all the bells and whistles. It is usually scalable and customizable and has a longer expected life, but is expensive. Then, of course, there are all the solutions that fall between these two.
Alternate solutions are not always a choice of relative expense, they can also be choices between technologies, between open source and Microsoft's managed code, for instance, between Sql Server and Oracle or an open sorce database, etc.
Feasibility
Each alternate solution should be analyzed for feasibility.
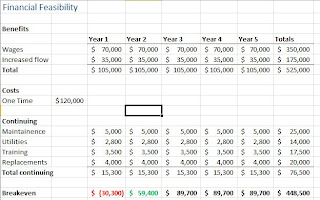
There several kinds of feasibility: First is financial. Will the project pay for itself? Will it ever recoup its cost. Below is a simple financial analysis of a project.
Other kinds of feasibility include, cultural, technical, time, and legal.
Cultural feasibility has to do with the culture of the company and its customers. Some changes go against the culture of a company and won't be successful no matter how good the technology. THey will only breed resistance and failure.
Technical feasibility has to do with whether the technology is avaialable and practical. It also has to do with whether the company has the means to support and maintain the technology.
Time feasibility has to to with whether the project can be completed within the projected timeline
Legal feasibility has to do with any relevant laws, copyrights and patents. It can also include safety rules and union contracts.
Below is a picture of a spreadsheet that can be used to help decide between alternatives. It uses a weighted average. The clients list the major requirements and features they would like to see the project embody. Then they provide percentages for how important each component is to the project. The total percents should add up to 100. They they rate each alternative solution on some scale. (the example uses 1 to 5). The rating is multiplied with the percent to get the weight. The weights are totaled. The heighest weight should be your best bet.

Once the problem is identified, the search begins for ways to solve the problem. There are always multiple solutions available. Typically there is a minimal, least expensive solution, which fulfills the core requirements for a project but doesn't provide any extra or desireable features. It may also be less scalable and customizable and have a shorter projected life.
On the other end, there is a solution that provides all the requirements and all the bells and whistles. It is usually scalable and customizable and has a longer expected life, but is expensive. Then, of course, there are all the solutions that fall between these two.
Alternate solutions are not always a choice of relative expense, they can also be choices between technologies, between open source and Microsoft's managed code, for instance, between Sql Server and Oracle or an open sorce database, etc.
Feasibility
Each alternate solution should be analyzed for feasibility.
There several kinds of feasibility: First is financial. Will the project pay for itself? Will it ever recoup its cost. Below is a simple financial analysis of a project.

Other kinds of feasibility include, cultural, technical, time, and legal.
Cultural feasibility has to do with the culture of the company and its customers. Some changes go against the culture of a company and won't be successful no matter how good the technology. THey will only breed resistance and failure.
Technical feasibility has to do with whether the technology is avaialable and practical. It also has to do with whether the company has the means to support and maintain the technology.
Time feasibility has to to with whether the project can be completed within the projected timeline
Legal feasibility has to do with any relevant laws, copyrights and patents. It can also include safety rules and union contracts.
Below is a picture of a spreadsheet that can be used to help decide between alternatives. It uses a weighted average. The clients list the major requirements and features they would like to see the project embody. Then they provide percentages for how important each component is to the project. The total percents should add up to 100. They they rate each alternative solution on some scale. (the example uses 1 to 5). The rating is multiplied with the percent to get the weight. The weights are totaled. The heighest weight should be your best bet.

Systems Analysis Overview
Definitions
System: a collection of things working together to accomplish some defined end. A computer is a system, as is a computer network, as is a piece of software, as is a production line or distribution platform. Systems can be small or global in scope.
Analysis: the process of breaking things into smaller and smaller parts in order to understand how the parts work together to accomplish an end.
Systems Analysis: Breaking systems into their parts in order to understand how each part contributes to the whole.
The discipline of systems analysis consists of a variety of techniques to help developers get a handle on complex systems in a way that will minimize expensive failures.
Every system has a life cycle:
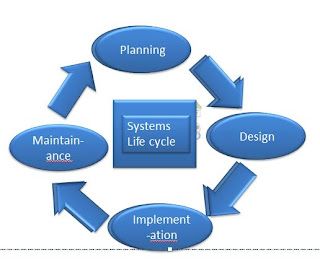
Planning: This begins with identifying a problem or weakness in the current system. Something about the current system is no longer adequate to the business needs. It may be slowing down because of an increase in the volume of activity. Conditions may have changed so that it is no longer able to do all that needs to be done. There may be new opportunities that should be taken advantage of. Planning first identifies what it is that needs to be done. Then it identifies some ways to do those things. It accesses feasibility of the various options and selects one to develop.
Design: Once one is selected the design process begins. In the design process developers identify all the requirements. They break the problem into smaller parts to make it easier to understand. Then they develop and test those parts.
Implementation: When the system is ready and meets all the requirements, it is put into production. This can be a tricky and complex problem with high stakes. There are several stratagies for putting it into production. A new system can be implemented little by little, testing each part as it is put into production. It can be put parallel to the old system and gradually phased in to be the only system. Or it can just be put in full production and hope for the best. Each method has its pros and cons.
Maintainance: When the system is in production it will need occassional fixes as bugs are discovered. Small adjustments to its processes can be added or subtracted as needed. But eventually, the system will become obsolete and the cycle will return to planning.
It should be noted that these sections of the life cycle are not as discrete as they appear in the diagram.
There are several broad aspects of systems analysis:
One of them focuses on project planning, and project management. This is a crucial aspect of systems analysis, but I am focusing on another aspect--the design aspect, especially object oriented design. We are going to work with the aspects of systems analysis that are closest to programming, specifically UML.
Monday, March 14, 2011
Xml and Logins
Alter table ServiceGrant
Add GrantDetails xml
Insert into ServiceGrant(GrantAmount,
GrantDate,
PersonKey,
ServiceKey,
EmployeeKey,
GrantDetails)
Values ( '1200',GETDATE(), 2, 1, 1,
'
The person is very hungry
Consider half this amount
')
Select * from ServiceGrant
--the last part starting with "for" is what you need for
--the final assignment
Select LastName, FirstName, contactInfo
From Person p
Inner Join PersonContact pc
on p.PersonKey=pc.PersonKey
Where ContactTypeKey=6
Order By LastName for xml raw('contact'), Root('emailList'), elements
--this is a sql server login
--you must first enable mixed logins
--by going to the server properties
--clicking the security tab
--clicking the checkbox by SqlServer and Windows logins
--and then restarting the server
Create login stevec
with password ='$passw0rd1',
default_database = CommunityAssist
go
Create schema manager --a schema is a collection of related objects
--it has to do with ownership
go
--this stored procedure belongs to the schema manager
Create proc manager.usp_EmployeeGrants
@EmployeeID int
As
Select COUNT(GrantKey) as total From ServiceGrant
Where EmployeeKey = @EmployeeID
GO
--create a user that is a member of the schema
Create user stevec for login stevec with default_schema=manager
--grant executable permissions on the schema to the user
Grant exec on Schema::manager to stevec
Add GrantDetails xml
Insert into ServiceGrant(GrantAmount,
GrantDate,
PersonKey,
ServiceKey,
EmployeeKey,
GrantDetails)
Values ( '1200',GETDATE(), 2, 1, 1,
'
The person is very hungry
Consider half this amount
Select * from ServiceGrant
--the last part starting with "for" is what you need for
--the final assignment
Select LastName, FirstName, contactInfo
From Person p
Inner Join PersonContact pc
on p.PersonKey=pc.PersonKey
Where ContactTypeKey=6
Order By LastName for xml raw('contact'), Root('emailList'), elements
--this is a sql server login
--you must first enable mixed logins
--by going to the server properties
--clicking the security tab
--clicking the checkbox by SqlServer and Windows logins
--and then restarting the server
Create login stevec
with password ='$passw0rd1',
default_database = CommunityAssist
go
Create schema manager --a schema is a collection of related objects
--it has to do with ownership
go
--this stored procedure belongs to the schema manager
Create proc manager.usp_EmployeeGrants
@EmployeeID int
As
Select COUNT(GrantKey) as total From ServiceGrant
Where EmployeeKey = @EmployeeID
GO
--create a user that is a member of the schema
Create user stevec for login stevec with default_schema=manager
--grant executable permissions on the schema to the user
Grant exec on Schema::manager to stevec
Saturday, March 12, 2011
Vertical and Horizontal layouts
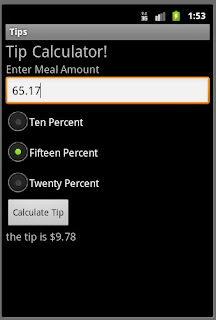
Here is the Android app again, but now the layout varies with the aspect of the phone.
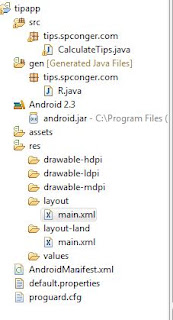
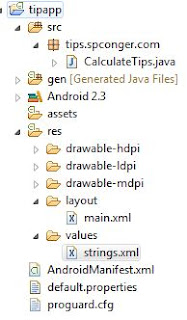
Mostly this just involved the addition of a new folder layout-land, and an additional main.xml file. Here is a picture of the files in the app:
I did add some slight changes to the original main.xml for formatting:
res/layout/main.xml
<?xml version="1.0" encoding="utf-8"?>
<LinearLayout xmlns:android="http://schemas.android.com/apk/res/android"
android:orientation="vertical"
android:layout_width="fill_parent"
android:layout_height="fill_parent"
>
<TextView
android:layout_width="fill_parent"
android:layout_height="wrap_content"
android:text="@string/hello"
android:textSize="24.5sp"
/>
<TextView
android:layout_width="fill_parent"
android:layout_height="wrap_content"
android:text="@string/txtprompt"
android:textSize="16.5sp"/>
<EditText
android:id="@+id/field"
android:layout_width="fill_parent"
android:layout_height="wrap_content"
android:singleLine="true"/>
<RadioGroup
android:layout_width="fill_parent"
android:layout_height="wrap_content"
android:orientation="vertical"
android:id="@+id/tipgroup">
<RadioButton
android:id="@+id/radio1"
android:layout_width="wrap_content"
android:layout_height="wrap_content"
android:text="@string/ten"
/>
<RadioButton
android:id="@+id/radio2"
android:layout_width="wrap_content"
android:layout_height="wrap_content"
android:text="@string/fifteen" />
<RadioButton
android:id="@+id/radio3"
android:layout_width="wrap_content"
android:layout_height="wrap_content"
android:text="@string/twenty" />
</RadioGroup>
<Button android:layout_height="wrap_content"
android:layout_width="wrap_content"
android:text="@string/buttonText"
android:id="@+id/calc" />
<TextView
android:layout_width="fill_parent"
android:layout_height="wrap_content"
android:id="@+id/result"
android:textSize="16.5sp"/>
</LinearLayout>
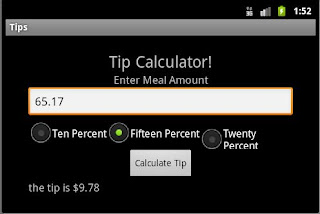
Here is the horizontal layout. (to turn the Emulator horizontal in Windows click ctrl and F11)
res/layout-land/main.xml
<?xml version="1.0" encoding="utf-8"?>
<LinearLayout
xmlns:android="http://schemas.android.com/apk/res/android"
android:layout_width="fill_parent"
android:layout_height="fill_parent"
android:padding="15dip"
android:orientation="horizontal">
<LinearLayout xmlns:android="http://schemas.android.com/apk/res/android"
android:orientation="vertical"
android:gravity="center"
android:layout_width="fill_parent"
android:layout_height="fill_parent"
android:paddingLeft="20dip"
android:paddingRight="20dip"
>
<TextView
android:layout_width="fill_parent"
android:layout_height="wrap_content"
android:gravity="center"
android:text="@string/hello"
android:textSize="24.5sp"
/>
<TextView
android:layout_width="fill_parent"
android:layout_height="wrap_content"
android:gravity="center"
android:text="@string/txtprompt"
android:textSize="16.5sp"/>
<EditText
android:id="@+id/field"
android:layout_width="fill_parent"
android:layout_height="wrap_content"
android:singleLine="true"/>
<RadioGroup
android:layout_width="fill_parent"
android:layout_height="wrap_content"
android:orientation="horizontal"
android:id="@+id/tipgroup">
<RadioButton
android:id="@+id/radio1"
android:layout_width="wrap_content"
android:layout_height="wrap_content"
android:text="@string/ten"
/>
<RadioButton
android:id="@+id/radio2"
android:layout_width="wrap_content"
android:layout_height="wrap_content"
android:text="@string/fifteen" />
<RadioButton
android:id="@+id/radio3"
android:layout_width="wrap_content"
android:layout_height="wrap_content"
android:text="@string/twenty" />
</RadioGroup>
<Button android:layout_height="wrap_content"
android:layout_width="wrap_content"
android:text="@string/buttonText"
android:id="@+id/calc" />
<TextView
android:layout_width="fill_parent"
android:layout_height="wrap_content"
android:id="@+id/result"
android:textSize="16.5sp"/>
</LinearLayout>
</LinearLayout>
Here is the code for CalculateTips.Java
package tips.spconger.com;
import android.app.Activity;
import android.os.Bundle;
import android.view.View;
import android.widget.Button;
import android.widget.EditText;
import android.widget.RadioButton;
import android.widget.TextView;
import java.text.NumberFormat;
public class CalculateTips extends Activity implements Button.OnClickListener{
/** Called when the activity is first created. */
private RadioButton rb1;
private RadioButton rb2;
private RadioButton rb3;
private Button b1;
private EditText et;
private TextView t1;
private double tip;
private EditText et2;
@Override
public void onCreate(Bundle savedInstanceState) {
super.onCreate(savedInstanceState);
setContentView(R.layout.main);
et=(EditText)findViewById(R.id.field);
rb1=(RadioButton)findViewById(R.id.radio1);
rb2=(RadioButton)findViewById(R.id.radio2);
rb3=(RadioButton)findViewById(R.id.radio3);
b1=(Button)findViewById(R.id.calc);
b1.setOnClickListener(this);
t1=(TextView)findViewById(R.id.result);
}
@Override
public void onClick(View v) {
double meal=Double.parseDouble(et.getText().toString());
if(v == b1)
{
if(rb1.isChecked() == true){
tip = meal * .1;
}
if(rb2.isChecked() == true){
tip = meal * .15;
}
if(rb3.isChecked() == true){
tip = meal * .2;
}
NumberFormat nf = NumberFormat.getCurrencyInstance();
t1.setText("the tip is " + nf.format(tip));
}
}
}
Mostly this just involved the addition of a new folder layout-land, and an additional main.xml file. Here is a picture of the files in the app:

I did add some slight changes to the original main.xml for formatting:

res/layout/main.xml
<?xml version="1.0" encoding="utf-8"?>
<LinearLayout xmlns:android="http://schemas.android.com/apk/res/android"
android:orientation="vertical"
android:layout_width="fill_parent"
android:layout_height="fill_parent"
>
<TextView
android:layout_width="fill_parent"
android:layout_height="wrap_content"
android:text="@string/hello"
android:textSize="24.5sp"
/>
<TextView
android:layout_width="fill_parent"
android:layout_height="wrap_content"
android:text="@string/txtprompt"
android:textSize="16.5sp"/>
<EditText
android:id="@+id/field"
android:layout_width="fill_parent"
android:layout_height="wrap_content"
android:singleLine="true"/>
<RadioGroup
android:layout_width="fill_parent"
android:layout_height="wrap_content"
android:orientation="vertical"
android:id="@+id/tipgroup">
<RadioButton
android:id="@+id/radio1"
android:layout_width="wrap_content"
android:layout_height="wrap_content"
android:text="@string/ten"
/>
<RadioButton
android:id="@+id/radio2"
android:layout_width="wrap_content"
android:layout_height="wrap_content"
android:text="@string/fifteen" />
<RadioButton
android:id="@+id/radio3"
android:layout_width="wrap_content"
android:layout_height="wrap_content"
android:text="@string/twenty" />
</RadioGroup>
<Button android:layout_height="wrap_content"
android:layout_width="wrap_content"
android:text="@string/buttonText"
android:id="@+id/calc" />
<TextView
android:layout_width="fill_parent"
android:layout_height="wrap_content"
android:id="@+id/result"
android:textSize="16.5sp"/>
</LinearLayout>
Here is the horizontal layout. (to turn the Emulator horizontal in Windows click ctrl and F11)

res/layout-land/main.xml
<?xml version="1.0" encoding="utf-8"?>
<LinearLayout
xmlns:android="http://schemas.android.com/apk/res/android"
android:layout_width="fill_parent"
android:layout_height="fill_parent"
android:padding="15dip"
android:orientation="horizontal">
<LinearLayout xmlns:android="http://schemas.android.com/apk/res/android"
android:orientation="vertical"
android:gravity="center"
android:layout_width="fill_parent"
android:layout_height="fill_parent"
android:paddingLeft="20dip"
android:paddingRight="20dip"
>
<TextView
android:layout_width="fill_parent"
android:layout_height="wrap_content"
android:gravity="center"
android:text="@string/hello"
android:textSize="24.5sp"
/>
<TextView
android:layout_width="fill_parent"
android:layout_height="wrap_content"
android:gravity="center"
android:text="@string/txtprompt"
android:textSize="16.5sp"/>
<EditText
android:id="@+id/field"
android:layout_width="fill_parent"
android:layout_height="wrap_content"
android:singleLine="true"/>
<RadioGroup
android:layout_width="fill_parent"
android:layout_height="wrap_content"
android:orientation="horizontal"
android:id="@+id/tipgroup">
<RadioButton
android:id="@+id/radio1"
android:layout_width="wrap_content"
android:layout_height="wrap_content"
android:text="@string/ten"
/>
<RadioButton
android:id="@+id/radio2"
android:layout_width="wrap_content"
android:layout_height="wrap_content"
android:text="@string/fifteen" />
<RadioButton
android:id="@+id/radio3"
android:layout_width="wrap_content"
android:layout_height="wrap_content"
android:text="@string/twenty" />
</RadioGroup>
<Button android:layout_height="wrap_content"
android:layout_width="wrap_content"
android:text="@string/buttonText"
android:id="@+id/calc" />
<TextView
android:layout_width="fill_parent"
android:layout_height="wrap_content"
android:id="@+id/result"
android:textSize="16.5sp"/>
</LinearLayout>
</LinearLayout>
Here is the code for CalculateTips.Java
package tips.spconger.com;
import android.app.Activity;
import android.os.Bundle;
import android.view.View;
import android.widget.Button;
import android.widget.EditText;
import android.widget.RadioButton;
import android.widget.TextView;
import java.text.NumberFormat;
public class CalculateTips extends Activity implements Button.OnClickListener{
/** Called when the activity is first created. */
private RadioButton rb1;
private RadioButton rb2;
private RadioButton rb3;
private Button b1;
private EditText et;
private TextView t1;
private double tip;
private EditText et2;
@Override
public void onCreate(Bundle savedInstanceState) {
super.onCreate(savedInstanceState);
setContentView(R.layout.main);
et=(EditText)findViewById(R.id.field);
rb1=(RadioButton)findViewById(R.id.radio1);
rb2=(RadioButton)findViewById(R.id.radio2);
rb3=(RadioButton)findViewById(R.id.radio3);
b1=(Button)findViewById(R.id.calc);
b1.setOnClickListener(this);
t1=(TextView)findViewById(R.id.result);
}
@Override
public void onClick(View v) {
double meal=Double.parseDouble(et.getText().toString());
if(v == b1)
{
if(rb1.isChecked() == true){
tip = meal * .1;
}
if(rb2.isChecked() == true){
tip = meal * .15;
}
if(rb3.isChecked() == true){
tip = meal * .2;
}
NumberFormat nf = NumberFormat.getCurrencyInstance();
t1.setText("the tip is " + nf.format(tip));
}
}
}
Saturday, March 5, 2011
First Android App
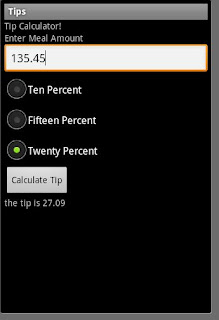
I have made my first android app. It is a simple program that calculates a tip for a meal at a restaurant. It use a TextView object to display the title, And EditView to allow users to enter an amount, a RadioGroup with three RadioButtons, a Button and another TextView to display the results. Here is a picture of the Android similuator with the program running.
Here is a view of the files. I actually only modified three files: CalculateTips.Java, Main.xml and Strings.xml
Here is the xml in Main.xml that sets up the Android form:
<?xml version="1.0" encoding="utf-8"?>
<LinearLayout xmlns:android="http://schemas.android.com/apk/res/android"
android:orientation="vertical"
android:layout_width="fill_parent"
android:layout_height="fill_parent"
>
<TextView
android:layout_width="fill_parent"
android:layout_height="wrap_content"
android:text="@string/hello"
/>
<TextView
android:layout_width="fill_parent"
android:layout_height="wrap_content"
android:text="@string/txtprompt"/>
<EditText
android:id="@+id/field"
android:layout_width="fill_parent"
android:layout_height="wrap_content"
android:singleLine="true"/>
<RadioGroup
android:layout_width="fill_parent"
android:layout_height="wrap_content">
android:orientation="vertical"
android:id="@+id/tipgroup"
<RadioButton
android:id="@+id/radio1"
android:layout_width="wrap_content"
android:layout_height="wrap_content"
android:text="@string/ten" />
<RadioButton
android:id="@+id/radio2"
android:layout_width="wrap_content"
android:layout_height="wrap_content"
android:text="@string/fifteen" />
<RadioButton
android:id="@+id/radio3"
android:layout_width="wrap_content"
android:layout_height="wrap_content"
android:text="@string/twenty" />
</RadioGroup>
<Button
android:id="@+id/calc"
android:layout_width="wrap_content"
android:layout_height="wrap_content"
android:text="@string/buttonText"
/>
<TextView
android:layout_width="fill_parent"
android:layout_height="wrap_content"
android:id="@+id/result"/>
</LinearLayout>
Here is the code for Strings.xml. This file is used to store string values used by the controls.
<?xml version="1.0" encoding="utf-8"?>
<resources>
<string name="hello">Tip Calculator!</string>
<string name="app_name">Tips</string>
<string name="txtprompt">Enter Meal Amount</string>
<string name="ten">Ten Percent</string>
<string name="fifteen">Fifteen Percent</string>
<string name="twenty">Twenty Percent</string>
<string name="buttonText">Calculate Tip</string>
</resources>
Finally, here is the Java code:
CalculateTips.java
package tips.spconger.com;
import android.app.Activity;
import android.os.Bundle;
import android.view.View;
import android.widget.Button;
import android.widget.EditText;
import android.widget.RadioButton;
import android.widget.TextView;
public class CalculateTips extends Activity implements Button.OnClickListener{
/** Called when the activity is first created. */
private RadioButton rb1;
private RadioButton rb2;
private RadioButton rb3;
private Button b1;
private EditText et;
private TextView t1;
private double tip;
@Override
public void onCreate(Bundle savedInstanceState) {
super.onCreate(savedInstanceState);
setContentView(R.layout.main);
et=(EditText)findViewById(R.id.field);
rb1=(RadioButton)findViewById(R.id.radio1);
rb2=(RadioButton)findViewById(R.id.radio2);
rb3=(RadioButton)findViewById(R.id.radio3);
b1=(Button)findViewById(R.id.calc);
b1.setOnClickListener(this);
t1=(TextView)findViewById(R.id.result);
}
@Override
public void onClick(View v) {
double meal=Double.parseDouble(et.getText().toString());
if(v == b1)
{
if(rb1.isChecked() == true){
tip = meal * .1;
}
if(rb2.isChecked() == true){
tip = meal * .15;
}
if(rb3.isChecked() == true){
tip = meal * .2;
}
t1.setText("the tip is " + tip);
}
}
}
The Java code declare an instance of each of the objects and then uses R.Id to associate it with the control in the Main.xml. R is an xml file that is automatically generated by the Android sdk. The button is given the OnClickListener method which is executed whenever the button is clicked.

Here is a view of the files. I actually only modified three files: CalculateTips.Java, Main.xml and Strings.xml

Here is the xml in Main.xml that sets up the Android form:
<?xml version="1.0" encoding="utf-8"?>
<LinearLayout xmlns:android="http://schemas.android.com/apk/res/android"
android:orientation="vertical"
android:layout_width="fill_parent"
android:layout_height="fill_parent"
>
<TextView
android:layout_width="fill_parent"
android:layout_height="wrap_content"
android:text="@string/hello"
/>
<TextView
android:layout_width="fill_parent"
android:layout_height="wrap_content"
android:text="@string/txtprompt"/>
<EditText
android:id="@+id/field"
android:layout_width="fill_parent"
android:layout_height="wrap_content"
android:singleLine="true"/>
<RadioGroup
android:layout_width="fill_parent"
android:layout_height="wrap_content">
android:orientation="vertical"
android:id="@+id/tipgroup"
<RadioButton
android:id="@+id/radio1"
android:layout_width="wrap_content"
android:layout_height="wrap_content"
android:text="@string/ten" />
<RadioButton
android:id="@+id/radio2"
android:layout_width="wrap_content"
android:layout_height="wrap_content"
android:text="@string/fifteen" />
<RadioButton
android:id="@+id/radio3"
android:layout_width="wrap_content"
android:layout_height="wrap_content"
android:text="@string/twenty" />
</RadioGroup>
<Button
android:id="@+id/calc"
android:layout_width="wrap_content"
android:layout_height="wrap_content"
android:text="@string/buttonText"
/>
<TextView
android:layout_width="fill_parent"
android:layout_height="wrap_content"
android:id="@+id/result"/>
</LinearLayout>
Here is the code for Strings.xml. This file is used to store string values used by the controls.
<?xml version="1.0" encoding="utf-8"?>
<resources>
<string name="hello">Tip Calculator!</string>
<string name="app_name">Tips</string>
<string name="txtprompt">Enter Meal Amount</string>
<string name="ten">Ten Percent</string>
<string name="fifteen">Fifteen Percent</string>
<string name="twenty">Twenty Percent</string>
<string name="buttonText">Calculate Tip</string>
</resources>
Finally, here is the Java code:
CalculateTips.java
package tips.spconger.com;
import android.app.Activity;
import android.os.Bundle;
import android.view.View;
import android.widget.Button;
import android.widget.EditText;
import android.widget.RadioButton;
import android.widget.TextView;
public class CalculateTips extends Activity implements Button.OnClickListener{
/** Called when the activity is first created. */
private RadioButton rb1;
private RadioButton rb2;
private RadioButton rb3;
private Button b1;
private EditText et;
private TextView t1;
private double tip;
@Override
public void onCreate(Bundle savedInstanceState) {
super.onCreate(savedInstanceState);
setContentView(R.layout.main);
et=(EditText)findViewById(R.id.field);
rb1=(RadioButton)findViewById(R.id.radio1);
rb2=(RadioButton)findViewById(R.id.radio2);
rb3=(RadioButton)findViewById(R.id.radio3);
b1=(Button)findViewById(R.id.calc);
b1.setOnClickListener(this);
t1=(TextView)findViewById(R.id.result);
}
@Override
public void onClick(View v) {
double meal=Double.parseDouble(et.getText().toString());
if(v == b1)
{
if(rb1.isChecked() == true){
tip = meal * .1;
}
if(rb2.isChecked() == true){
tip = meal * .15;
}
if(rb3.isChecked() == true){
tip = meal * .2;
}
t1.setText("the tip is " + tip);
}
}
}
The Java code declare an instance of each of the objects and then uses R.Id to associate it with the control in the Main.xml. R is an xml file that is automatically generated by the Android sdk. The button is given the OnClickListener method which is executed whenever the button is clicked.
Thursday, March 3, 2011
SQL
Use TutorManagement
Select StudentfirstName, Studentlastname
From Student
Select *
From Student
Select Distinct Tutorkey from Session
Select 5 * (3 + 4) /(2 -3)
Select StudentGender,StudentAge, StudentAge * 2 As [Double Age]
From Student
Order by StudentGender, StudentAge DESC
Select StudentLastname, StudentFirstName
From Student
Where StudentGender='M'
Select StudentLastName,StudentFirstName,StudentAge
From Student
Where StudentAge <= 23
Select StudentLastName,StudentFirstName,StudentAge
From Student
Where StudentLastName like 'M%'
Select * From Session
Select *
from Session
Where SessionDateKey not between '11/1/2009' and '11/30/2009'
--scalar functions
Select * from Session
where MONTH(SessionDateKey) = 11
Select MONTH(SessionDateKey) From Session
Select Year(SessionDateKey) From Session
Select DAY(SessionDateKey) From Session
Select GETDATE()
Select DATEDIFF(yy, '3/3/2011', '9/11/2010')
--scalar functions
Select COUNT(Distinct StudentKey) as students from Session
Select AVG(StudentAge) From Student
Select SUM(StudentAge) From Student
Select MAX(StudentAge) From Student
Select MIN(StudentAge) From Student
Select * from Student
Begin tran
Update Student
Set StudentFirstName='Ray'
Where StudentKey='980001008'
Insert into Student(StudentKey, StudentLastName,
StudentFirstName, StudentPhone, StudentEmail,
StudentGender, StudentAge,
StudentCitizen, StudentWorkforceRetraining,
EthnicityKey)
Values('980002002', 'Smith', 'John', null, null, null, null, null, null,null)
Delete from Student
Where StudentKey='980002002'
Begin tran
Delete from Session
Select * from Session
Rollback tran
Commit tran
Create view vw_TutorsStudents
As
Select SessionDateKey, TutorLastName, CourseKey, StudentLastName
From [Session]
Inner Join Tutor
On [Session].TutorKey=Tutor.TutorKey
Inner join Student
On Student.StudentKey=[Session].StudentKey
Select * from vw_tutorsstudents
Select [name] from sys.views
Select [name] from sys.Tables
Login Control
Here is the code for manually handling the login control
using System;
using System.Collections.Generic;
using System.Linq;
using System.Web;
using System.Web.UI;
using System.Web.UI.WebControls;
using System.Data;
public partial class _Default : System.Web.UI.Page
{
protected void Page_Load(object sender, EventArgs e)
{
}
protected void Login1_Authenticate(object sender, AuthenticateEventArgs e)
{
DataSet userlogins = new DataSet();
userlogins.ReadXml(MapPath("logins.xml"));
foreach (DataRow row in userlogins.Tables[0].Rows)
{
Response.Write(row["username"].ToString() + " " + row["password"].ToString());
if (row["username"].ToString()==(Login1.UserName)
&& row["password"].ToString()==(Login1.Password))
{
e.Authenticated = true;
Response.Redirect("Default2.aspx");
return;
}
else
{
e.Authenticated = false;
}
}
}
}
Wednesday, March 2, 2011
Modified Stored procedure and triggers
--stored procedures
Use MagazineSubscription
Go
Alter proc usp_GetSubscriptionSummary
@Month int =3
As
Select MONTH(SubscriptionStart) as [Month]
,COUNT (SubscriptionID) as [Subscriptions]
,SUM(SubscriptionPrice) as Total
From Subscription s
Inner Join MagazineDetail md
On md.MagDetID=s.MagDetID
Where MONTH(SubscriptionStart)=@month
Group by MONTH(SubscriptionStart)
go
exec usp_GetSubscriptionSummary 2
usp_GetSubscriptionSummary @Month=3
--stored procedure to enter a new magazine subscription
--new customer --add the customer
--will need the new customer ID
--Get the magazine
--what the subscription terms are for that magazine-magdetID
--insert the subscription information (date function)
--Both inserts should happen or none -- transaction and error trapping
Go
Alter proc usp_NewSubscription
--parameters provided by the user
@LastName varchar(30),
@FirstName varchar(25),
@CustAddress varchar(100),
@CustCity varchar(50),
@CustState Char(2),
@CustZipcode char(11),
@CustPhone char(10),
@magDetID int
As
Declare @StartDate datetime
set @StartDate = GETDATE()
Declare @EndDate Datetime
Declare @CustID int --added a variable for customer
Begin Tran
Begin try
--check to see if the customer exists already
if not exists
(Select CustID From Customer
Where CustLastName=@LastName
And CustFirstName=@FirstName
And CustCity=@CustCity
And CustAddress=@CustAddress
And CustPhone=@CustPhone)
Begin --if customer doesn't exist
Insert into Customer (CustLastName,
CustFirstName,
CustAddress,
CustCity,
CustState,
CustZipcode,
CustPhone)
Values(
@LastName,
@FirstName,
@CustAddress,
@CustCity,
@CustState ,
@CustZipcode,
@CustPhone)
Set @CustID=SCOPE_IDENTITY()
End
Else --if customer does exist
Begin
Select @CustID=CustID from Customer
Where CustLastName=@LastName
And CustFirstName=@FirstName
And CustCity=@CustCity
And CustAddress=@CustAddress
And CustPhone=@CustPhone
End
Declare @SubscriptionType int
Select @SubscriptionType=SubscriptTypeID
from MagazineDetail
Where MagDetID=@MagDetID
Insert into Subscription(
CustID,
MagDetID,
SubscriptionStart,
SubscriptionEnd)
Values(
@CustID,
@magDetID,
@StartDate,
dbo.func_SubscriptionEndDate(@subscriptionType, @StartDate))
commit tran
End try
Begin Catch
print error_message()
RollBack Tran
End Catch
exec usp_NewSubscription
@LastName ='London',
@FirstName ='Jack',
@CustAddress='100 artic way',
@CustCity='Seattle' ,
@CustState='WA' ,
@CustZipcode='98000',
@CustPhone='2065551962' ,
@magDetID=4
Select * from Customer
Select * from Subscription
Select [name] from sys.procedures
go
--this trigger captures the original values for
--updates and deletes and writes them
--to a table for later review
Create trigger tr_DeleteMagazine on Magazine
After delete, update
AS
if not exists
(Select [name] from sys.Tables
where [name]='ScrapPile')
Begin
Create table ScrapPile
(
MagID int,
MagName varchar(100),
MagType char(10)
)
End
Insert into ScrapPile(MagID, MagName, MagType)
(Select MagID, MagName, MagType from Deleted)
Select * from Magazine
Update Magazine
Set MagType ='Quarterly'
Where Magid=1
Insert into Magazine(MagName, MagType)
Values('Ray gun', 'Weekly')
Delete from Magazine
Where magid=12
Select * from ScrapPile
Go
--this trigger checks the start date
--of a new subscription to make
--sure not less than the current date
Alter trigger tr_SubscriptionStartDate on Subscription
instead of insert
As
Declare @start DateTime
Select @start =SubscriptionStart from inserted
If @Start < GetDate()
Begin
Set @Start=GetDate()
End
Insert into Subscription(CustID, MagDetID, SubscriptionStart, SubscriptionEnd)
(Select CustID, MagDetID, @Start, SubscriptionEnd
From Inserted)
INsert into Subscription(
CustID, MagDetID, SubscriptionStart, SubscriptionEnd)
Values(2, 2,'1/1/1903','1/1/2012')
Select * from Subscription
go
Disable trigger dbo.tr_SubscriptionStartDate on Subscription
Go
Enable trigger dbo.tr_SubscriptionStartDate on Subscription
Tuesday, March 1, 2011
More LINQ Examples
This linq code writes a new magazine with one magazine detail to the database. Remember you must add a new LINQ to SQL object to the web site and then drag the appropriate tables onto the LINQ designer in order for this work
using System;
using System.Collections.Generic;
using System.Linq;
using System.Web;
using System.Web.UI;
using System.Web.UI.WebControls;
public partial class _Default : System.Web.UI.Page
{
magazineClassesDataContext dc = new magazineClassesDataContext();
protected void Page_Load(object sender, EventArgs e)
{
if (!IsPostBack)
{
var stype = from s in dc.SubscriptionTypes
select new { s.SubscriptTypeID, s.SubscriptTypeName };
DropDownList1.DataSource = stype.ToList();
DropDownList1.DataTextField = "SubscriptTypeName";
DropDownList1.DataValueField = "SubscriptTypeID";
DropDownList1.DataBind();
}
}
protected void Button1_Click(object sender, EventArgs e)
{
Magazine mag = new Magazine();
mag.MagName = txtMagName.Text;
mag.MagType = txtMagType.Text;
dc.Magazines.InsertOnSubmit(mag);
MagazineDetail magdet = new MagazineDetail();
magdet.Magazine = mag;
magdet.SubscriptTypeID = int.Parse(DropDownList1.SelectedValue.ToString());
magdet.SubscriptionPrice = decimal.Parse(txtPrice.Text.ToString());
dc.MagazineDetails.InsertOnSubmit(magdet);
dc.SubmitChanges();
}
}
Subscribe to:
Comments (Atom)