This is a tutorial for creating a simple report in SQL Server. We will use the database Automart and the view vw_LocationSummary.
First start the SQL Server data tools. Make sure you start it as administrator. You don't have to be Administrator to create the reports but you do to deploy them.
Start a new project and then chose Report Projects. We will name this report project "AutomartLocations."

In the solution explorer right click on the Shared Data Source folder.

In the dialog box that pops up change the name of the data source from DataSource1 to AutomartDataSource.

Click the Edit button. Key in Localhost for server and select the database Automart from the drop down list.

If you click on the credentials tab you will see that we are using Windows Authentication, though you can change it to Sql Server login or other credentials
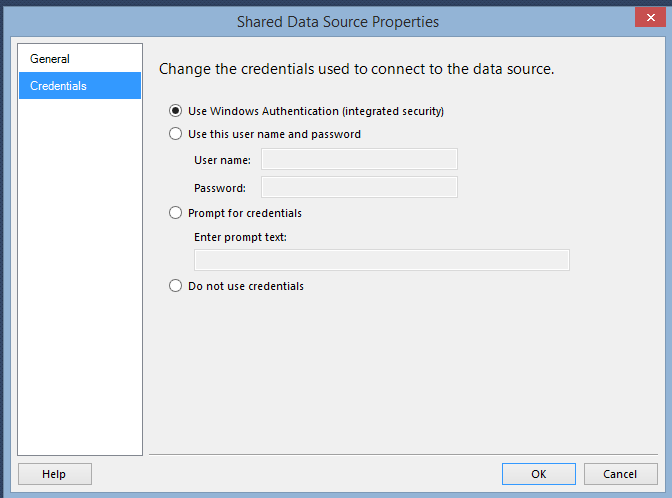
Click OK.
Right click on Reports in the Solution window and choose Add New Report. This will start the report wizard.

Click Next
The next screen just confirms our data source. Click Next.

In the third string we need to build our query. Just type the following code into the query string box:,/p>
Select * from vw_LocationSummary

Click Next.
Choose Tabular for the report type.

Move all available fields into the details box

Click Next.
Choose the Report Style of your choice.

Click next.
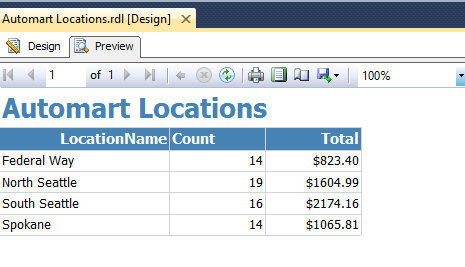
The last screen is a summary. Change the name of the report to "Automart Locations" and check the box that says preview the report.

Click Finish.
The report opens on a preview.

There are couple of things to change. It would better if the total came after the Location name and count. It would also be nice to display the total as currency. Click the design tab.

If you click in the corner of the data field you will see a little icon representing a field list. We can use this to change the order of the fields. We will also,of course, need to change the column headings. this we do by simply typing over the existing column headings. I also increased the width of the first column by dragging the line in to the right.

To change the total to currency, right click on the text field for total and select text box totals.

Along the left side, choose number and then in the number dialog box choose currency.
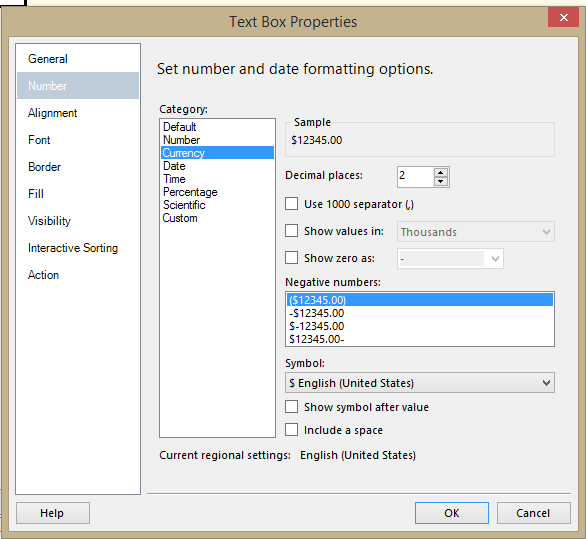
Click OK and then preview the report again.
Deploying the Report
Before we can deploy the report we must specify where to deploy it. Click the Project menu and select AutomartLocation Properties. The target URL is blank. Change it to Localhost/ReportServer

Click OK. Now right click on the shared data source and click deploy. If you do nor deploy the data source first, you will not be able to deploy the report. Now right click on the report itself and click deploy. With luck you will get success.

Viewing the Reports in IE
We need to run Internet Explorer in Administrative mode to access and view our report. In Windows 8 this is not easy. You must Navigate to the executable file, right click on it, and choose run as administrator. It is found in C:\Program Files (x86)\Internet Explorer\iexplore.exe. When internet explorer launches write http://localhost/Reports in the address bar. It may take a few minutes to load the first time. Your should see something like in the image below. Your screen will look a little different because I have been doing other reports and practices.

Open the folder and view the report.

No comments:
Post a Comment