For this example we will do much the same thing we did for the ADO example for assignment 4, only we will do it with ADO Entities. This will require less coding since the Entities wizards will create classes for all the Tables we add to the designer. We can use the same hash class as in the previous assignment.
First we create a new Empty web site. I will call it "Assignment5Example."
Next I am going to add an App_Code folder and add the existing class "PasswordHash."

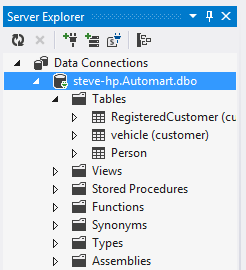
To use the ADO Entities we will need to have a Data connection in the Server window. If it is is not open, open the Server window from View. Make a new DataConnection to Automart Database. Use the AutomarLogin we created for Assignment4

It will only show you the tables you have permissions for.
Now Let's add the ADO Data Entites. Right click on the project and select Add NewItem then ADO Data Entity Model. I am naming it "AutomartModel."

Click ADD, then YES when it tells you it needs to place these files in a special folder. Then Choose Generate from Database

Click NEXT, then make sure it has the correct connection. Click YES to include sensitive data and then NEXT

Next you need to select what you are going to add to the designer. Select all the tables under the customer and dbo schemas
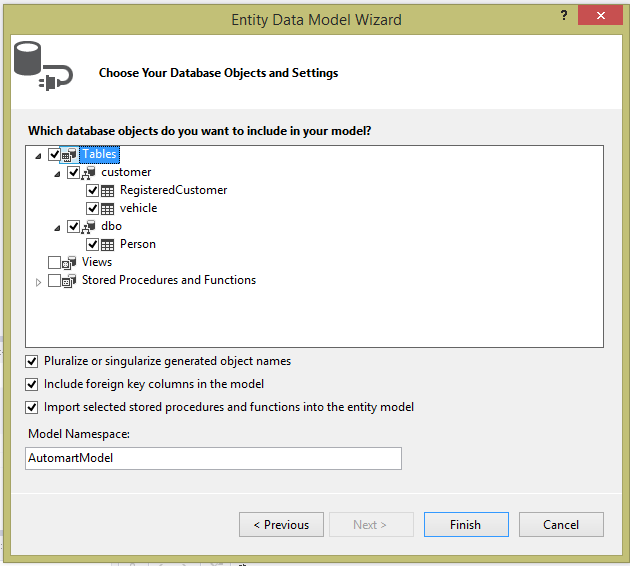
Click Finish and it will set up the designer. You may get one or more security warnings. Just click OK.
Now we set up the Web forms. The login form, the registration form and the Welcome will have exactly the same structure as the assignment four example, so I will not go over them here.
I also added the PasscodeGenerator class from the previous assignment. I realized I would need it for the registration.
Let's do the registration code first. We will do this in the page, as there is little gained by separating it into a class. Double click the submit button in design view.
first we will initialize the data entities classes
//initialize the Data Entity Data context
        AutomartEntities entites = new AutomartEntities();
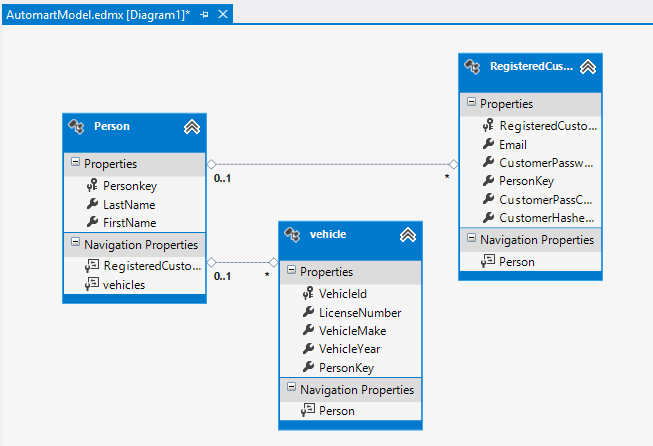
Then we initialize the person class, set its properties and add it to the people collection. Next we do the same with Vehicles. The Person, property sets the relation to the person just created above and will insert that person's personkey as a foreign key.
 //initialize the person class, set the values
        //and add to People (a class that stores persons)
        Person p = new Person();
        p.FirstName = txtFirstName.Text;
        p.LastName = txtLastName.Text;

        entites.People.Add(p);

        //same for vehicle
        vehicle v = new vehicle();
        v.LicenseNumber = txtLicense.Text;
        v.Person = p;
        v.VehicleMake = txtMake.Text;
        v.VehicleYear = txtYear.Text;
        entites.vehicles.Add(v);
The Registered customer class will take a little more work because we have to get the passcode and hash the password. Once done we save changes and the values are written to the database
PasscodeGenerator pg = new PasscodeGenerator();
        int passcode = pg.GetPasscode();

        PasswordHash ph = new PasswordHash();

        RegisteredCustomer rc = new RegisteredCustomer();
        rc.Person = p;
        rc.Email = txtEmail.Text;
        rc.CustomerPassCode = passcode;
        rc.CustomerPassword = txtPassword.Text;
        rc.CustomerHashedPassword = ph.HashIt(txtPassword.Text, passcode.ToString());
        entites.RegisteredCustomers.Add(rc);

        //write to database
        entites.SaveChanges();
Now let's turn to the Login. We will create a new Login class. This one will use the entities syntax. So First add a class to the app_code called LoginClass. this class needs to take the user name and password, query the database to retrieve the passcode and then hash the password and code. If they match the existing hash then the user is authenticated. Here is the whole class with comments.
using System; using System.Collections.Generic; using System.Linq; using System.Web; ////// Summary description for LoginClass /// public class LoginClass { string user; string pass; int personkey=0; Byte[] hashed; AutomartEntities ent = new AutomartEntities(); public LoginClass(string userName, string pWord) { user = userName; pass = pWord; } //get the passcode from the database private int GetPassCode() { int passcode = 0; //this is linq syntax for a query var code = from c in ent.RegisteredCustomers where c.Email == user select new { c.PersonKey, c.CustomerPassCode, c.CustomerHashedPassword }; //we loop through the result and assign some values foreach (var v in code) { passcode = (int)v.CustomerPassCode; personkey = (int)v.PersonKey; hashed = (Byte[])v.CustomerHashedPassword; } return passcode; } // this method hashes the password and matches the database hash //to the new hash public int Authenticate() { int passcode = GetPassCode(); PasswordHash ph = new PasswordHash(); Byte[] newHash = ph.HashIt(pass, passcode.ToString()); int pk = 0; if (hashed == newHash) { pk = personkey; } return pk; } }
Finally we need to write some code for the Login button. It really doesn't need to change much from the code we wrote before.
LoginClass lc = new LoginClass(txtUser.Text, txtPassword.Text);
        int personKey = lc.Authenticate();
        if (personKey != 0)
        {
            Session["personkey"] = personKey;
            Response.Redirect("Welcome.aspx");
        }
        else
        {
            lblError.Text = "Invalid login";
        }
Now We will try a login


No comments:
Post a Comment