SSIS is a way of creating packages that allow you to do complex imports over and over again. The packages can be run periodically to automate the import process. They are really too much work to justify for a one time import, but we are going to so anyway just to get a feel of how to create the packages.
We are going to import a simple and brief file called TacomaEmployees.Text

This would be easy enough just to type in--and if it was for real, that is what I would advise. But we are going to create a package. There are a couple of things to note about the file. While it only has three columns, two go in one table (Person) and one, hiredate, goes in Employee. We also need the PersonID from the person table to link the employee to the name.
Creating the Package
First start a new project with Visual Studio 2008 (this is the stub of VS that SQL Server 2008 installs). Choose the "Integration Services Project." This will open a designer and a toolbox.
Right click in the bottom of the designer and make a new OLEDB Connection

Drag a DataFlow control onto the designer. Name it "AddPerson"

Click on the DataFlow Tab. Add a Flat File Source and name it PersonSource

Double click the PersonSource to Open its properties. Name the Manager EmployeeManager. Click browse and locate the file TacomaEmployees.txt.

Click on Advanced and change the column names to "FirstName", "LastName" and "HireDate." Change the datatype of "HireDate" to Database date.

Now add a SQL Server Destination Control and hook it to the Employee Source:

Double click it to open up the properties. Click on Mapping and make sure the mapping is correct.

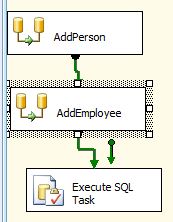
Go back to the Control Flow Tab and Add a second DataFlow control hooked to the first. Name it "AddEmployee".

With AddEmployee selected click on the DataFlow tab. Add another FlatFile source and name it EmployeeSource.

You can use the same connection manager (EmployeeManager) as you did for the other flat file source.
Now add a lookup control and connect it to the AddEmployee source.

Double click the control to open the properties. Use the automart connection and the Person table. Click on columns and set it to look like the picture. You can drag from one to the other to get the linking lines.
Now add a SQL Destination control and link it to the lookup.

Configure the SQL Destination control to Insert into Employee:

Now, return to the control flow tab. Add cn Execute SQL Control:
Configure the control. Make sure you choose the automart connection.

For the SQL Statement property click the 3 dots to open up the SQL editor. Type in the SQL statement in the image. This will assign the employees to the last Location which in this case is Tacoma.

Now execute the package, and check SQL Server to see if the data was added.
Troubleshooting
Don't assume I included every tiny step. I tried to be comprehensive, but I could easily have missed something. Read the dialog boxes and use your common sense.
If everything turns green that means success. Yellow means it is in process. Red is an error. I found that if I set the error output on the data flows to "ignore failure" that everything processed correctly:
No comments:
Post a Comment