Overview
Github is a site that lets you store code in a way that allows you to share it with other coders or with potential employers. But more than that, it allows you to keep track of versions. Others can download or make copies of your code and, if they have permissions, upload their own versions and merge it with the original. This makes it an ideal for team projects.
You have to register to use it, but Github is free as long as your Repositories are public. Students can get a limited number of private repositories for free.
Definitions
So, what's a repository? Here are a few definitions:
Repository--this is basically a directory, a folder(s) where you store your code. These can be local meaning they are on your own machine, or hosted at Github. Repositories are public or private. Public means anyone can view the code and copy it. Private means only those with permission can see or modify the code in any way. As I mentioned before public repositories are free. Generally private requires paying.
Commit--To add code to a repository, you must commit it. You give the commit a name and, optionally, a description and then commit it to the repository. The commits are how GitHub keeps track of versions and changes. You can look at the Log to see a history of commits.
Clone--Cloning is making a copy of the online repository to your local machine or some other site.
Forking--Forking is making a copy of someone else's repository to your local machine. You get a copy of all the files and directories in the original repository.
Branch--a branch is a separate version of the code in the same repository. It allows you to have multiple versions simultaneously. When you are ready you can Merge them. This is how you can do team development
Here is a link to a GitHub glossary in Github's help files
Ways of Using GitHub
There are three basic ways of using Github. You can do most activities through the web page itself. You can also download a client application that resides on your machine. There are clients for Windows and Macs. I am only going to cover the Windows client and assume the Mac one is similar.
Power users use the Git Shell, or the BASH shell and use the command line for all their activities.
For this tutorial, I am going to focus on just creating repositories and getting your code on GitHub. I will follow up with tutorials on Cloning, branching etc.
Using the Web page
Once you have created an account, you can create repositories. If you are on your main page, there is a green button to create a new repository.
You can click it to get started. If you already have repositories you may be on a page viewing a list of those repositories. You can click on the down arrow beside the plus sign and choose "New Repository."
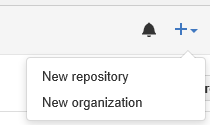
For the purposes of this tutorial I will make a repository called "Sample-Repository"

The next page gives you options for creating the repository.

We are first going to add a readme file

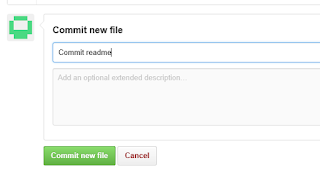
To actually add this file to the repository, we must commit it. The commit is lower on the same web page. We need to give the commit a name and, optionally, a description and then click the commit button.
Now the repository looks like this. We are next going to upload some files

When you choose Upload files, it gives you two options: You can drag the files onto the web page or you can choose files which opens up a file dialog box.

We will choose them. I am going to just get some random files from my Visual Studio directory

I will choose everything, but notice the folder doesn't upload.

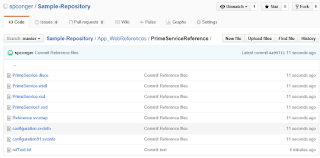
We will deal with that in a minute. For now I will commit the files. Here is our repository so far:

There is no way in GitHub to add an empty folder. This is a problem. But you can add a folder if you put something in it, even a dummy text file. So, the project I uploaded has some folders in which service references are stored. If we want the cloned program to work we need those folders. I click on new file and add, not only a file but the path I want.

Commit it. Navigate to the folder you desire and then choose upload files.

Now you have all your files and in their appropriate folders.
Finally, if you wish to delete the repository, click on settings:

Navigate down the page to the "Danger Zone" and choose "Delete Repository." You will receive several warnings and then have to type in the name of the repository before you can delete it.

Using the Windows Client
The web page is not difficult, and the windows client is even easier. First you have to download it. You can get it here: https://desktop.github.com/. Once you have downloaded and installed it. You need to log in to your Github account. Then you can create repositories.
To create a new repository, click the plus sign in the left corner of the application.
Type in the name of the new Repository.
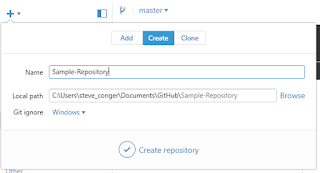
Click the check mark. This creates a GitHub directory in My Documents. Inside it will be the new Repository Folder.

Using Windows file explorer, navigate to the folder with your Program files and copy all the files and directories and paste them into the Github repository folder.

Now return to the Github windows application. Click on the tab "Change" and note that all your files are there. In the summary type a commit statement and then click the check mark by Commit to Master.

Now click on "History." You will see all your files and folders. Click publish to push the files to the web site.
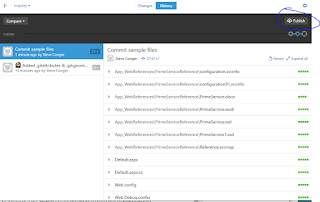
If you check the web site you will see your files are posted there.

If you change files you can use sync to upload the changes to GitHub.
Using the Git Shell
Before beginning this part, I deleted the Sample-repository both on GitHub and on my local machine. Next I created a new directory in My documents called "Sample-Repository." I copied the same files I used before into the directory. I also recreated the Sample-Repository on Github and left it empty.

Next I open the Git Shell. It is downloaded with the Windows Client. I navigate to my folder.

Next I make it a git folder.

Then I add all the files.

Then I do the first commit.

Next I add the remote (GitHub) URL. and verify it.

Now we push the files to the server.

Once again, if you check the web page, you will see the repository is populated with files and folders.
Here are the commands in order
Cd <path to your directory>
git init
git add .
git commit -m "<your commit statement>"
git remote add origin https://github.com/<username>/<repository>
git remote -v
git push origin master
Next we will look at cloning and forking GitHub Two

No comments:
Post a Comment