Showing posts with label ITC115. Show all posts

Saturday, April 30, 2016

GitHub One

Overview


Github is a site that lets you store code in a way that allows you to share it with other coders or with potential employers. But more than that, it allows you to keep track of versions. Others can download or make copies of your code and, if they have permissions, upload their own versions and merge it with the original. This makes it an ideal for team projects.

You have to register to use it, but Github is free as long as your Repositories are public. Students can get a limited number of private repositories for free.

Definitions


So, what's a repository? Here are a few definitions:

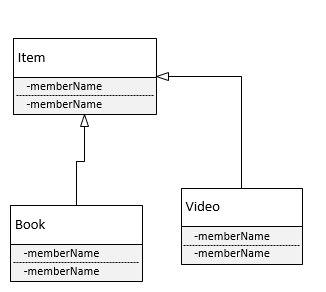
Repository--this is basically a directory, a folder(s) where you store your code. These can be local meaning they are on your own machine, or hosted at Github. Repositories are public or private. Public means anyone can view the code and copy it. Private means only those with permission can see or modify the code in any way. As I mentioned before public repositories are free. Generally private requires paying.

Commit--To add code to a repository, you must commit it. You give the commit a name and, optionally, a description and then commit it to the repository. The commits are how GitHub keeps track of versions and changes. You can look at the Log to see a history of commits.

Clone--Cloning is making a copy of the online repository to your local machine or some other site.

Forking--Forking is making a copy of someone else's repository to your local machine. You get a copy of all the files and directories in the original repository.

Branch--a branch is a separate version of the code in the same repository. It allows you to have multiple versions simultaneously. When you are ready you can Merge them. This is how you can do team development

Here is a link to a GitHub glossary in Github's help files

Ways of Using GitHub


There are three basic ways of using Github. You can do most activities through the web page itself. You can also download a client application that resides on your machine. There are clients for Windows and Macs. I am only going to cover the Windows client and assume the Mac one is similar.

Power users use the Git Shell, or the BASH shell and use the command line for all their activities.

For this tutorial, I am going to focus on just creating repositories and getting your code on GitHub. I will follow up with tutorials on Cloning, branching etc.

Using the Web page


Once you have created an account, you can create repositories. If you are on your main page, there is a green button to create a new repository.

You can click it to get started. If you already have repositories you may be on a page viewing a list of those repositories. You can click on the down arrow beside the plus sign and choose "New Repository."

New Repository Menu

For the purposes of this tutorial I will make a repository called "Sample-Repository"

Create Sample Repository

The next page gives you options for creating the repository.

Repository Options

We are first going to add a readme file

read me file

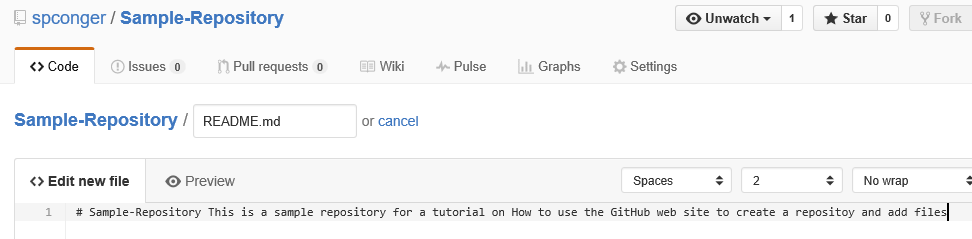
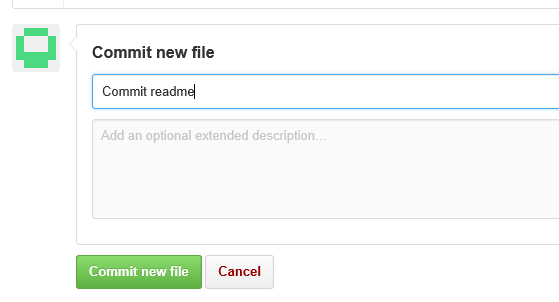
To actually add this file to the repository, we must commit it. The commit is lower on the same web page. We need to give the commit a name and, optionally, a description and then click the commit button.

Now the repository looks like this. We are next going to upload some files

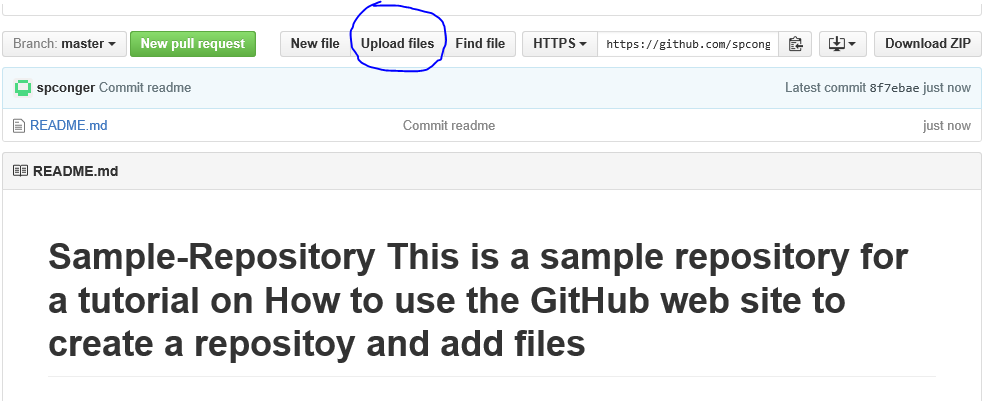
When you choose Upload files, it gives you two options: You can drag the files onto the web page or you can choose files which opens up a file dialog box.

drag files or choose them

We will choose them. I am going to just get some random files from my Visual Studio directory

files

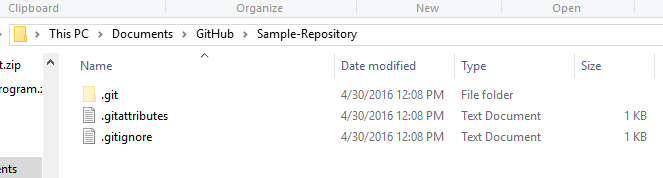
I will choose everything, but notice the folder doesn't upload.

only files no folders

We will deal with that in a minute. For now I will commit the files. Here is our repository so far:

repository so far

There is no way in GitHub to add an empty folder. This is a problem. But you can add a folder if you put something in it, even a dummy text file. So, the project I uploaded has some folders in which service references are stored. If we want the cloned program to work we need those folders. I click on new file and add, not only a file but the path I want.

adding folders

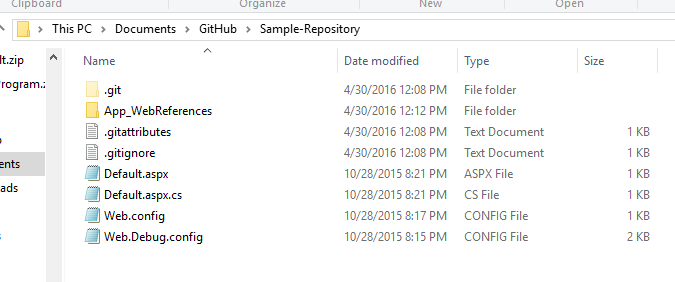
Commit it. Navigate to the folder you desire and then choose upload files.

additional files

Now you have all your files and in their appropriate folders.

completed

Finally, if you wish to delete the repository, click on settings:

settings

Navigate down the page to the "Danger Zone" and choose "Delete Repository." You will receive several warnings and then have to type in the name of the repository before you can delete it.

Delete

Using the Windows Client


The web page is not difficult, and the windows client is even easier. First you have to download it. You can get it here: https://desktop.github.com/. Once you have downloaded and installed it. You need to log in to your Github account. Then you can create repositories.

To create a new repository, click the plus sign in the left corner of the application.

plus sign

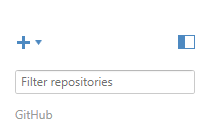
Type in the name of the new Repository.

Create Repository

Click the check mark. This creates a GitHub directory in My Documents. Inside it will be the new Repository Folder.

Repository directory

Using Windows file explorer, navigate to the folder with your Program files and copy all the files and directories and paste them into the Github repository folder.

files in Github folder

Now return to the Github windows application. Click on the tab "Change" and note that all your files are there. In the summary type a commit statement and then click the check mark by Commit to Master.

windows application, commit

Now click on "History." You will see all your files and folders. Click publish to push the files to the web site.

publish

If you check the web site you will see your files are posted there.

Files on Github

If you change files you can use sync to upload the changes to GitHub.

Using the Git Shell


Before beginning this part, I deleted the Sample-repository both on GitHub and on my local machine. Next I created a new directory in My documents called "Sample-Repository." I copied the same files I used before into the directory. I also recreated the Sample-Repository on Github and left it empty.

directory with files

Next I open the Git Shell. It is downloaded with the Windows Client. I navigate to my folder.

navigate to folder

Next I make it a git folder.

init

Then I add all the files.

add Files

Then I do the first commit.

commit

Next I add the remote (GitHub) URL. and verify it.

Create and verify remote server

Now we push the files to the server.

Once again, if you check the web page, you will see the repository is populated with files and folders.

Here are the commands in order

Cd <path to your directory>
git init
git add .
git commit -m "<your commit statement>"
git remote add origin https://github.com/<username>/<repository>
git remote -v
git push origin master

Next we will look at cloning and forking GitHub Two

Monday, February 9, 2015

Inheritance Examples

Here is the link to the code on GitHub https://github.com/spconger/InheritanceExampleJava

Here is a second link to our Wednesday Night example https://github.com/spconger/SecondInheritanceExample115

Wednesday, January 28, 2015

Word and Dictionary Example

Here is the code for the WordClass

package com.spconger.DictionaryProgram;

public class Word {
 /*************************
  * this class store the content
  * of a word and definition
  * It has a toString() method
  * that concatenates the word and
  * a definition with a dash between
  */
 //private fields
 private String word;
 private String definition;
 
 public String getWord() {
  return word;
 }
 public void setWord(String word) {
  this.word = word;
 }
 public String getDefinition() {
  return definition;
 }
 public void setDefinition(String definition) {
  this.definition = definition;
 }
 
 //this overrides the toString method
 //that comes from object
 public String toString(){
  return getWord() + "--" + getDefinition();
 }

}

Here is the MyDictionary class

package com.spconger.DictionaryProgram;

import java.util.ArrayList;

public class MyDictionary {
 /*****
  * this class stores the Word objects
  * in an Arraylist. It provides methods
  * for adding words, removing them and 
  * returning the whole list of words
  */
     private ArrayList<Word> words;
     
     //initialize the ArrayList in the constructor
     public MyDictionary(){
      words = new ArrayList<Word>();
     }
     
     //add words to the list
     public void addWord(Word w){
      words.add(w);
     }
     
     //remove words from the list
     public void removeWord(Word w){
      for(Word wd : words){
       if(wd.getWord().equals(w.getWord())){
        words.remove(wd);
       }//end if
      }//end for
     }//end removeword
     
     //return the whole list of words
     public ArrayList getWords(){
      return words;
     }
}

Here is the Form Again

package com.spconger.DictionaryProgram;

//import allthe various form elements
import java.awt.BorderLayout;
import java.awt.FlowLayout;
import java.awt.GridLayout;
import java.awt.event.ActionEvent;
import java.awt.event.ActionListener;
import java.util.ArrayList;
import javax.swing.DefaultListModel;
import javax.swing.JButton;
import javax.swing.JFrame;
import javax.swing.JLabel;
import javax.swing.JList;
import javax.swing.JPanel;
import javax.swing.JScrollPane;
import javax.swing.JTextField;

public class WordForm {

 /***************
  * this class creates the form to add 
  * words and display the results in a 
  * JList object.  The form contains
  * four panels: A border panel to orient
  * the others, A grid panel that contains
  * labels and textboxes, a scrollpane 
  * with a list in the center and a 
  * flow panel with the buttons at
  * the bottom
  */
 private JFrame frame;
 private JPanel borderPanel;
 private JPanel newWordPanel;
 private JPanel buttonPanel;
 private JScrollPane scrollPane;
 private JList wordList;
 private JLabel wordPrompt;
 private JTextField wordText;
 private JLabel defPrompt;
 private JTextField defText;
 private JButton addButton;
 private JButton getWordsButton;
 private JButton exitButton;

 //instantiate the dictionary class
 private MyDictionary tech;

 public WordForm() {
  createFrame();
  tech = new MyDictionary();
 }

 private void createFrame() {
  frame = new JFrame();
  frame.setBounds(100, 100, 300, 300);
  frame.add(createBorderPanel());
  frame.setVisible(true);
 }

 private JPanel createBorderPanel() {
  borderPanel = new JPanel();
  borderPanel.setLayout(new BorderLayout());
  borderPanel.add(createNewWordPanel(), BorderLayout.NORTH);
  borderPanel.add(createScrollPane(), BorderLayout.CENTER);
  borderPanel.add(createButtonPanel(), BorderLayout.SOUTH);
  return borderPanel;
 }

 private JPanel createNewWordPanel() {
  newWordPanel = new JPanel();
  newWordPanel.setLayout(new GridLayout(2, 2));
  wordPrompt = new JLabel("Enter Word");
  wordText = new JTextField();
  defPrompt = new JLabel("Enter Definition");
  defText = new JTextField();
  newWordPanel.add(wordPrompt);
  newWordPanel.add(wordText);
  newWordPanel.add(defPrompt);
  newWordPanel.add(defText);
  return newWordPanel;
 }

 private JScrollPane createScrollPane() {
  wordList = new JList();
  // add the selection listener to the list
  // wordlist.addListSelectionListener(new SelectionListener());
  scrollPane = new JScrollPane(wordList);
  scrollPane.setBounds(20, 20, 100, 200);

  return scrollPane;
 }

 private JPanel createButtonPanel() {
  buttonPanel = new JPanel();
  buttonPanel.setLayout(new FlowLayout());
  addButton = new JButton("Add Word");
  addButton.addActionListener(new AddButtonListener());
  getWordsButton = new JButton("Get Words");
  getWordsButton.addActionListener(new GetWordsListener());
  exitButton = new JButton("Exit");
  exitButton.addActionListener(new ExitListener());

  buttonPanel.add(addButton);
  buttonPanel.add(getWordsButton);
  buttonPanel.add(exitButton);

  return buttonPanel;
 }

 private class AddButtonListener implements ActionListener {

  @Override
  public void actionPerformed(ActionEvent e) {
   //in this method we add a word object
   //to the dictionary class
   Word w = new Word();
   w.setWord(wordText.getText());
   w.setDefinition(defText.getText());
   tech.addWord(w);

   wordText.setText("");
   defText.setText("");
  }

 }

 private class GetWordsListener implements ActionListener {

  @Override
  //here we write to the JList
  public void actionPerformed(ActionEvent e) {
   ArrayList<Word> words = tech.getWords();
   DefaultListModel model = new DefaultListModel();

   for (Word w : words) {
    model.addElement(w.toString());
   }
   wordList.setModel(model);
  }

 }

 private class ExitListener implements ActionListener {

  @Override
  public void actionPerformed(ActionEvent e) {
   System.exit(0);

  }

 }
}

Here is the Program class

package com.spconger.DictionaryProgram;

public class Program {

 public static void main(String[] args) {
  WordForm wf = new WordForm();

 }

}

Here is a picture of the program running

Code for WordForm

Here is the code for the word form. I thought I would give it to you to save a little time. I have not given you the word class or the TechnicalDictionary class. We will do them together.

package com.spconger.TechDictionary;

import java.awt.BorderLayout;
import java.awt.FlowLayout;
import java.awt.GridLayout;
import java.awt.event.ActionEvent;
import java.awt.event.ActionListener;
import java.util.ArrayList;

import javax.swing.DefaultListModel;
import javax.swing.JButton;
import javax.swing.JFrame;
import javax.swing.JLabel;
import javax.swing.JList;
import javax.swing.JPanel;
import javax.swing.JScrollPane;
import javax.swing.JTextField;

public class WordForm {
 
 private JFrame frame;
 private JPanel borderPanel;
 private JPanel newWordPanel;
 private JPanel buttonPanel;
 private JScrollPane scrollPane;
 private JList wordList;
 private JLabel wordPrompt;
 private JTextField wordText;
 private JLabel defPrompt;
 private JTextField defText;
 private JButton addButton;
 private JButton getWordsButton;
 private JButton exitButton;
 
 private TechnicalDictionary tech;
 
 public WordForm(){
  createFrame();
  tech = new TechnicalDictionary();
 }
 
 private void createFrame(){
  frame = new JFrame();
  frame.setBounds(100, 100, 300, 300);
  frame.add(createBorderPanel());
  frame.setVisible(true);
 }
 
 private JPanel createBorderPanel(){
  borderPanel = new JPanel();
  borderPanel.setLayout(new BorderLayout());
  borderPanel.add(createNewWordPanel(), BorderLayout.NORTH);
  borderPanel.add(createScrollPane(),BorderLayout.CENTER);
  borderPanel.add(createButtonPanel(), BorderLayout.SOUTH);
  return borderPanel;
 }
 
 private JPanel createNewWordPanel(){
  newWordPanel = new JPanel();
  newWordPanel.setLayout(new GridLayout(2,2));
  wordPrompt=new JLabel("Enter Word");
  wordText = new JTextField();
  defPrompt = new JLabel("Enter Definition");
  defText = new JTextField();
  newWordPanel.add(wordPrompt);
  newWordPanel.add(wordText);
  newWordPanel.add(defPrompt);
  newWordPanel.add(defText);
  return newWordPanel;
 }
 
 private JScrollPane createScrollPane(){
  wordList = new JList();
  //add the selection listener to the list
  //wordlist.addListSelectionListener(new SelectionListener());
  scrollPane = new JScrollPane(wordList);
  scrollPane.setBounds(20, 20, 100, 200);
 
  
  return scrollPane;
 }
 
 private JPanel createButtonPanel(){
  buttonPanel = new JPanel();
  buttonPanel.setLayout(new FlowLayout());
  addButton = new JButton("Add Word");
  addButton.addActionListener(new AddButtonListener());
  getWordsButton = new JButton("Get Words");
  getWordsButton.addActionListener(new GetWordsListener());
  exitButton = new JButton("Exit");
  exitButton.addActionListener(new ExitListener());
  
  buttonPanel.add(addButton);
  buttonPanel.add(getWordsButton);
  buttonPanel.add(exitButton);
  
  return buttonPanel;
 }
 
 private class AddButtonListener implements ActionListener{

  @Override
  public void actionPerformed(ActionEvent e) {
   Word w = new Word();
   w.setWord(wordText.getText());
   w.setDefinition(defText.getText());
   tech.addWord(w);
   
   wordText.setText("");
   defText.setText("");
  }
  
 }
 
 private class GetWordsListener implements ActionListener{

  @Override
  public void actionPerformed(ActionEvent e) {
   ArrayList words = tech.getWords();
   DefaultListModel model = new DefaultListModel();
   
   for(Word w: words){
    model.addElement(w.toString());
   }
   wordList.setModel(model);
  }
  
 }
 private class ExitListener implements ActionListener{

  @Override
  public void actionPerformed(ActionEvent e) {
   System.exit(0);
   
  }
  
 }
}

Monday, January 26, 2015

Swing form examples

package com.spconger.FormLayouts;

import java.awt.BorderLayout;
import java.awt.FlowLayout;
import java.awt.GridLayout;
import java.awt.event.ActionEvent;
import java.awt.event.ActionListener;

import javax.swing.JButton;
import javax.swing.JFrame;
import javax.swing.JLabel;
import javax.swing.JPanel;
import javax.swing.JTextField;

public class FormLayout {
 JFrame frame;
 JPanel panel1;
 JPanel borderPanel;
 JPanel buttonPanel;
 JLabel label1;
 JLabel label2;
 JTextField textName;
 JButton button;
 JButton exitButton;
 
 public FormLayout(){
  
  createFrame();
  
 }
 
 private void createFrame(){
  frame = new JFrame();
  frame.setBounds(100, 100, 400, 200);
  frame.setDefaultCloseOperation(frame.EXIT_ON_CLOSE);
  frame.add(createBorderPanel());
  frame.setVisible(true);
 }
 
 private JPanel createBorderPanel(){
  borderPanel= new JPanel();
  borderPanel.setLayout(new BorderLayout());
  borderPanel.add(createPanel(), BorderLayout.NORTH);
  borderPanel.add(createButtonPanel(), BorderLayout.SOUTH);
  return borderPanel;
  
 }
 
 private JPanel createButtonPanel(){
  buttonPanel = new JPanel();
  buttonPanel.setLayout(new FlowLayout());
  button = new JButton("Click");
  button.addActionListener(new ButtonListener());
  exitButton = new JButton("Exit");
  exitButton.addActionListener(new ExitListener());
  buttonPanel.add(button);
  buttonPanel.add(exitButton);
  return buttonPanel;
 }
 
 private JPanel createPanel(){
  panel1=new JPanel();
  panel1.setLayout(new GridLayout(2,2));
  label1 = new JLabel("Enter Your name");
  textName=new JTextField(25);
  
  label2=new JLabel();
  panel1.add(label1);
  panel1.add(textName);
  panel1.add(label2);
  
  return panel1;
 }
 
 private class ButtonListener implements ActionListener{

  @Override
  public void actionPerformed(ActionEvent e) {
   label2.setText("Hello, " + textName.getText());
   
  }
  
 }
 
 private class ExitListener implements ActionListener{

  @Override
  public void actionPerformed(ActionEvent e) {
   System.exit(0);
   
  }
  
 }

}

Thursday, January 15, 2015

The Vehicle Example

package com.spconger.VehicleExample;

public class Program {

 public static void main(String[] args) {
  Display d = new Display();
  
  
 }

}


package com.spconger.VehicleExample;

public class Vehicle {
 /*
  * Class can contain methods
  * Constants and variables (class level fields)
  * constructor
  */
 //private fields
 private int passengers;
 private int fuelCapacity;
 private int mpg;
 
 //public getter and setters
 //accessors and mutators
 public int getPassengers(){
  return passengers;
 }
 
 public void setPassengers(int passengers){
  this.passengers=passengers;
 }

 public int getFuelCapacity() {
  return fuelCapacity;
 }

 public void setFuelCapacity(int fuelCapacity) {
  this.fuelCapacity = fuelCapacity;
 }

 public int getMpg() {
  return mpg;
 }

 public void setMpg(int mpg) {
  this.mpg = mpg;
 }
 //public method
 public int calculateRange(){
  return getFuelCapacity() * getMpg();
 }
 
}


package com.spconger.VehicleExample;

import java.util.Scanner;


public class Display {
 
 private Vehicle vehicle;
 Scanner scan;
 
 public Display(){
  vehicle = new Vehicle();
  scan = new Scanner(System.in);
  getInputs();
  getOutput();
 }
 
 
 private void getInputs(){
  System.out.println("Enter the seating capacity of the vehicle");
  vehicle.setPassengers(scan.nextInt());
  System.out.println("Enter the Fuel capacity");
  vehicle.setFuelCapacity(scan.nextInt());
  System.out.println("Enter the mpg");
  vehicle.setMpg(scan.nextInt());
 }
 
 private void getOutput(){
  System.out.println("Your vehicle can hold " 
 + vehicle.getPassengers() + 
 " Passenger and had a range of "
 + vehicle.calculateRange());
 }

}

Monday, January 12, 2015

Arrays and Loops, Random

Here is the code for the Loops and Arrays

package com.spconger.LoopsandArrays;

import java.util.Random;

public class Program {
 /*This class consists of examples
  * of arrays, ifs and loops
  * steve conger 1/7/2015
  */
 final int SIZE = 50;
 final int MAXRANDOM = 500;

 public static void main(String[] args) {
  Program p = new Program();
  p.createArrays();

 }//end main

 private int getRandom() {
  Random r = new Random();
  int number = r.nextInt(MAXRANDOM);
  return number;
 }//end random

 private void createArrays() {
  int[] smaller = new int[SIZE];
  int[] larger = new int[SIZE];
  populateArrays(smaller,larger);
 }//end createArrays

 private void populateArrays(int[] small, int[] large) {
  int smallCounter = 0, largeCounter = 0;

  for (int i = 0; i < SIZE; i++) {

   int num = getRandom();
            
   //this writes the numbers to
   //the large array if they are
   //greater than 250
   //otherwise it writes them to
   //the smaller array
   if (num > 250) {
    large[largeCounter] = num;
    largeCounter++;
   }//end if
   else {
    small[smallCounter] = num;
    smallCounter++;
   }//end else

  }//end for
  displayArrays(small, large);
 }//end populateArrays
 
 private void displayArrays(int[] small, int[] large){
  System.out.println("these are the values 250 or less");
  for(int i = 0; i<SIZE; i++){
   if(small[i] != 0){
    System.out.println(small[i]);
  }//end if
   
   
  }//end for
  System.out.println("these are values over 250");
  int x=0;
   while(x < large.length){
    if(large[x] != 0){
     System.out.println(large[x]);
     x++;
    }//end if
   }//end while
 }

}//end class

Monday, January 5, 2015

First Java Code

Here is the code from last night

To Start a new program go to the FILE menu, choose NEW/JAVA PROJECT. Give the project a name and click FINISH.

To add a new class. Right Click on the SRC folder in the project and choose NEW/CLASS. Name the Package and the class. If you want this class to have the main method click the check box to add static void main

package com.sponger.MileageCalculator;

import java.util.Scanner;

public class MileageCalc {
 @SuppressWarnings("unused")
 Scanner scan = new Scanner(System.in);
 public static void main(String[] args) {
 
  // Input: how many miles
  //Input:how many gallons
  //Output: MPG
  // MPG=Miles/Gallons
  
  MileageCalc m = new MileageCalc();
  m.calcuateMPG();

 }
 
 private double getTotalMiles(){
  System.out.println("Enter the total miles traveled");
  double miles = scan.nextDouble();
  return miles;
 }
 
 private double  getGallonsUsed(){
  System.out.println("Enter the gallons used.");
  double gallons = scan.nextDouble();
  return gallons;
 }
 
 private void calcuateMPG(){
  double mpg =getTotalMiles()/getGallonsUsed();
  displayMPG(mpg);
 }
 
 private void displayMPG(double mpg){
  System.out.println("You mpg is " + mpg);
 }

}

Wednesday, August 6, 2014

Loading images dynamically

The complete code for this, and the images I used are available at https://github.com/spconger/DynamicallyShowImages

To load images I ended up using these imports

import java.awt.image.BufferedImage;
import java.io.File;
import java.io.IOException;
import java.util.ArrayList;

import javax.imageio.ImageIO;
import javax.swing.ImageIcon;

I sat the image path as a constant. You will have to change the path to make the sample work. To get an easier more flexible path you might try using .getAbsolutePath(), .getPath(), or .getCanonicalPath().

private final String IMG_PATH = "C:\\Users\\stevec\\Workspace\\ImageTest\\Images\\";
private final int IMAGE_WIDTH=315;
private final int IMAGE_HEIGHT=670;

The image is stored in a label using an icon property.(I put the image names in an array).

 BufferedImage img=null;

img = ImageIO.read(new File(IMG_PATH + pictures[i]));
ImageIcon icon = new ImageIcon(img);
JLabel label = new JLabel(icon);

The program starts by letting the user enter how many pictures they want to display. In this case the only valid numbers are 1 to 5. I did not validation. It will crash if you enter any number greater than 5. When they click the button, the action listener, loops for as many times as the user requested, adding labels and pictures to a picturePanel. Then the panel is added to a JPanel that uses a border layout. The frame is given a new size based on the number of images and the image width. Then the frame is revalidated and repainted. These two methods are necessary to redraw the fram with the new picture panel and pictures. Here is the code for the ActionListener.

private class PictureListener implements ActionListener{

@Override
public void actionPerformed(ActionEvent arg0) {
 number = Integer.parseInt(numberField.getText());
 String[] pictures = new String[] {"One.png", "Two.png",
                     "Three.png", "four.png", "Five.png"};
 picturePanel=new JPanel();
 picturePanel.setLayout(new FlowLayout(FlowLayout.LEFT));
 BufferedImage img=null;
 try {
      for (int i=0; i<number;i++){
  img = ImageIO.read(new File(IMG_PATH + pictures[i]));
  ImageIcon icon = new ImageIcon(img);
         JLabel label = new JLabel(icon);
         picturePanel.add(label,BorderLayout.WEST);
           
     }
            panel.add(picturePanel, BorderLayout.CENTER);
     frame.setBounds(200,200,number *(IMAGE_WIDTH),IMAGE_HEIGHT);
     
     frame.revalidate();
     frame.repaint();
 } catch (IOException e) {
     
  e.printStackTrace();
     
    }
     }
  
}

The try catch is required because whenever you try to get a file it might cause an IOException--i.e. the file might not be found.

Here are two pictures of the program running

Wednesday, July 30, 2014

A shuffle method for array lists

It so happens that there is a method in Java specifically designed to shuffle array lists called, surprisingly, shuffle. Here is some code that enters items into an arrayList and then calls the shuffle method. the shuffle method is in the Collections library.

First here is my Item class that has one property "name."

package com.sponger.RandomizeArray;

public class Item {
 private String name;
 
 public Item(String name){
  setName(name);
 }

 public String getName() {
  return name;
 }

 public void setName(String name) {
  this.name = name;
 }
}

Now here is the Program class that creates an ArrayList of Items and then shuffles them

package com.sponger.RandomizeArray;

import java.util.ArrayList;
import java.util.Collections;

public class Program {

 public static void main(String[] args) {
  Program p = new Program();
  p.createArray();

 }
 
 private void createArray(){
  ArrayList<Item> myArray = new ArrayList<Item>();
  Item i = new Item("one");
  Item i2 =new Item("two");
  Item i3 =new Item("three");
  Item i4=new Item("four");
  Item i5=new Item("five");
  myArray.add(i);
  myArray.add(i2);
  myArray.add(i3);
  myArray.add(i4);
  myArray.add(i5);
  
  shuffle(myArray);
 }
 
 private void shuffle(ArrayList<Item> list){
  Collections.shuffle(list);
  
  for(Item i: list){
   System.out.println(i.getName());
  }
 }

}


After the shuffle it came out

four
two
five
one
three

Monday, July 28, 2014

Passing an object from one swing form to another

Here is the ListSelectionListener from my JListExample that gets the name from the list, requests the object associated with that list and then passes it to the second form.

private class SelectionListener implements ListSelectionListener{

@Override
public void valueChanged(ListSelectionEvent e) {
    
if (list.getSelectedIndex() != -1) {
   //No selection, disable fire button.
   String name=list.getSelectedValue();
            
   Item i = iList.getItem(name);
              
SecondForm second = new SecondForm(i);

   } 


}

Here is the code for the second form. Note especially the Constructor


package com.spconger.JListExample;

import java.awt.FlowLayout;
import java.awt.LayoutManager;

import javax.swing.JFrame;
import javax.swing.JLabel;
import javax.swing.JPanel;

public class SecondForm {
 Item i;
 
//the constructor takes in an object of the type Item
 public SecondForm(Item i){
  this.i=i;
  createJFrame();
 }
 
 private void createJFrame(){
  JFrame frame= new JFrame();
  frame.setDefaultCloseOperation(JFrame.DISPOSE_ON_CLOSE);
  frame.setBounds(200,200,200,200);
  frame.add(createPanel());
  frame.setVisible(true);
 }
 
 private JPanel createPanel(){
  JPanel panel = new JPanel();
  panel.setLayout(new FlowLayout(FlowLayout.LEFT));
//the labels get their value from the Item object passed in
  JLabel label1=new JLabel(i.getName());
  JLabel label2 = new JLabel(Double.toString(i.getPrice()));
  panel.add(label1);
  panel.add(label2);
  return panel;
 }

}

Saturday, July 26, 2014

Recipe Program Code and Diagrams.

I have posted the code for a version of the Recipe program on GitHub at https://github.com/spconger/RecipeProgram. If you want to work it out on its own, don't look at the code yet.

Here are some sequence diagrams that show how the objects communicate with each other in accomplishing certain tasks.


Wednesday, July 23, 2014

Relations between Classes

I am going to use examples from two projects, both on GitHub. The BookList example and the JListExample.

There are four basic types of relations between classes.

* Association
* Inheritance
* Aggregation
* Compositon

Association

Association is probably the most common relationship between classes. It exists when a class talks to another class by calling a method in that other class. In the JLIst example The Swing form has this relationship with ItemsList class. Association is shown with a simple line drawn between classes. Here is a diagram. (Note, I have only included the fields and methods that are immediately relevant.)

Here is the relevant code. The first is the constructor where the class is intitialized. The second from the private class of the action listener where the class is used to get a copy of the array list

public Mainform(){
  //Initialize the form and the ItemList 
  //in the constructor
  createFrame();
  iList = new ItemList();
 }

. . .

if (list.getSelectedIndex() != -1) {
            
//No selection, disable fire button.
              
 String name=list.getSelectedValue();
            
Item i = iList.getItem(name);

Inheritance

We have discussed inheritance. Inheritance is a parent/Child, general/specific kind of relationship. It it represented by a line with a triangle at one end. The triangle always points toward the parent in the relationship. You should also note that the relationship between a class that implements and interface and the interface is also represented as inheritance with the triangle always pointing toward the interface. Sometimes the line is dashed to distinguish it from regular inheritance.

Aggregation

Unlike Inheritance which represents a general/specific relationship, Aggregation represents a whole/part relationship.In the JListExample, the ItemList is the whole and the Items are the part. Aggregation assumes that the part can exist independently of the whole. Aggregation is represented by an empty diamond. The diamond always points to the whole.

Composition

Just like aggreagation, composition is a whole/part relationship. The only difference is that in composition the parts cannot exist independently from the whole. The ActionListener classes have this type of relation to the swing form. If the form is destroyed the listeners also go away. The line for composition has a filled in diamond. Again the diamond always points to the whole.

Wednesday, July 16, 2014

Code for Class 7/16/2014

I have published the code covering inheritance, abstract classes and interfaces on Github at https://github.com/spconger/BookLibrary

And here is the link to the multiple swing forms example https://github.com/spconger/MultipleSwingFormsExample

Wednesday, July 9, 2014

FirstSwingExample in-class

Here is the ExampleForm.Java

package com.spconger.SwingExample;

import java.awt.GridLayout;
import java.awt.event.ActionEvent;
import java.awt.event.ActionListener;

import javax.swing.*;


public class ExampleForm {
 
 //declare the form objects
 private JFrame frame;
 private JPanel panel;
 private JLabel lblNumber;
 private JTextField txtNumber;
 private JButton btnSubmit;
 private JLabel lblPrime;
 
 private final int OFFSETX=200;
 private final int OFFSETY=300;
 private final int X=420;
 private final int Y=150;
 
 public ExampleForm(){
  createFrame();
 }
 
 private void createFrame(){
  frame = new JFrame();
  frame.add(createPanel());
  frame.setTitle("Prime Number Calculator");
  frame.setBounds(OFFSETX,OFFSETY,X,Y);
  frame.setDefaultCloseOperation(JFrame.EXIT_ON_CLOSE);
  frame.setVisible(true);
 }
 
 private JPanel createPanel(){
  panel = new JPanel();
  panel.setLayout(new GridLayout(2,2,5,5));
  
  lblNumber=new JLabel("Enter an integer between 1 and 41");
  txtNumber=new JTextField();
  btnSubmit=new JButton("Get Prime");
  btnSubmit.addActionListener(new SubmitListener());
  lblPrime = new JLabel();
  
  panel.add(lblNumber);
  panel.add(txtNumber);
  panel.add(btnSubmit);
  panel.add(lblPrime);
  
  return panel;
 }
 
 private class SubmitListener implements ActionListener{

  @Override
  public void actionPerformed(ActionEvent arg0) {
   try{
    int number = Integer.parseInt(txtNumber.getText());
    if(number > 0 && number < 42){
     int prime = number * number - number + 41;
     lblPrime.setText(Integer.toString(prime));
    }//end if
    else{
     JOptionPane.showMessageDialog
                 (null,"Enter an integer between 1 and 41", "Invalid Number",0);
     txtNumber.setText("");
     txtNumber.grabFocus();
    
    }//end else
   
   }//end try
   catch(NumberFormatException e){
    JOptionPane.showMessageDialog
                 (null,"Not a valid number", "Invalid Number",0);
    txtNumber.setText("");
    txtNumber.grabFocus();
   }//end catch
   
  }
  
 }

}

Here is the Program.java

package com.spconger.SwingExample;

public class Program {

 public static void main(String[] args) {
  ExampleForm ex = new ExampleForm();

 }

}

Here is a picture of the form after pressing the button

Monday, July 7, 2014

A java class example

Here is a class that calculates a simplified weekly payroll. Notice components that make up the class:

Fields: Fields are class level variables that describe the object. In this case we need the employee number, the rate of pay and the number of hours worked for the week.

Constants: Constants are values that cannot be changed in the course of the program. Java uses the word "final" to designate a constant. The naming convention for constants is to use all caps.

Sets and Gets: fields should be private. This is part of an object oriented principle called Encapsulation. You can use sets and gets to expose these private fields to outside classes. Sets allow another class to change the value of the underlying field. Gets allow another class to see the current value of a field. Not every field needs to be seen by other classes. You can also make a set without a get or visa-versa. You can also add validation to the sets if needed.

Public Methods: public methods are methods that can be accessed by other classes. You can also make private methods for things that are only internal to the class. Notice that each method does one thing. That makes troubleshooting and maintenance much easier.

Constructors: constructors are specialized methods whose purpose is to initialize or "construct" the class. Constructors can be overridden. This call has three constructors: an empty constructor that takes no parameters, a constructor that takes just the employee's number and a constructor that takes the employee number, the pay rate and the hours worked. You can have as many constructors as you want as long as each constructor has a different set of parameters. (It is important to note it is not the name of the parameter that matters, but the data type. You can only have one constructor that takes a single String parameter, even if they represent different Strings. So you can't do something like


public Pay(String employeeNumber){}
public Pay(String employeeName){}

They would not be seen as different by the complier.) Only one constructor is used for any instance of the class. Which constructor is used is determined by the parameters that are passed. In our example I used the last constructor that takes the employee number, pay rate and hours.

Here is the Pay.java class


package com.spconger.PayrollExample;

public class Pay {
 /*
  * This class represents a simplified
  * Payroll class. It calculates base pay,
  * overtime pay. total pay and net pay
  * with deductions for social security
  * federal withholding and union dues
  * it has a ToString method that returns
  * a complete pay stub
  * Steve Conger, 7/7/1014
  */
 //fields: class level variables that describe the object
 private String employeeNumber;
 private double payRate;
 private double hoursWorked;
 
 //declare a constant
 private final double UNIONDUES=.02;
 
 //get and set methods to allow access
 //to each field
 
 public String getEmployeeNumber() {
  return employeeNumber;
 }
 public void setEmployeeNumber(String employeeNumber) {
  this.employeeNumber = employeeNumber;
 }
 public double getPayRate() {
  return payRate;
 }
 public void setPayRate(double payRate) {
  this.payRate = payRate;
 }
 public double getHoursWorked() {
  return hoursWorked;
 }
 public void setHoursWorked(double hoursWorked) {
  this.hoursWorked = hoursWorked;
 }


 //public methods
 
 public double calculateBasePay(){
  double basePay = getHoursWorked() * getPayRate();
  return basePay;
 }
 
 public double calculateOvertimePay(){
  double overtime=(getHoursWorked()-40) * getPayRate()*1.5;
  return overtime;
 }
 
 public double calculateTotalPay(){
  return calculateBasePay() + calculateOvertimePay();
 }

 public double calculateSocialSecurity(){
  double ss=0;
  double ssPercent=0;
  
  double total = calculateTotalPay();
  if(total > 1500)
   ssPercent=.25;
  else if (total > 1000)
   ssPercent=.2;
  else if (total > 600)
   ssPercent=.15;
  else 
   ssPercent=.1;
  
   
  ss=total * ssPercent; 
    
  return ss;
 }
 
 public double calculateFederalWithholding(){
  double fw=0;
  double fwPercent=0;
  
  double total = calculateTotalPay();
  if(total > 1500)
   fwPercent=.1;
  else if (total > 1000)
   fwPercent=.08;
  else if (total > 600)
   fwPercent=.05;
  else 
   fwPercent=.01;
  
  fw=total * fwPercent;
  
  return fw;
 }
 
 public double calculateUnionDues(){
  return calculateTotalPay()*UNIONDUES;
 }
 
 public double calculateTotalDeductions(){
  return calculateSocialSecurity() + calculateFederalWithholding() 
    + calculateUnionDues();
 }
 
 public double calculateNetPay(){
  return calculateTotalPay()-calculateTotalDeductions();
 }
 
 
 public String toString(){
  
  String paystub= "Employee Number: "
    + getEmployeeNumber() 
    + "\n"
    + "Hours: "
    + getHoursWorked() 
    + "\n"
    + " Rate: "
    + getPayRate()
    + "\n"
    + " Base Pay: "
    + calculateBasePay()
    + "\n"
    + " Overtime: "
    + calculateOvertimePay()
    + "\n"
    + "Total Pay: " 
    + calculateTotalPay()
    + "\n"
    + "Social Security Detuction: "
    + calculateSocialSecurity()
    + "\n"
    + "Federal Witholding: "
    + calculateFederalWithholding()
    + "\n"
    + "Union dues: "
    + calculateUnionDues()
    + "\n"
    + "Total Deductions: "
    + calculateTotalDeductions()
    + "\n"
    + "Net Pay: "
    + calculateNetPay();
  
  return paystub;
  
    
 }
 //public constructors
 //empty Constructor
 public Pay(){
  
 }
 
 //Overridden constructor that takes employee number
 public Pay(String emp){
  setEmployeeNumber(emp);
 }
 
 //overridden constructor
 public Pay(String emp, double rate, double hours){
  setEmployeeNumber(emp);
  setPayRate(rate);
  setHoursWorked(hours);
 }

}


Here is Program.java


package com.spconger.PayrollExample;

public class Program {

 /**
  * @param args
  */
 public static void main(String[] args) {
  Program p=new Program();
  p.Display();

 }
 
 private void Display(){
  Pay pay = new Pay("345", 35.75, 45);
  System.out.println(pay.toString());
 }

}


Here is a picture of the results using the toString() method.

Thursday, July 3, 2014

FIrst Java Examples

Here is the code for the first two days:

First Java

package com.spconger.FirstJava;

import java.util.Scanner;

public class Program {
 /*
  * This class takes a word and a number
  * as arguments 
  * and outputs the word as many times as 
  * the number indicates
  * Steve Conger 6/30/2014
  */

 public static void main(String[] args) {
  //initialize the program class
  Program p = new Program();
  p.getInput();

 }
 
 private void getInput(){
  Scanner scan = new Scanner(System.in);
  String name=null;
  int number;
  System.out.println("Please enter a name or something");
  name=scan.next();


  if(name != null)
  {
   System.out.println("Enter how many time you want it to repeat");
   number=scan.nextInt();
   
   display(name, number);
   
  }
  
  else
  {
  
  System.out.println("You must enter a word");
  }
 }
 
 private void display(String name, int number){
  for (int i = 0; i < number; i++){
   System.out.println(name);
  }
 }

}


Array Example

package com.spconger.ArrayExample;

import java.util.Random;
import java.util.Scanner;

public class Program {
 int[] myArray = new int[10];
 
 public static void main(String[] args) {
  Program p = new Program();
  //p.createArray();
  //p.displayArray();
  p.twoDimensionalArray();
 }
 
 private void createArray()
 {
  
  
  Random rand = new Random();
  
  for (int i=0;i<myArray.length;i++){
   myArray[i]=rand.nextInt(300);
  }
 }
 
 private void displayArray(){
  for(int i=0;i<myArray.length;i++){
   System.out.println(myArray[i]);
  }
 }
 
 private void twoDimensionalArray(){
  String[] [] classes = new String[4][2];
  classes[0][0]="ITC115";
  classes[0][1]="Conger";
  classes[1][0]="ITC 240";
  classes[1][1]="Newman";
  classes[2][0]="NET 120";
  classes[2][1]="Messerly";
  classes[3][0]="ITC 224";
  classes[3][1]="Conger";
  
  System.out.println("Enter an instructor's name");
  Scanner scan = new Scanner(System.in);
  String instructor=scan.next();
  
  for(int i=0;i<classes.length;i++){
   if(classes[i][1].equals(instructor)){
    System.out.println(classes[i][0]);
   }
  }
 }
 

}


While Loop Example

package com.spconger.WhileLoopExample;

import java.util.Scanner;

public class Program {

 public static void main(String[] args) {
  Program p = new Program();
  //p.whileLoop();
  p.forEachLoop();

 }
 
 private void whileLoop(){
  String answer="Yes";
  int counter=0;
  Scanner scan = new Scanner(System.in);
  while (answer.equals("Yes") || answer.equals("yes")){
   counter ++;
   System.out.println(counter);
   System.out.println("Would you like to continue? Yes/No");
   
   answer = scan.next();
   
  }
  
  
 }
 private void DoWhileLoop()
 {
   String answer = "no";
   int counter=0;
   Scanner scan = new Scanner(System.in);
   do
   {
    counter++;
    System.out.println(counter);
    System.out.println("Would you like to continue? Yes/No");
   }while(answer.equals("Yes")|| answer.equals("yes"));
 }
 
 private void forEachLoop(){
  String[] colors = new String[] {"Red", "Green", "Blue", "Orange","Purple"};
  for(String s: colors){
   System.out.println(s);
  }
 }

}


Saturday, June 28, 2014

First use of Eclipse

Double click the Eclipse icon to start it

You will get this dialog


Your workspace is where all you files will be stored by default. These are the files that will show up in the package explorer. You can change your workspace location if you wish.

When Eclipse opens the first time you will have a screen that shows various options. Click get started to get to the IDE. (I am doing this from memory so it may be a little different.)

From the FILE menu select NEW then Java Project. Give the project a name.


Then click Next to see how the project will be laid out. You could also just click Finish if you prefer.

In the package explorer click the triangle to expand the project.


The src folder is where your files will go. Right Click on the src folder and add new class. You will get the following dialog:


I have filled out the main details. First you should give a package name. The convention is a sort of reverse url: "com.spconger.FirstProject." This gives the com, my user name and the name of the project. You don't have to follow this convention, but it makes assigning package names easier. A package functions much like a namespace in C#. It is used to group classes that belong together and differentiate them from classes in other packages that might have the same name. You have to give the class a name. I chose Program for this one. I usually call the class that contains the main() function program. The convention for class names is to start them with a capital letter and then capitalize the first letter of each succeeding word. Of course there can be no spaces. I have checked the box that adds a public static main() method. The main is the starting point for every Java program. There must be one and only one main per project. Click Finish to create the class. With the main stub the file looks like this.


In the package explorer you now have the Program class listed under source:


A couple of notes: Notice that the "main" method starts with a lower case m. The naming convention for methods in Java is to start method names with a lower case letter and then capitalize the first letter of any following word. This is different than C# which capitalizes the first letter of method names. Also, unlike C#, the Java class name and the physical file name for that class must be the same. The Program class must be in a file called Program.java

Let's add a couple of methods to take in a name and an integer and repeat that name as many times as the integer indicates. In this example we will declare variables, get input , use an if statement to validate the input and create a loop to do the output. In short we will cover many of the basics of Java.

First we will create a new private method to get input. Next we will add two variables, a String variable called "name" and an int variable called "number." Notice that "String" starts with a capital letter. The String type in java always starts with a capital. Then we will add a Scanner object. A Scanner can read input when you place the argument "System.in" in the constructor. Eclipse will place a red line under Scanner. When you hover the mouse over the term, you will see options. One of them is to import Scanner from java.util. Do that.

Now we use the System.out.println to output prompts and the Scanner object to get the answers. There is an if statement to make sure the name is not null. At the end of the method we call the display method.


Now lets create the display method. It will use a for loop to loop through and print the name the specified number of times.


You should notice that the if and for statements are exactly the same as in C#.

Finally we have to call the Input method from main. To do this we must instantiate the Program class just as in C#. This is because, the main is static, but we did not make our other methods static.


Here is the whole program.


package com.spconger.firstProject;

import java.util.Scanner;

public class Program {

         /**
         * PROGRAM HEADER
         * This is a first Java Program
         * It takes a name and number as input
         * and outputs the name as many times
         * as the number indicates
         * Steve Conger 6/28/2014
         */

 public static void main(String[] args) {
  Program p = new Program();
  p.getInput();

 }
 
 private void getInput(){
  //variable declarations
  String name=null;
  int number=1;
  //declaring the Scanner object
  Scanner scan = new Scanner(System.in);
  //printing prompt to console
  System.out.println("Enter your name"); 
  //getting value with scanner
  name=scan.next();
  //check to make sure there is a name entered
  if (name==null){
   System.out.println("You must enter a name");
   return;
  }
  //propmpt and get integer value
  System.out.println("Enter an integer");
  number=scan.nextInt();
  //call the display method and  pass it 
                //the name and number
  displayNames(name, number);
 }
 
 private void displayNames(String n, int num){
  //loop to print out names
  for (int i=0;i<num;i++){
   System.out.println(n);
  }
 }

}


To run the project click on the green triangle on the toolbar. A dialog will appear asking if you want to build your class. Click ok. Then your prompt should appear at the bottom of your eclipse instance looking something like this:


Enter a name and a number. Your results should look something like this: