Saturday, April 30, 2016

GitHub One

Overview


Github is a site that lets you store code in a way that allows you to share it with other coders or with potential employers. But more than that, it allows you to keep track of versions. Others can download or make copies of your code and, if they have permissions, upload their own versions and merge it with the original. This makes it an ideal for team projects.

You have to register to use it, but Github is free as long as your Repositories are public. Students can get a limited number of private repositories for free.

Definitions


So, what's a repository? Here are a few definitions:

Repository--this is basically a directory, a folder(s) where you store your code. These can be local meaning they are on your own machine, or hosted at Github. Repositories are public or private. Public means anyone can view the code and copy it. Private means only those with permission can see or modify the code in any way. As I mentioned before public repositories are free. Generally private requires paying.

Commit--To add code to a repository, you must commit it. You give the commit a name and, optionally, a description and then commit it to the repository. The commits are how GitHub keeps track of versions and changes. You can look at the Log to see a history of commits.

Clone--Cloning is making a copy of the online repository to your local machine or some other site.

Forking--Forking is making a copy of someone else's repository to your local machine. You get a copy of all the files and directories in the original repository.

Branch--a branch is a separate version of the code in the same repository. It allows you to have multiple versions simultaneously. When you are ready you can Merge them. This is how you can do team development

Here is a link to a GitHub glossary in Github's help files

Ways of Using GitHub


There are three basic ways of using Github. You can do most activities through the web page itself. You can also download a client application that resides on your machine. There are clients for Windows and Macs. I am only going to cover the Windows client and assume the Mac one is similar.

Power users use the Git Shell, or the BASH shell and use the command line for all their activities.

For this tutorial, I am going to focus on just creating repositories and getting your code on GitHub. I will follow up with tutorials on Cloning, branching etc.

Using the Web page


Once you have created an account, you can create repositories. If you are on your main page, there is a green button to create a new repository.

You can click it to get started. If you already have repositories you may be on a page viewing a list of those repositories. You can click on the down arrow beside the plus sign and choose "New Repository."
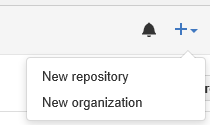
New Repository Menu

For the purposes of this tutorial I will make a repository called "Sample-Repository"

Create Sample Repository

The next page gives you options for creating the repository.

Repository Options

We are first going to add a readme file

read me file

To actually add this file to the repository, we must commit it. The commit is lower on the same web page. We need to give the commit a name and, optionally, a description and then click the commit button.
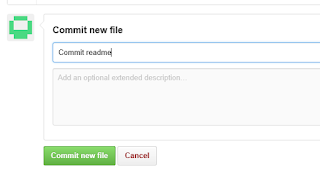
Now the repository looks like this. We are next going to upload some files

When you choose Upload files, it gives you two options: You can drag the files onto the web page or you can choose files which opens up a file dialog box.

drag files or choose them

We will choose them. I am going to just get some random files from my Visual Studio directory

files

I will choose everything, but notice the folder doesn't upload.

only files no folders

We will deal with that in a minute. For now I will commit the files. Here is our repository so far:

repository so far

There is no way in GitHub to add an empty folder. This is a problem. But you can add a folder if you put something in it, even a dummy text file. So, the project I uploaded has some folders in which service references are stored. If we want the cloned program to work we need those folders. I click on new file and add, not only a file but the path I want.

adding folders

Commit it. Navigate to the folder you desire and then choose upload files.

additional files

Now you have all your files and in their appropriate folders.
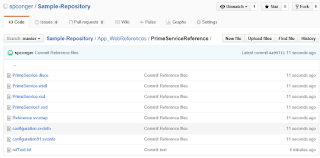
completed

Finally, if you wish to delete the repository, click on settings:

settings

Navigate down the page to the "Danger Zone" and choose "Delete Repository." You will receive several warnings and then have to type in the name of the repository before you can delete it.

Delete

Using the Windows Client


The web page is not difficult, and the windows client is even easier. First you have to download it. You can get it here: https://desktop.github.com/. Once you have downloaded and installed it. You need to log in to your Github account. Then you can create repositories.

To create a new repository, click the plus sign in the left corner of the application.

plus sign

Type in the name of the new Repository.
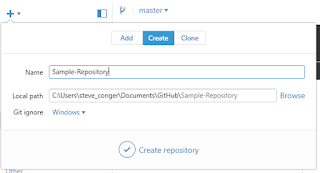
Create Repository

Click the check mark. This creates a GitHub directory in My Documents. Inside it will be the new Repository Folder.

Repository directory

Using Windows file explorer, navigate to the folder with your Program files and copy all the files and directories and paste them into the Github repository folder.

files in Github folder

Now return to the Github windows application. Click on the tab "Change" and note that all your files are there. In the summary type a commit statement and then click the check mark by Commit to Master.

windows application, commit

Now click on "History." You will see all your files and folders. Click publish to push the files to the web site.
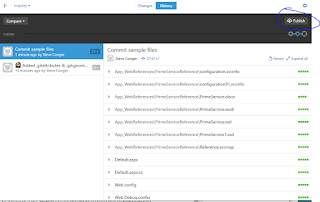
publish

If you check the web site you will see your files are posted there.

Files on Github

If you change files you can use sync to upload the changes to GitHub.

Using the Git Shell


Before beginning this part, I deleted the Sample-repository both on GitHub and on my local machine. Next I created a new directory in My documents called "Sample-Repository." I copied the same files I used before into the directory. I also recreated the Sample-Repository on Github and left it empty.

directory with files

Next I open the Git Shell. It is downloaded with the Windows Client. I navigate to my folder.

navigate to folder

Next I make it a git folder.

init

Then I add all the files.

add Files

Then I do the first commit.

commit

Next I add the remote (GitHub) URL. and verify it.

Create and verify remote server

Now we push the files to the server.

Once again, if you check the web page, you will see the repository is populated with files and folders.

Here are the commands in order

Cd <path to your directory>
git init
git add .
git commit -m "<your commit statement>"
git remote add origin https://github.com/<username>/<repository>
git remote -v
git push origin master

Next we will look at cloning and forking GitHub Two

Wednesday, April 27, 2016

SUbQueries

--Subqueries

Use Community_Assist
Select Personkey, DonationDate, max(DonationAmount) from Donation
Group by PersonKey, donationDate

Select PersonKey, donationDate, DonationAmount
From Donation
Where DonationAmount=(Select max(donationAmount) from donation)

Select PersonLastName, PersonFirstName, donationDate, DonationAmount
From person
inner join Donation
on person.personkey=donation.personkey
Where donationAmount=(Select max(donationAmount) from donation)

Select GrantTypeName from GrantType
Where grantTypeKey not in (Select grantTypeKey from GrantRequest)

Select GrantTypeName from GrantType
Where grantTypeKey in (Select grantTypeKey from GrantRequest)


Select PersonFirstName, PersonLastName
From person
Where PersonKey in
        (Select personkey from Employee where employeekey in
      (Select EmployeeKey from GrantReviewcomment))


Select GrantTypeKey, Sum(GrantRequestAmount) as Total, 
      (select sum(GrantRequestAmount) from GrantRequest) as GrandTotal,
   (sum(GrantRequestAmount) / 
(Select sum(GrantRequestAmount) from GrantRequest)) *100 
   as [Percent]
From GrantRequest
Group by GrantTypeKey

Select GrantTypeName, Format(Sum(GrantRequestAmount), '$#,##0.00') as Total, 
      Format((select sum(GrantRequestAmount) from GrantRequest),'$#,##0.00') 
   as GrandTotal,
   Format((sum(GrantRequestAmount) / 
   (Select sum(GrantRequestAmount) from GrantRequest)), '##.00 %')
   as [Percent]
From GrantType
inner Join GrantRequest
on GrantType.GrantTypeKey = GrantRequest.GrantTypeKey
Group by GrantTypeName

--Correlated subquery
--Requests that are greater than the average request
--Want to compare rent to rent, food to food etc.
--like to like

Select GrantTypeKey, GrantRequestAmount,GrantRequestDate, 
PersonKey, GrantRequestExplanation
From GrantRequest gr1
Where GrantRequestAmount > 
(Select avg(GrantRequestAmount) From GrantRequest gr2
   Where gr1.GrantTypeKey=gr2.GrantTypeKey)

   Select Avg(GrantRequestAmount) from GrantRequest where GrantTypeKey=2

   Create table PersonT
   (
  LastName nvarchar(255),
  FirstName nvarchar(255),
  Email nvarchar(255)
   )

   Insert into PersonT(LastName, FirstName, Email)
   Select PersonLastName, PersonFirstName, PersonEmail
      From Person where PersonLastName like 'T%'

 -- fully qualified name = [server name].[Database name].[Schema].[Table name]

  Insert into PersonT(LastName, FirstName, Email)
  Select EmployeeLastName, EmployeeFirstName, EmployeeEmail
  From MetroAlt.dbo.Employee where EmployeeLastName like 'T%'

   Select * from PersonT


Thursday, April 21, 2016

Windows Communication service

This is the code we wrote in class. It does not include the code generated by the ADO Data Entities

here is the interface and data contract

using System;
using System.Collections.Generic;
using System.Linq;
using System.Runtime.Serialization;
using System.ServiceModel;
using System.Text;

// NOTE: You can use the "Rename" command on the "Refactor" menu to change the interface name "ISampleBookReviewService" in both code and config file together.
[ServiceContract]
public interface ISampleBookReviewService
{
    [OperationContract]
    List<string> GetAuthors();

    [OperationContract]
    List<BookLite> GetBooks(string authorName);
}

[DataContract]
public class BookLite
{
    [DataMember]
    public string Title { set; get; }

    [DataMember]
    public string ISBN { set; get; }

    [DataMember]
    public string AuthorName { set; get; }

    [DataMember]
    public DateTime EntryDate { set; get; }

}


Here is the service code

using System;
using System.Collections.Generic;
using System.Linq;
using System.Runtime.Serialization;
using System.ServiceModel;
using System.Text;

// NOTE: You can use the "Rename" command on the "Refactor" menu to change the class name "SampleBookReviewService" in code, svc and config file together.
public class SampleBookReviewService : ISampleBookReviewService
{
    BookReviewDbEntities db = new BookReviewDbEntities();
    public List<string> GetAuthors()
    {
        var auth = from a in db.Authors
                   orderby a.AuthorName
                   select new { a.AuthorName };
        List<string> authors = new List<string>();
        foreach (var au in auth)
        {
            authors.Add(au.AuthorName.ToString());
        }
        return authors;
    }

    public List<BookLite> GetBooks(string authorName)
    {
        var bks = from b in db.Books
                  from a in b.Authors
                  orderby b.BookTitle
                  where a.AuthorName.Equals(authorName)
                  select new {
                      b.BookTitle,
                      a.AuthorName,
                      b.BookISBN,
                      b.BookEntryDate
                  };
        List<BookLite> books = new List<BookLite>();

        foreach (var bk in bks)
        {
            BookLite bl = new BookLite();
            bl.Title = bk.BookTitle;
            bl.AuthorName = bk.AuthorName;
            bl.ISBN = bk.BookISBN;
            bl.EntryDate = bk.BookEntryDate;
            books.Add(bl);
        }
        return books;
    }
}

Tuesday, April 19, 2016

Use Cases

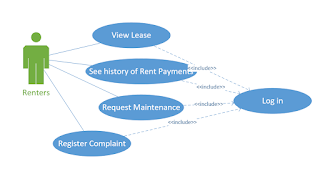
Here is the use case for the Renter Actor

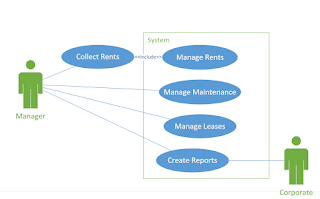
Here is the manager user case

Here is the write up of the request maintenance use case

Here is a bit of the testing spreadsheet

Monday, April 18, 2016

Joins

Use Community_Assist
--joins
Select * From Employee

--inner join
Select PersonLastName, PersonFirstName, PersonEmail,
EmployeeHireDate, EmployeeAnnualSalary
From Person
inner join Employee
On Person.PersonKey = Employee.PersonKey

--just join inner optional and aliased tables
Select p.PersonKey, 
PersonLastName, PersonFirstName, PersonEmail,
EmployeeHireDate, EmployeeAnnualSalary
From Person p
join Employee e
On p.PersonKey = e.PersonKey

Select * from EmployeePosition
Select * from Position

--4 table inner join
Select PersonLastName, PersonFirstName, PersonEmail,
EmployeeHireDate, PositionName, EmployeeAnnualSalary
From Person
inner Join Employee
on Person.PersonKey=Employee.PersonKey
inner join EmployeePosition
on Employee.EmployeeKey=EmployeePosition.EmployeeKey
inner join Position
on Position.PositionKey=EmployeePosition.PositionKey

Select PersonLastName, PersonFirstName, PersonEmail,
EmployeeHireDate, PositionName, EmployeeAnnualSalary
From Person, Employee, EmployeePosition, Position
Where Person.PersonKey=Employee.PersonKey
And Employee.EmployeeKey = EmployeePosition.EmployeeKey
And Position.PositionKey=EmployeePosition.EmployeeKey

--leave out position creates an accidental cross  join
Select PersonLastName, PersonFirstName, PersonEmail,
EmployeeHireDate, PositionName, EmployeeAnnualSalary
From Person, Employee, EmployeePosition, Position
Where Person.PersonKey=Employee.PersonKey
And Position.PositionKey=EmployeePosition.EmployeeKey

--cross join
Select PersonLastName, PersonFirstName, PersonEmail,
EmployeeHireDate
From Person, Employee
--explicit cross join
Select PersonLastName, PersonFirstName, PersonEmail,
EmployeeHireDate
From Person
Cross join Employee

--outer join
--an outer join returns all the records from one table
--and only matching records from the other
--the left table is the first table named
--the right table is the second table named
Select GrantTypeName, GrantRequest.GrantTypeKey
From GrantType
left outer join GrantRequest
On GrantType.GrantTypeKey = GrantRequest.GrantTypeKey
Where GrantRequest.GrantTypeKey is null

Select GrantTypeName, format(avg(GrantRequestAmount),'$#,##0.00') Average
From GrantType
inner join GrantRequest
on GrantType.GrantTypeKey=GrantRequest.GrantTypeKey
Group by GrantTypeName
having avg(GrantRequestAmount)>400

Thursday, April 14, 2016

Parts of the Community Assist


Web interface the look and feel of the website
Database (Data layer)  
Security (database website) users, permissions
Server Database Web
Employee access intranet
Customers asking for grants—applying for grants
Donors able to donate tracking donations
Administrator elements
General user
Reporting services
Coffee and cookies

Ado classic in class version.

Here is the dataClass.cs

using System;
using System.Collections.Generic;
using System.Linq;
using System.Web;
//libraries need to talk to database
using System.Data;
using System.Data.SqlClient;
using System.Configuration;

/// 
/// This class will connect to the database
/// It will have methods to retrieve the Services
/// It will also retreive all the grants for that service
/// Steve Conger 2016-4-12
/// 
/// 
public class DataClass
{
    private SqlConnection connect; 
    public DataClass()
    {
        connect = new SqlConnection
            (ConfigurationManager.
            ConnectionStrings["CommunityAssistConnectionString"].ToString());
    }//end constructor

    public DataTable GetServices()
    {
        DataTable tbl = null;

        string sql = "Select GrantTypeKey, GrantTypeName from GrantType";
        SqlCommand cmd = new SqlCommand(sql, connect);
       
     
        tbl = ReadData(cmd);

        
        return tbl;
    }

    public DataTable GetGrants(int grantTypeKey)
    {
        DataTable tbl = null;
        string sql = "SELECT GrantRequestDate, GrantRequestExplanation, GrantRequestAmount "
            + "FROM GrantRequest "
            + "WHERE GrantTypeKey=@Key";

        SqlCommand cmd = new SqlCommand(sql, connect);
        cmd.Parameters.AddWithValue("@Key", grantTypeKey);

        tbl = ReadData(cmd);
        return tbl;

        
    }

    private DataTable ReadData(SqlCommand cmd)
    {
        SqlDataReader reader = null;
        DataTable tbl = new DataTable();

        connect.Open();
        reader = cmd.ExecuteReader();
        tbl.Load(reader);
        reader.Close();
        connect.Close();

        return tbl;
    }


}//end class

Here is the Default.aspx page

<%@ Page Language="C#" AutoEventWireup="true" 
CodeFile="Default.aspx.cs" 
Inherits="_Default" %>

<!DOCTYPE html>

<html xmlns="http://www.w3.org/1999/xhtml">
<head runat="server">
    <title></title>
</head>
<body>
    <form id="form1" runat="server">
    <div>
        <asp:DropDownList ID="DropDownList1" runat="server" 
AutoPostBack="True" 
            OnSelectedIndexChanged="DropDownList1_SelectedIndexChanged">
        </asp:DropDownList>
        <asp:GridView ID="GridView1" runat="server"></asp:GridView>
    </div>
    </form>
</body>
</html>

Here is the code behind in Default.aspx.cs

using System;
using System.Collections.Generic;
using System.Linq;
using System.Web;
using System.Web.UI;
using System.Web.UI.WebControls;
using System.Data; //added for datatable

public partial class _Default : System.Web.UI.Page
{

    DataClass dc = new DataClass();
    protected void Page_Load(object sender, EventArgs e)
    {
        if(!IsPostBack)
        LoadDropDownList();
    }

    protected void LoadDropDownList()
    {
        DataTable tbl = dc.GetServices();
        DropDownList1.DataSource = tbl;
        DropDownList1.DataTextField = "GrantTypeName";
        DropDownList1.DataValueField = "GrantTypeKey";
        DropDownList1.DataBind();
        DropDownList1.Items.Insert(0, "Choose a Service");
    }


    protected void DropDownList1_SelectedIndexChanged(object sender, EventArgs e)
    {
        FillGrid();
    }

    protected void FillGrid()
    {
        if(!DropDownList1.SelectedValue.Equals("Choose a Service"))
        { 
            int key = int.Parse(DropDownList1.SelectedValue.ToString());
            DataTable tbl = dc.GetGrants(key);
            GridView1.DataSource = tbl;
            GridView1.DataBind();
        }
    }

}

Here is the web config with the connection string

<?xml version="1.0"?>

<!--
  For more information on how to configure your ASP.NET application, please visit
  http://go.microsoft.com/fwlink/?LinkId=169433
  -->

<configuration>

    <system.web>
      <compilation debug="true" targetFramework="4.5.2" />
      <httpRuntime targetFramework="4.5.2" />
    </system.web>
  <connectionStrings>
    <add name="CommunityAssistConnectionString" 
         connectionString="data source=srv38;
initial catalog=community_assist; 
integrated security=true"/>
  </connectionStrings>
</configuration>

Wednesday, April 13, 2016

Selects 2 functions

Use Community_Assist

--scalar
--aggregate
Select * From Donation
--date time functions
Select Distinct Year(DonationDate) [Year] from Donation
Select Distinct Month(DonationDate) [Month] from Donation
Select Distinct Day (donationDate) [Day] from Donation
Select DatePart(YY, DonationDate) [Year] from donation
Select Distinct DatePart(hour, donationDate) [hour] 
From donation

--casting dates to character for formatting
Select cast(month(DonationDate) as nchar(2))+ '/' 
+ cast(day(DonationDate) as nchar(2))
+ '/'+ cast(Year(DonationDate)as nchar(4)) as [Date] 
From Donation

Select * From Employee
--casting and doing math to get the years
Select cast(dateDiff(mm,min(EmployeeHiredate), 
(max(EmployeeHireDate))) / cast(12 as Decimal(10,2))
as decimal(10,2))
 From Employee

 --years and month
 Select dateDiff(mm,min(EmployeeHiredate), 
max(EmployeeHireDate))/12 as [years],
dateDiff(mm,min(EmployeeHiredate), 
max(EmployeeHireDate))% 12 [Months]
From Employee

--format function (only works on numberic types)
Select EmployeeKey, format(EmployeeAnnualSalary,'$#,##0.00')
From Employee

--without format function
Select EmployeeKey, '$' + cast(EmployeeAnnualSalary as nvarchar(10))
From Employee

--just math
Select 4 * 3 - 2 /5.0

--seeing what a 5% raise would look like
Select EmployeeAnnualSalary, 
EmployeeAnnualSalary * 1.05 as Raise
From Employee

--aggregate functions
Select Sum(donationAmount) as total From Donation
Select Avg(DonationAmount) Average from Donation
Select Count(donationAmount) Number from Donation
Select Max(donationAmount) Maximum from Donation
Select Min(donationAmount) Minimum from Donation

--group by. Any column not a part of an 
--an aggregate function must be included
--in a group by clause
Select Year(DonationDate) [year], 
Month(donationDate) [Month],
Sum(donationAmount) total
From Donation
Group by Year(donationDate), Month(DonationDate)

Select Year(GrantRequestDate) [Year],
Month(GrantRequestDate) [Month],
Count(GrantRequestKey) Number,
format(Sum(GrantRequestAmount),'$#,##0.00') total
from GrantRequest
Group by Year(GrantRequestDate),
Month(GrantRequestDate)

--if the criteria contains an aggregate function
--You have to use a having clause
--the having clause always follows the group by clause
--you can still use a where for non aggregate criteria
Select Year(GrantRequestDate) [Year],
Month(GrantRequestDate) [Month],
Count(GrantRequestKey) Number,
format(Sum(GrantRequestAmount),'$#,##0.00') total
from GrantRequest
Where Month(GrantRequestDate)=8
Group by Year(GrantRequestDate),
Month(GrantRequestDate)
having Sum(GrantRequestAmount) > 1000

--Examples of two system views
Select * from Sys.Databases
Select * from sys.Tables
use MetroAlt
Use Community_Assist
Select * from sys.Columns where Object_ID=373576369

Monday, April 11, 2016

Selects Part One

Use Community_Assist;

Select PersonLastName, PersonFirstName, PersonEmail
From Person

Select * From Person

Select * from Person
Order by PersonLastName 

Select * from Person
Order by PersonLastName DESC

Select * from Person
Order by PersonLastName DESC, PersonFirstName 

--column aliasing
Select PersonLastName as [Last Name],
PersonFirstName as [First Name],
PersonEmail as Email
From person

Select PersonLastName "Last Name",
PersonFirstName [First Name],
PersonEmail Email
From person

--concatenation 
Select PersonLastName + ', ' + PersonFirstName as Name, 
PersonEmail as Email
From Person

--Where clauses
Select * From PersonAddress 
Where PersonAddressCity = 'Seattle'

Select * From Donation
Where DonationDate >'8/9/2015' And DonationDate < '8/10/2015'

Select * From Donation
Where DonationDate between'8/9/2015' And '8/10/2015'

Select * from Donation
Where DonationAmount > 1000

Select * from PersonAddress 
Where Not PersonAddressCity ='Seattle'

--c language not -- not ansi standare
Select * from PersonAddress 
Where PersonAddressCity !='Seattle'

--visual basic not--not ansi standard
Select * from PersonAddress 
Where PersonAddressCity <>'Seattle'

Select * from PersonAddress
Where PersonAddressApt is null

Select * from PersonAddress
Where PersonAddressApt is not null

Select PersonLastName, PersonFirstName, PersonEmail
From Person
Where PersonLastName like 'H%'

Select PersonLastName, PersonFirstName, PersonEmail
From Person
Where PersonLastName like '%and%'
AND PersonFirstName='Martin'

Select top 10 DonationAmount, DonationDate
From Donation
Order by DonationAmount DESC

Select DonationAmount, DonationDate
From Donation
Order by DonationAmount DESC
Offset 10 rows Fetch next 10 rows only

--distinct eliminates duplicate rows
Select Distinct GrantTypeKey from GrantRequest
order by GrantTypeKey

Select Distinct EmployeeKey from DonationCheck
Order by EmployeeKey


Thursday, April 7, 2016

Beginnings and Overview

Here is the HTML source code

<%@ Page Language="C#" AutoEventWireup="true" CodeFile="Default.aspx.cs" 
Inherits="_Default" %>

<!DOCTYPE html>

<html xmlns="http://www.w3.org/1999/xhtml">
<head runat="server">
    <title></title>
    <link href="FirstStyle.css" rel="stylesheet" />
</head>
<body>
    <form id="form1" runat="server">
    <div>
        <!--This is a web or xml comment-->
    <h1>Birthday Calculator</h1>
        <hr />
        <p>Choose your birthday</p>
        <asp:Calendar ID="Calendar1" runat="server" >

        </asp:Calendar>
        <p>Enter your name <asp:TextBox ID="NameTextBox" runat="server">
                                      </asp:TextBox>
        </p>
        <p>
            <asp:Button ID="SubmitButton" runat="server" Text="Submit" 
OnClick="SubmitButton_Click" />
            <asp:Label ID="ResultLabel" runat="server" Text="" 
CssClass="result"></asp:Label>
        </p>
    </div>
    </form>
</body>
</html>


The C# code

using System;
using System.Collections.Generic;
using System.Linq;
using System.Web;
using System.Web.UI;
using System.Web.UI.WebControls;

public partial class _Default : System.Web.UI.Page
{
    /*This is a multiline comment. It's a good idea
    to put a header comment for every class */


    protected void Page_Load(object sender, EventArgs e)
    {

    }

    protected void SubmitButton_Click(object sender, EventArgs e)
    {
        GetTimeTillBirthday();
    }

    protected void GetTimeTillBirthday()
    {
        DateTime birthDay;
        

        if (Calendar1.SelectedDate==null)
        {
            birthDay = DateTime.Now;
        }
        else
        {
            birthDay = Calendar1.SelectedDate;
        }
        Response.Write(birthDay);
        string name = NameTextBox.Text;

        //this calculates the time until the birthday
        TimeSpan daysUntilBirthday = birthDay.Subtract(DateTime.Now);
        ResultLabel.Text ="Days until Birthday " +
            Math.Abs(daysUntilBirthday.Days).ToString() +
            ". And this many hours " 
         + Math.Abs(daysUntilBirthday.Hours).ToString();


    }

}

Here is the minimal css

body {
}

h1{
    color:navy;
}

.result{
    color:green;
}

Wednesday, April 6, 2016

Creating and Altering Tables


use ITC22;

Create table Customer_Steve
(
 CustomerKey int identity(1,1) primary key,
 CustomerLastName nvarchar(255) not null,
 CustomerFirstName nvarchar(255),
 CustomerDateAdded DateTime default GetDate()

)

Create Table CustomerOrder
(
   CustomerOrderKey int identity(1,1),
   CustomerKey int not null,
   CustomerOrderDate Date default getDate(),
   Constraint PK_CustomerOrder 
          Primary Key(CustomerOrderKey),
   Constraint FK_Customer Foreign Key(CustomerKey)
          References Customer_Steve(CustomerKey)
);

Create Table OrderDetail
(
 OrderDetailKey int identity(1,1),
 OrderKey int not null,
 OrderDetailProduct nvarchar(255) not null,
 OrderDetailPrice decimal(10,2)not null
)

Alter table OrderDetail
Add Constraint Pk_OrderDetail 
     primary key (OrderDetailKey);

Alter Table OrderDetail
Add Constraint FK_CustomerOrder Foreign Key(OrderKey)
   References CustomerOrder (CustomerOrderKey)

Alter Table Customer_Steve
Add CustomerEmail nvarchar(255)

Alter Table Customer_Steve
Drop column CustomerEmail

Alter Table Customer_Steve
Add Constraint unique_Email unique (customerEmail)

Alter Table OrderDetail 
Add constraint check_Price 
Check (OrderDetailPrice Between 1 and 100)