Monday, December 15, 2014

Using Data Entities

Start Visual Studio and New Web Site/Empty Web Site. Name it "BooksByCategory."

The first thing we will add is the Data Entities. Right click on the web site in the Solution Explorer and choose Add/ New Item.

You will get this warning

It just means that in ASP.Net code such as this must go in an App_Code folder. Just click "Yes." The Entity Wizard will start.

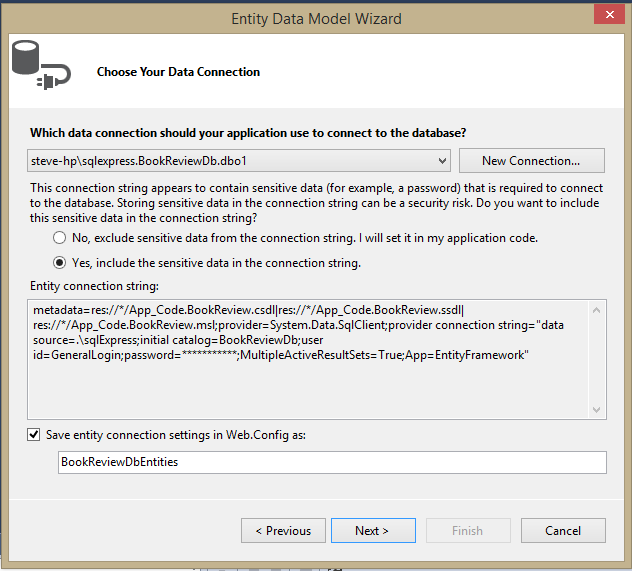
We want to generate the entities from an existing database. In the next dialog choose New Connection, even if a connection to the database already exists. Fill in the dialog box as in the following image. We want ".\sqlexpress" for the server. We want to use a SQL Server login. The Login name is "GeneralLogin." The password is "P@ssw0rd1". (Don't include the quotes.) Select the database BookReviewDB. This will give us a connection with limited priviledges. We will only be able to select data.

Click OK. The next screen contains a warning about the fact that our connection string will contain a password. Say Yes and click Next.
On the next screen, go with Entity data 6.0

In the next screen we choose what we want to include in our entities. Expand Tables dbo and select Author, AuthorBook, Book, BookCategory and Category. Leave the two check boxes checked. and click Finish.

You will get the following security warning.

You may get this several times. Each time just click OK. After you get through the security warnings it will generate a diagram.
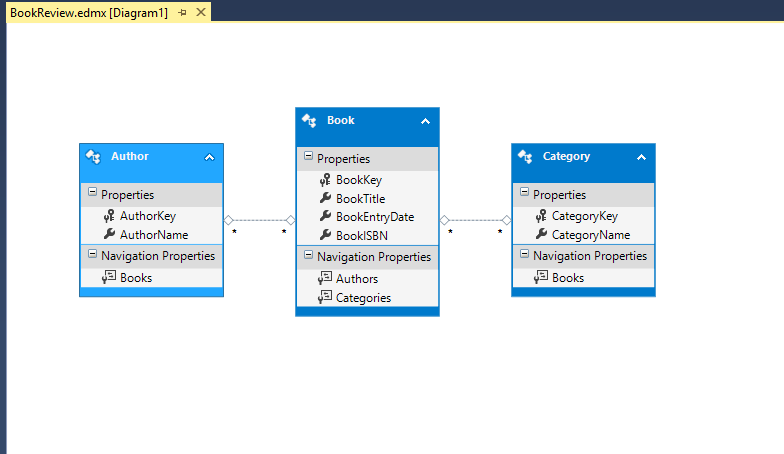
The linking tables are incorporated into the many-to-many relationship that it shows. Save the diagram.

Now right click on the web site in the Solution Explorer and choose Add New WebForm. The name can remain "Default".

We are going to add two controls to the form. A DropDownList and a GridView. For now we will let them keep their default name. We will add one attribute to the DropDownList: AutoPostBack="true"

Right click into the html source view and select View Code. We will add some code to the PageLoad event of the page. This method executes as the page loads, so we can use it to populate the DropDownList.

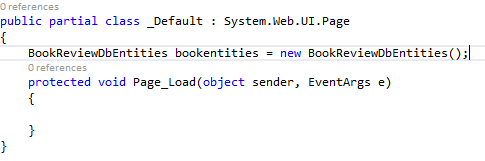
Instantiate the BookReviewDBEntities at the class level. This will connect us to the Data Entities code. Declaring it at class level lets us access it in more than one method.
We want to populate the DropDownList with the categories of books. To do so we use a LINQ query. The LINQ syntax declares a variable of the type var. This variable doesn't have a datatype until compile time. The basic LINQ syntax resembles, but is not quite the same as, SQL. After the query, we bind the results to the DropDownList. We want to show the CategoryName as the text in the DropDown and store the key for use in our next query. Here is the code.

You should run this to make sure the dropdownlisti is populated.

Click on the tab to open the Default.aspx in design view. Double click on the dropDownList to create the Index changed event. We will use Entities LINQ to create a query and return the books that match the one. To do this we use three froms to bring in the relevant table. ADO Entities keeps track of the relations. Here is the code for the Index changed event.

There are a few things to note about this code: One, notice the three from statements in which we bring in all the relevant tables. Notice also how we get the text from the DropDownList. Despite what I said above, we don't really need the value to be stored in the DropDownList this time. It works just fine with the name of the category. Also note how the fields are selected. When we bind it to the control we need to convert the var to a list type so that the grid view understands how to arrange and display it.

If you run the program right now you will notice that it still doesn't quite work. Every time you select a value in the DropDownList it returns to the top value. This is do to the nature of web pages. Whenever you make a change or invoke an event the page is completely redrawn from the server, and all variables are reinitialized. We will have to deal with this many times in our coding. To solve it this time we need to enclose the code in the Page Load event within an if statement. The statement says to only do what is in the if block when it is not a postback. Postback is a Microsoft term for a post back to the server from the page. ASP distinguishes the original posts from later re-posts of the page. Here is the adjusted code. Now it should work.

I am going to add one other little element--a style sheet. In a real web page this would be a major element. It is important to make the page attractive and functional. But I am only going to add a touch of CSS just to reinforce that you can and should. Again the Data Grid is essentially a table. By formating table elements you can format the grid. Here is my CSS.

Attach the stylesheet to the WebForm as shown in a previous blog. Here is a picture of the page running. (note: the grid will only show when there is data to match the selection.).

Getting Started with Database in Visual Studio

Installing and Managing Databases

SQL Server has a Management Studio application that provides you with all the tools you need to manage SQL Server instances and databases, but you can also use Visual Studio to do almost all the same tasks. For our assignments we need to create two databases, one for the examples and one for the assignments. The one for examples is called BookReviewDB, the one for Assignments ShowTracker. I will go through the process of installing BookReviewDB. The process for creating and populating ShowTracker is the same with one minor detail that will be noted in place.

Installing Databases

First we need to get the SQL script for the database. You can find it in Files in Canvas, or at http://www.spconger.com/school/ITC172/BookClub.txt. Select all and copy the Text. If you haven’t already, open Visual Studio. You do not need to start a project. On the Top Menu Select Tools/SQL Server/NewQuery.

In the Connect to Database dialog key in “.\Sqlexpress”. The “.\” is a shortcut for the computer name. If the shortcut doesn’t work, key in the computer name, backslash and SqlExpress: “myComputer\SqlExpress.”

Click Connect. In the query window that opens, paste the script for BookReviewDB.

Click the Green Triangle in the query tool bar to run the script. You should see the following after a successful completion:

Mananging Databases

Now that you have installed the database you will want to see it and inspect its objects. To do this go to the View menu and select Server Explorer.

Pin the Server Explorer pane open:

Now we are going to create a connection to the server and the database. Right click on the Data Connections Icon at the top of the Server Explorer. Select Add Connection. In the Add Connection Dialog key in “.\SqlExpress for the server and then select BookReviewDB from the list of Databases. It is important to note that you must make a separate data connection for each database you wish to see in the Server Explorer. You can also make connections with different privileges and permissions. Our current connection will use the Windows Authentication which gives us Admin privileges in the database.

Click OK. Now you will see a connection in the Server Explorer. Click the little triangle to expand the node. Expand the Tables node and then the Book Table. You can see the columns in the table.

If you want to see the data in a table you can right click on the table and select Show Table Data.

Preparing the Data For Mixed Logins

By Default the SQL Server accepts only Windows authentication. That means a Windows account, usually from Active Directory, is mapped to SQL Server and given appropriate permissions. In our Virtual Machine our Windows account is mapped with Admin Permissions. We will want our assignments and examples to connect with lesser permissions. We could make numerous Windows accounts, but in class it is a pain to constantly have to log out and log in to different accounts. Instead we will enable SQL Server and Windows Accounts. SQL Server accounts are like most logins you know. They require a user name and a password. The script we ran set up these accounts, but we must make some changes on the server to enable them.

This is the one thing we want to go to the SQL Server Management Studio for. We need to change the login mode on the server and then restart it. Technically it is possible to do from Visual Studio, but it involves a registry edit. It is safer and easier to do the change in the Management Studio. This is something you only have to do once. Once the mode is reset it stays reset.

Open SQL Server Management Studio. In Windows 8.1 you can find it by going to the tile screen and typing SQL anywhere in an open space. This brings up the search and should list the management studio among its results.

Connect to the server with “.\SqlExpress” and Windows Authentication, just as you did in Visual Studio. Right click on the .\sqlexpress in the Object Explorer and choose Properties.

In the Properties dialog select Security and click on the Radio button beside SQL Server and Windows Authentication.

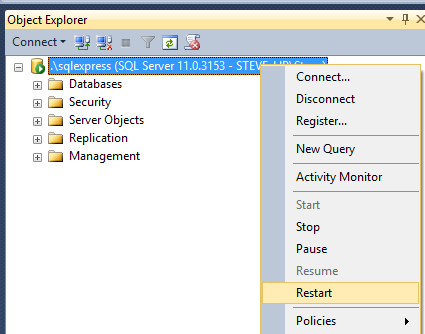
Click OK. You will be warned that for these changes to take place you must restart the server. Click OK to clear the warning. Now go back to the Object explorer and right click on the server again. Choose Restart.

You will be asked twice whether or not you want to do this. Say Yes to both. Once the Server is restarted you can close SQL Server Management Studio. You can now use the mixed mode for logins.

Tuesday, December 2, 2014

First ASP.Net Web Project.

What is ASP.Net

ASP.Net is a Microsoft technology for creating web pages and web sites. It is not the only one Microsoft has, but it is probably the easiest to use initially. One question I often get is "Where is ASP.Net used?" The answer is varied. Anyone can use it, though the hosting is often more expensive since it requires a Windows server with IIS (Internet Information Server). IIS is the Microsoft equivalent of Apache. It serves web pages that are requested by a browser such as Internet Explorer or Chrome. Typically ASP.Net is used by more enterprise level companies. ASP.Net is (or at least can be) more secure than interpreted code like PHP because it is compiled and stored on the server. It also interacts extremely well with Microsoft's SQL Server Databases and Azure cloud platform. ASP.Net with SQL Server is also the technology underlying SharePoint.

That being said more companies, especially small to medium sized companies, use PHP and mySQL.

Creating a Web Page with a web form

First start a new Web Site in Visual Studio

We will select an Empty web site for our template. Make sure that it is C#, and also check the file location. We are using "File System" which uses a built in IIS express to host and run the web pages. They are not available anywhere but on the current machine. HTTP would host the web page in the real IIS and the page would be available to anyone that knew the IP address. FTP is for remoting into a web site on another server somewhere else.

Now we need to add a web form. Right click on the website name in the Solution Explorer--this window keeps track of all your files-- and select add new and then Web Form

You will be asked to name the form. Just let it stay "Default." Default is the same as index on most sites.

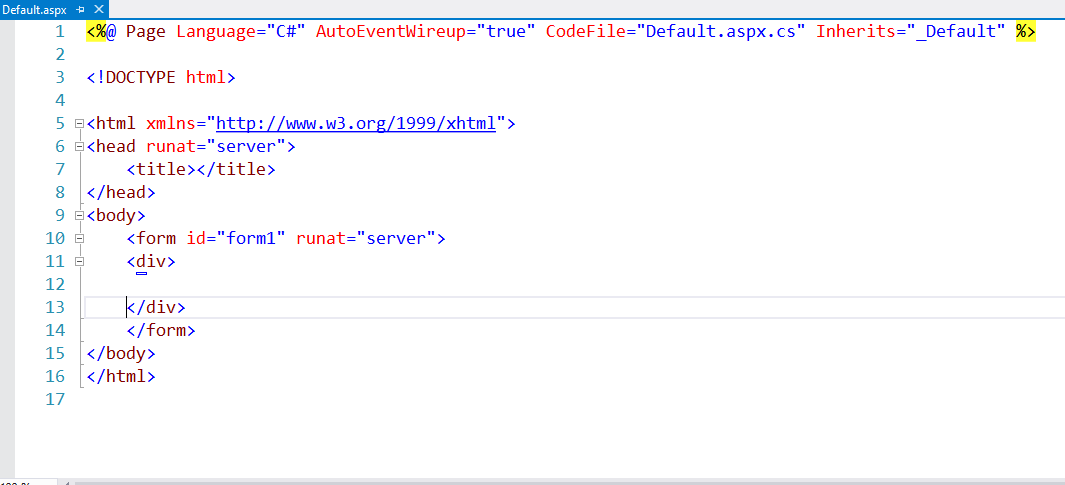
Here is an image of the default source view with the HTML

Note that the form gives you both the HTML 5 designation and the xhtml namespace. You can delete the xhtml if you wish.

Also note the Page header at the very top. This is what tells IIS that this is an ASP.Net page. The attributes set some of the page's initial parameters.

The head tag and the form tag have an attribute "runat" with the value "server." This tells IIS to process the content at the server. The ASP tags that we will use mean nothing to the browser. It requires the compiler on the server to interpret and render them.

All ASP controls from the tool box must be placed inside the Form tags. Additionally no ASP.Net Web Form can have more than one form element.

You can add all the HTML you like. You can also drag in ASP controls from the took box. Here is a picture of the source for the page with some HTML added (an H2 tag and a p tag) and two ASP.Net controls: a Calendar and a label.

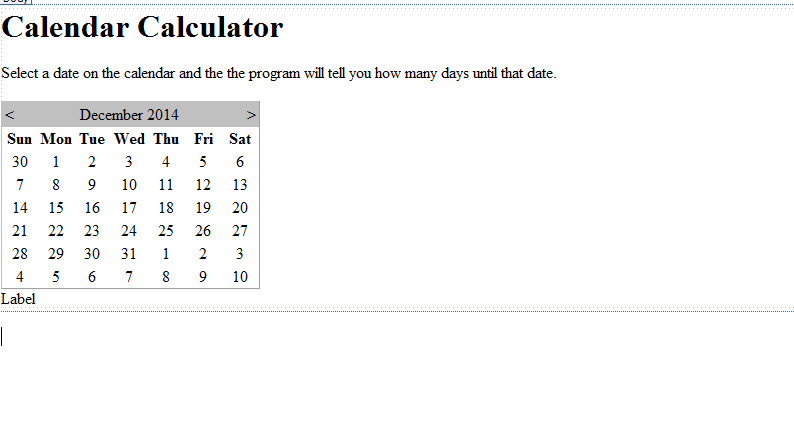
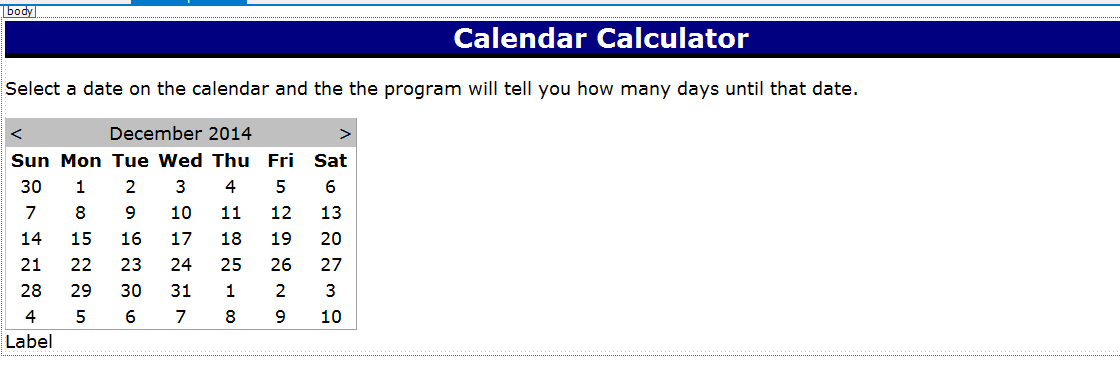
Here is what it looks like in Design view (the tabs on the bottom of the window)

Just as any web page, you use CSS to style and order your elements. To add a css stylesheet you can right click on the web site in the Solution Explorer and choose add new item stylesheet

You will be asked to name it

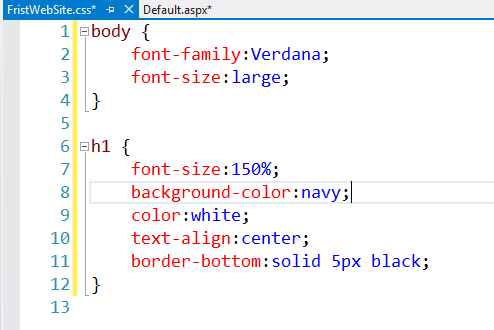
We will add a few simple style statements

We need to attach the style sheet to the page. You can do that by dragging the stylesheet onto the page in design view or by typing the following lines

Here is the view in the Designer afterwards

Double click the Calendar in design view. This will open the Code Behind page and create a Selected date changed event for the calendar

Now we will add some code. The code gets the current date from the machine and whatever date the user selects from the calendar. It subtracts the current date from the present date and returns days. If the number of days is less than 0 then the user selected a earlier date. Otherwise he selected the current or a later date. We return the difference in days and write it to the label.

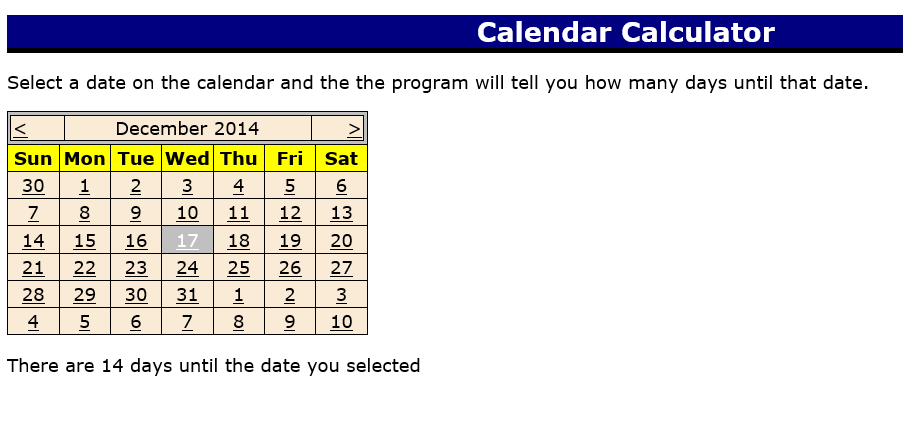
The calendar has its own pre built format, but it is probably better to use CSS to format it. The calendar renders into html as a table, so by formatting the table elements I can format the calendar. I add these to the CSS.

Because this CSS targets the rendered calendar, they won't be reflected in the Designer.

Here is a picture of the running Web page

Wednesday, November 19, 2014

Mileage WPF (Evening)

Here is the Mileage class

using System;
using System.Collections.Generic;
using System.Linq;
using System.Text;
using System.Threading.Tasks;

namespace MileageForm
{
    /// 
    /// this is a very simple mileage class 
    /// it has three properties
    /// Distance, Gallons and PricePerGallon
    /// I used a short cut method to create
    /// the properties just expressing the get and set
    /// It has two methods one to calculate 
    /// the gas mileage and one to calculate the 
    /// price per mile
    /// 
    class Mileage
    {
        //short cut for properties
         public double Distance {get; set;}
         public double Gallons { get; set; }
         public double PricePerGallon { get; set; }

        //methods
        public double CalculateMileage()
         {
             return Distance / Gallons;
         }

        public double CalculatePricePerMile()
        {
            return  PricePerGallon * Gallons /Distance;
        }

    } 
}

Here is the XAML for the form

<Window x:Class="MileageForm.MainWindow"
        xmlns="http://schemas.microsoft.com/winfx/2006/xaml/presentation"
        xmlns:x="http://schemas.microsoft.com/winfx/2006/xaml"
        Title="MainWindow" Height="350" Width="525"
        Name="Form1">
    <Grid x:Name="labelCost">
        <Label Content="Enter the miles traveled" HorizontalAlignment="Left" Margin="46,7,0,0" VerticalAlignment="Top"/>
        <TextBox x:Name="textMiles" HorizontalAlignment="Left" Height="23" Margin="227,11,0,0" TextWrapping="Wrap" VerticalAlignment="Top" Width="120"/>
        <Label Content="Enter the total gallons" HorizontalAlignment="Left" Margin="46,55,0,0" VerticalAlignment="Top"/>
        <TextBox x:Name="textGallons" HorizontalAlignment="Left" Height="23" Margin="227,55,0,0" TextWrapping="Wrap" VerticalAlignment="Top" Width="120"/>
        <Label Content="Enter the price per Gallon" HorizontalAlignment="Left" Margin="46,98,0,0" VerticalAlignment="Top"/>
        <TextBox x:Name="textPrice" HorizontalAlignment="Left" Height="23" Margin="227,98,0,0" TextWrapping="Wrap" VerticalAlignment="Top" Width="120"/>
        <Button x:Name="ButtonCalculate" Content="Calculate" HorizontalAlignment="Left" Margin="56,142,0,0" VerticalAlignment="Top" Width="75" Click="ButtonCalculate_Click"/>
        <Label Content="Your Mileage is" HorizontalAlignment="Left" Margin="46,181,0,0" VerticalAlignment="Top"/>
        <Label x:Name="labelMileage" Content="Label" HorizontalAlignment="Left" Margin="227,181,0,0" VerticalAlignment="Top" RenderTransformOrigin="0.474,-0.385"/>
        <Label Content="The cost per mile is" HorizontalAlignment="Left" Margin="46,212,0,0" VerticalAlignment="Top"/>
        <Label x:Name="labelCost1" Content="Label" HorizontalAlignment="Left" Margin="227,220,0,0" VerticalAlignment="Top" RenderTransformOrigin="-0.026,0.385"/>
        <Button x:Name="buttonClear" Content="Clear" HorizontalAlignment="Left" Margin="56,259,0,0" VerticalAlignment="Top" Width="75" Click="buttonClear_Click"/>
        <Button x:Name="buttonExit" Content="Exit" HorizontalAlignment="Left" Margin="156,259,0,0" VerticalAlignment="Top" Width="75" Click="buttonExit_Click"/>

    </Grid>
</Window>

Here is the code behind the form

using System;
using System.Collections.Generic;
using System.Linq;
using System.Text;
using System.Threading.Tasks;
using System.Windows;
using System.Windows.Controls;
using System.Windows.Data;
using System.Windows.Documents;
using System.Windows.Input;
using System.Windows.Media;
using System.Windows.Media.Imaging;
using System.Windows.Navigation;
using System.Windows.Shapes;

namespace MileageForm
{
    /// 
    /// Interaction logic for MainWindow.xaml
    /// this is the code behind the windows form
    /// 
    public partial class MainWindow : Window
    {
        public MainWindow()
        {
            //initilize the form--don't remove thos
            InitializeComponent();
        }

        private void ButtonCalculate_Click(object sender, RoutedEventArgs e)
        {

            //call the method to make sure the text boxes have content
            //they return true if there is a value missing
            bool good =CheckTextBoxes();
            //if there is a value missing stop the action
            //here
            if (good)
            {
                return;
            }
            //delcare a new instance of Mileage class
            Mileage m = new Mileage();
            //get inputs
            m.Distance = double.Parse(textMiles.Text);
            m.Gallons = double.Parse(textGallons.Text);
            m.PricePerGallon = double.Parse(textPrice.Text);
            //outputs
            labelMileage.Content = m.CalculateMileage().ToString();
            EvaluateMileage(m.CalculateMileage());
            labelCost1.Content= m.CalculatePricePerMile().ToString("C");

        }

        private void buttonClear_Click(object sender, RoutedEventArgs e)
        {
            //this method clears the textboxes and labels
            textMiles.Clear();
            textGallons.Clear();
            textPrice.Clear();
            labelCost1.Content="";
            labelMileage.Content = "";
            //resets the color to white
            Form1.Background = new SolidColorBrush(Colors.White);
            textMiles.Focus();
        }

        private void buttonExit_Click(object sender, RoutedEventArgs e)
        {
            //close the form
            this.Close();
            
        }

        private void EvaluateMileage(double mileage)
        {
            //this checks the mileage and returns a 
            //background color based on the value
            if (mileage > 35)
            {
                Form1.Background = new SolidColorBrush(Colors.Green);
            }
            else if (mileage > 25)
            {
                Form1.Background = new SolidColorBrush(Colors.Yellow);
            }
            else
            {
                Form1.Background = new SolidColorBrush(Colors.Red);
            }
        }

        private bool CheckTextBoxes()
        {
           //this method checks to make sure the form
            //textboxes have values
            if (textMiles.Text=="")
            {
                MessageBox.Show("Enter a valid mileage");
                return true;
            }
            if(textGallons.Text=="")
            {
                MessageBox.Show("Enter a valid Gallon amount");
               return true;
            }
            if (textPrice.Text == "")
            {
                MessageBox.Show("Enter a valid Price per Gallon");
                return true;
            }
            return false;
        }
    }
}

Here is a picture of the form in design

Wednesday, November 12, 2014

File Input and Output (Evening)

Here is the WriteFile class

using System;
using System.Collections.Generic;
using System.Linq;
using System.Text;
using System.Threading.Tasks;
using System.IO; //necessary for file creation
//and reading

namespace FileHandling
{
    class WriteFiles
    {
        /// <summary>
        /// This class writes a text file
        /// the constructor takes the path
        /// --the complete file name--
        /// and instantiates the StreamWriter
        /// object that writes the files
        /// </summary>
        private StreamWriter writer;
        public WriteFiles(string path)
        {
            //instantiate the SteamWriteObject
            //its constructor takes the path
            //the true means set the file to append
            //if it exists. If it doesn't exist it
            //will create the file
            //false would mean to write over
            //the file if it exists
            writer = new StreamWriter(path, true);
        }

        public void AddToFile(string line)
        {
            //this uses a method of the StreamWriter
            //that writes a line to the file
            writer.WriteLine(line);
        }

        public void CloseFile()
        {
            //this closes the file
            //if you don't close it
            //you will be unable to access
            //the file
            writer.Close();
        }
    }
}


Here is the ReadFile class

using System;
using System.Collections.Generic;
using System.Linq;
using System.Text;
using System.Threading.Tasks;
using System.IO;//nescessary for file IO

namespace FileHandling
{
    
    class ReadFile
    {
        /// <summary>
        /// this class reads text files.
        /// It takes the path to the file as a parameter
        /// in the constructor
        /// </summary>
        /// 
        private StreamReader reader;
        private string filePath;

        //constructor takes in the path
        //as parameter
        public ReadFile (string path)
        {
            filePath = path;
           
        }

        public string GetFile()
        {
            //this method gets the file and
            //reads it, returning a string
            string line = null;
            //when dealing with things like files
            //it is a good idea to use a try set
            //It is always possible that the file
            //is not at the specified path
            //or that it is unreadable
            try 
            {
                //get the file from the location
                //indicated by the path
                reader = new StreamReader(filePath);
                //read it all into a string
                //this is not very sophisticated
                //there are other ways to read the file
                line = reader.ReadToEnd();
            }
            catch (FileNotFoundException fnf)
            {
                //the FileNotFoundException is a pre built
                //exception for missing files
                //we throw the exception to the 
                //calling class for display
                throw fnf;
            }
            catch (Exception ex)
            {
                //this catch is for any other kind
                //of error
                throw ex;
            }
            return line;
        }
    }
}


Here is the Program class

using System;
using System.Collections.Generic;
using System.Linq;
using System.Text;
using System.Threading.Tasks;

namespace FileHandling
{
    class Program
    {
        /// <summary>
        /// I use this class to call the other classes
        /// The WriteStuff() method writes a file
        /// and the ReadStuff() method reads the
        /// file that was just written
        /// </summary>
        /// 
        static void Main(string[] args)
        {
            Program p = new Program();
            p.WriteStuff();
            p.ReadStuff();
           
            Console.ReadKey();
        }

        private void WriteStuff()
        {
            //instantiate WriteFiles and pass the path
            //to its constructor
            WriteFiles write = new WriteFiles(@"C:\temp\MyFile.txt");
            //write something to store in the file
            Console.WriteLine("Enter whatever");
            string stuff = Console.ReadLine();
            //pass what you write to the WriteFiles method AddToFile(string)
            write.AddToFile(stuff);
            //make sure to close the file
            write.CloseFile();
        }

        private void ReadStuff()
        {
            //this try catch will catch the errors
            //thrown by ReadFiles
            try
            { 
                //first we read the file. If it doesn't exist
                //it will throw a file not found exception
                ReadFile read = new ReadFile(@"C:\temp\MyFile.txt");
                //now we read the file into a string
                string myText = read.GetFile();
                //then we display the string
                Console.WriteLine(myText);
            }
            catch(Exception ex)
            {
                //this catches any error and displays
                //the error message
                Console.WriteLine(ex.Message);
                Console.ReadKey();
            }
        }
    }
}

SQL Examples

Use CommunityAssist
/*
this is a multiline comment
This is a basic SQL 
tutorial
*/
--these are simple selects
--the * is a wild card meaning list all columns
Select * From Person

--choose the columns to display
Select PersonLastName, PersonUserName From Person

--sort by lastname ascending
Select PersonLastName, PersonUserName From Person
order by PersonLastName;

--sort by last name descending and user name ascending
Select PersonLastName, PersonUserName From Person
order by PersonLastName desc, PersonUserName;

--this shows using math in the select clause
Select DonationAmount, DonationAmount+ 100 AS Added
From Donation
order by DonationAmount desc

--you can use these operators with numeric
--or date values
-- <, >, <=, >=, =, !=, <>, Not =
Select DonationDate, DonationAmount From Donation
Where DonationAmount < 100

--with AND
Select DonationDate, DonationAmount From Donation
Where DonationAmount > 100 and DonationAmount < 1000

--with Between
Select DonationDate, DonationAmount From Donation
Where DonationAmount between 100 and 1000

--Between with dates
Select DonationDate, DonationAmount From Donation
Where DonationDate between '9/1/2013' and '9/30/2013'

--OR
Select * from PersonAddress
Where City = 'Bellevue' or City = 'Redmond'

--Like with wildcard. % is for any number of characters
-- _ is for a single character
--the following returns all names starting with t
--and ending with r
Select PersonLastName from Person
Where PersonLastName like 'T%r'

--joining two tables also looking for not null values
--nulls must be addressed using is or is not
--you cannot use comparitive values (=, <, > etc) with nulls
Select PersonFirstName, PersonLastName, Street,Apartment, [State], City, Zip
From Person
inner join PersonAddress
on Person.PersonKey=PersonAddress.PersonKey
Where Apartment is not null

--insert into a table 
Insert into Person (PersonLastName, PersonFirstName)
Values ('Bender','Robot')

--inner joins always return matched values
--outer joins return unmatched values
Select PersonlastName, Street, Apartment, [State], City, Zip
From Person
left outer join PersonAddress
on Person.PersonKey = PersonAddress.Personkey
Where PersonAddress.Personkey is null

-- an inner join with multiple tables
Select PersonFirstName, PersonLastName, Street,Apartment, [State], City, Zip,
ContactInfo, contactTypeName
From Person
inner join PersonAddress
on Person.PersonKey=PersonAddress.PersonKey
inner Join PersonContact
on Person.Personkey=PersonContact.PersonKey
inner join ContactType
on ContactType.ContactTypeKey=PersonContact.ContactTypeKey
Where not City = 'Seattle'
Order by City

--insert. You can only insert into one table at a time
Insert into Person(PersonLastName, PersonFirstName, PersonUsername, 
PersonPlainPassword,PersonEntryDate)
Values ('Conger','Steve','steve@spconger.com','password',getDate())

--insert  the Ident_current function returns the last 
--autonumber generated in the table listed
--it only works with autonumbers
Insert into PersonAddress(Street, Apartment, State, City, Zip, PersonKey)
values('1701 Broadway',null,'Wa','Seattle','98122', IDENT_CURRENT('Person'))

--you can insert multiple rows at a time
--as long as they are in the same table
Insert into Person(PersonLastName, PersonFirstName)
Values('Flanders', 'Ned'),
('Clown','Krusty'),
('Simpson','Homer')

--updates change existing data
--they should always (almost always)
--have a where clause
--Update is the most dangerous
--command in SQL
Update PersonAddress
Set Apartment='3176b',
State='WA'
Where PersonKey=128


Select * From PersonAddress where PersonKey=128

--to be safe with updates and deletes
--you can manually set the beginning and
--ending of a transaction
--this locks the table for the duration
Begin tran

--will set every last name to smith
Update Person
Set PersonLastName='Smith'

Select * From Person

--rollback undoes the command
--commit writes it 
Rollback tran
commit tran

--Delete removes a row or rows from
--a table
--you cannot delete a row that has 
--children in another table
Delete from person
Where PersonKey =128

Thursday, November 6, 2014

Square Footage Class Examples (Morming)

Here is the SquareFootage class

using System;
using System.Collections.Generic;
using System.Linq;
using System.Text;
using System.Threading.Tasks;

namespace ClassExampleMorning
{
    class SquareFootage
    {
        /************************
         * this class calculates square footage and
         * the total cost of that footage
         * *****************************/


        //fields--class level variables that describe the object
        private double length;
        private double width;
        private double pricePerSquareFoot;

        //this is a default constructor
        //constructors initialize a class
        //setting default values for variables
        //and maybe calling a method
        public SquareFootage()
        {
            Length = 0;
            Width = 1;
            PricePerSquareFoot = 0;
        }

        //this is an overloaded constructor.
        //You can only initialize a class one way
        //but you can set up choices for how
        //to initialize the class
        //In this case you can pass the width and length
        //directly to the constructor
        public SquareFootage(double width, double length)
        {
            Width = width;
            Length = length;
            PricePerSquareFoot = 0;
        }

        //public properties
        //properties expose the private variables
        //to the world
        public double PricePerSquareFoot
        {
            //return lets another class see the value of the field
            get { return pricePerSquareFoot; }
            //set lets another class change the value of the field
            set { pricePerSquareFoot = value; }
        }


        public double Width
        {
            //you can do some validation in a property
            get { return width; }
            set { 
                if (value >0)
                { 
                width = value;
                }
                else
                {
                    //an exception is an error object
                    //here we make our own error with a message
                    Exception ex = new Exception("Must be greater than zero");
                    //we don't have a way to display it here
                    //so we throw it back to the class
                    //where it was called
                    throw ex;
                }
            }
        }
       

        //properties
        public double Length
        {
            get { return length; }
            set { length = value; }
        }

        //public methods
        //these are just methods 
        //just like any other method
        public double CalculateSquareFootage()
        {
            return Width * Length;
        }

        public double CalculateTotalCost()
        {
            return CalculateSquareFootage() * PricePerSquareFoot;
        }
    }
}


Here is the Display class

using System;
using System.Collections.Generic;
using System.Linq;
using System.Text;
using System.Threading.Tasks;

namespace ClassExampleMorning
{
    class Display
    {
        //Square footage is a class level field
        private SquareFootage sf;

        //the constructor calls the methods
        //for getting inputs and showing outputs
        public Display()
        {
            //I commented this to use the 
            //overloaded constructor in SquareFootage
            //sf = new SquareFootage();
            GetInputs();
            ShowOutputs();
        }

        private void GetInputs()
        {
            //I declare these two variables to
            //store the input, then I pass them
            //to SquareFootage through its 2nd constructor
            double w, l; 
            //the try "tries" all the code. If there is an error
            //it falls to the catch
            try
            {
                Console.WriteLine("Enter the Width");
                //sf.Width = double.Parse(Console.ReadLine());
                w = double.Parse(Console.ReadLine());
                Console.WriteLine("Enter the Length");
                //sf.Length = double.Parse(Console.ReadLine());
                l = double.Parse(Console.ReadLine());
                //initialize SquareFootage and pass it width and length
                sf = new SquareFootage(w, l);

                //but we use the property to assign
                //the value to PricePerSquareFoot
                Console.WriteLine("Enter the Price per square foot");
                sf.PricePerSquareFoot = double.Parse(Console.ReadLine());
            }
            catch(Exception ex)
            {
                //display the error message
                Console.WriteLine(ex.Message);
                Console.ReadKey();
            }
        }

        private void ShowOutputs()
        {
            //call the methods from squareFootage
            //and display the results
            Console.WriteLine("the Square footage is " +
                sf.CalculateSquareFootage());
            Console.WriteLine("the total cost is " +
                sf.CalculateTotalCost());
            Console.ReadKey();
        }

    }
}


Here is the Program class


using System;
using System.Collections.Generic;
using System.Linq;
using System.Text;
using System.Threading.Tasks;

namespace ClassExampleMorning
{
    class Program
    {
        static void Main(string[] args)
        {
            //this initilizes the Display class
            //and class the constructor
            //that calls the getInputs method
            Display d = new Display();
            
        }
    }


}