Showing posts with label ITC162. Show all posts

Monday, May 28, 2012

SQLIte Database Take Two

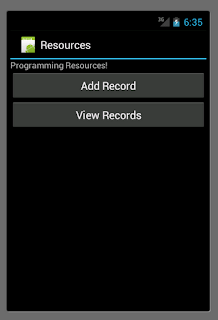
I wanted to redo the database in the simplest way possible to make things clearer. To do this I made a simple initial form with two buttons:

I still needed to create the sqlHelper class. But this time I only created a single table. Here is the code for the SqlHelperClass

package com.spconger.programmingresourcesdata;
import android.content.Context;
import android.database.sqlite.SQLiteDatabase;
import android.database.sqlite.SQLiteOpenHelper;


public class SqlHelperClass extends SQLiteOpenHelper{

 /*
  * This class extends SqlLiteOpenHelper
  * It creates the database and the tables
  * and sets static constants that are used
  * in the other classes
  */
 
 //set database as priiate constatn
 private static final String DATABASE_NAME = "ProgramResources.db";
 private static final int DATABASE_VERSION = 1;
 
 //public constants
 //database table
 public static final String TABLE_NAME="Book";
 
 //columns
 public static final String BOOK_ID="bookId";
 public static final String BOOK_TITLE="title";
 public static final String BOOK_AUTHOR="author";
 public static final String BOOK_RATING="Rating";
 
 //required constructor
 //takes the contest which is usually the current 
 //activity, it also passes the database name and
 //version to the super class
 public SqlHelperClass(Context context) {
  super(context, DATABASE_NAME, null, DATABASE_VERSION);
  // TODO Auto-generated constructor stub
 }

 @Override
 public void onCreate(SQLiteDatabase db) {
  // here we create the table
  String sql_Book="CREATE TABLE " + TABLE_NAME
  +"(" + BOOK_ID + " integer primary key autoincrement, " 
  + BOOK_TITLE + " text not null, "
  + BOOK_AUTHOR + " text not null, "
  + BOOK_RATING + " int, "
  + "unique (" +BOOK_TITLE + "))";
  
  //add the table to the database
  db.execSQL(sql_Book);
 }

 @Override
 public void onUpgrade(SQLiteDatabase db, int oldVersion, int newVersion) {
  //You should put code here to handle new versions of the database
  
 }

}


Here is the form for adding records


The java behind this form is fairly straight forward. I just initialize a writable database, get the values from the EditText controls and insert them into the database

package com.spconger.programmingresourcesdata;


import android.app.Activity;
import android.content.ContentValues;
import android.database.sqlite.SQLiteDatabase;
import android.os.Bundle;
import android.view.View;
import android.widget.Button;
import android.widget.EditText;
import android.widget.Toast;

public class AddRecordsActivity extends Activity{
 /*
  * This activity adds records to the database. 
  * I purposefully kept this simple
  * not breaking it into too many methods
  * Consequently the AddRecord method does 
  * more than it probably should
  */
 EditText txtTitle;
 EditText txtAuthor;
 EditText txtRating;
 Button btnSave;
 
 @Override
 protected void onCreate(Bundle savedInstanceState) {
  // TODO Auto-generated method stub
  super.onCreate(savedInstanceState);
  setContentView(R.layout.addrecords);
  
  btnSave = (Button)findViewById(R.id.button1);
  btnSave.setOnClickListener(new AddRecordListener());
 }
 
 private class AddRecordListener implements View.OnClickListener{

  @Override
  public void onClick(View v) {
   
   //get database
   SqlHelperClass sqlHelper = new SqlHelperClass(AddRecordsActivity.this);
   SQLiteDatabase db= sqlHelper.getWritableDatabase();
   
   //get the values from the EditText controls
   
   txtTitle = (EditText)findViewById(R.id.editTextTitle);
   String title=txtTitle.getText().toString();
   
   txtAuthor=(EditText)findViewById(R.id.editTextAuthor);
   String author=txtAuthor.getText().toString();
   
   txtRating = (EditText)findViewById(R.id.editTextRating);
   String ratingString=txtRating.getText().toString();
   int rating=Integer.parseInt(ratingString);
   
   //add the values from the EditViews to the columns
   ContentValues values = new ContentValues();
   values.put(SqlHelperClass.BOOK_TITLE,title);
   values.put(SqlHelperClass.BOOK_AUTHOR, author);
   values.put(SqlHelperClass.BOOK_RATING, rating);
   
   
   //Insert into the database
   long book_id= db.insert(SqlHelperClass.TABLE_NAME, null, values);
   db.close();
   
   //if the insert is successful
   if(book_id != -1)
   {
    //start a toast (a message)
    Toast toast = Toast.makeText
       (AddRecordsActivity.this, "Record Added", Toast.LENGTH_LONG);
    toast.show();
   }
   else
   {
    Toast toast = Toast.makeText
      (AddRecordsActivity.this, "Record failed to Insert", Toast.LENGTH_LONG);
             toast.show();
   }
            
   //clear for next record
            clearForm();
   
   
   }
   
  }
  
  private void clearForm()
  {
   txtTitle.setText("");
   txtAuthor.setText("");
   txtRating.setText("");
  }
  }
  

finally we just view the records. I didn't do anything fancy. I created a cursor to look through the records and appended them to a string that terminates with a new line character. Then I set the resulting text to the ViewText. Here is the codeL

package com.spconger.programmingresourcesdata;

import android.app.Activity;
import android.database.Cursor;
import android.database.sqlite.SQLiteDatabase;
import android.os.Bundle;
import android.widget.TextView;


public class ViewRecordsActivity extends Activity{
 
 /*
  * Again, to make this simple, the getRecords method
  * does more than one record should do
  * 
  */
 @Override
  protected void onCreate(Bundle savedInstanceState) {
 // TODO Auto-generated method stub
 super.onCreate(savedInstanceState);
 setContentView(R.layout.viewrecords);
 
 getRecords();
 }
 
 private void getRecords(){
  
  //initiate the SqlHeperClass and get the database
  SqlHelperClass sqlHelper = new SqlHelperClass(ViewRecordsActivity.this);
  SQLiteDatabase db= sqlHelper.getWritableDatabase();
  
  //create an array of the columns
  String[] columns = new String[] 
         {sqlHelper.BOOK_TITLE, 
    sqlHelper.BOOK_AUTHOR, 
    sqlHelper.BOOK_RATING};
  
  //start a cursor to move through the records
  Cursor cursor = db.query(sqlHelper.TABLE_NAME, columns, null, null, null, null, null);
  
  String result="";
  //use the cursor to loop through the records
  for(cursor.moveToFirst();!cursor.isAfterLast();cursor.moveToNext()){
   //I am just concatenating the records into a string
   //terminated by a line break
   result+= cursor.getString(0) + ", " + cursor.getString(1) + "--" + cursor.getInt(2) + "\n" ;
  }
  
  //assign the result to the textview
  TextView content=(TextView)findViewById(R.id.content_list);
  content.setText(result);
 }
}

Here is the the activity running
Wednesday, May 23, 2012

ITC 162 Project

I am going to make the requirements for this minimal, given how little of the quarter is left.

The project should involve multiple activities and multiple java classes. Other than that, all I really want to see is your attempts to explore Android.

If design is your interest, you can spend the time working with the android's controls and resources, or, if programming is more your interest, see about adding some functionality, maybe consuming services on the phone or from the cloud.

You can work on these alone or in groups

I would like for groups or individuals to present what they have done on Monday of finals week

Sunday, May 20, 2012

Android Assignment 3 (assignment 6)

The goal of this assignment is to create a database with two tables, a recipe table and an ingredients table.

The Recipe Table should have a
RecipeID which is an autonumber
RecipeName which is String
RecipeDescription also String

The Ingredient Table should have
RecipeID as a foreign key
IngredientName as String

The structure is essentially identical to the CD/Tracks structure

The app should work like the example. the first activity should list the available recipes. When one is clicked on a second activity that shows all the ingredients should open. Also on the first activity there should be a button or a clickable text that takes you to an activity to insert a new recipe.

For an extra challenge you can try to add edit and delete buttons on the detail activity to further manage the records.

SQLLite Database in Android

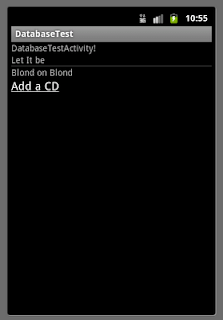
This is fairly complex for what is really a simple thing. This example creates a database to store CDs and Tracks. The main form shows you what CDs are in the database. If you tap (or in the emulator click) on a CD it takes you to the detail view where you can see the CD title, artist and all the tracks. Also at the bottom of the main form is a clickable TextView that takes you to an Activity where you can input a new Cd and tracks.

You can get the complete project in a zip file here

Here are screen shots of the views:

the main view with some data already in the database


here is a view of the detail screen


And here is the input screen


Creating the Database

The first thing you need to do is create the database and the tables. The best way to do this is to use a SQLHelper class which extends SQLLiteOpenHelper. Here is the code for my class


package com.spconger.databasetest;

import android.content.Context;
import android.database.sqlite.SQLiteDatabase;
import android.database.sqlite.SQLiteOpenHelper;

public class SQLHelper extends SQLiteOpenHelper{
/*
 * this class creates the database and its tables. it 
 * extends the SQLiteOpenHelper class
 * which give access to the sql lite database
 */
 
 //create the database
 private static final String DATABASE_NAME = "Cds.db";
 private static final int DATABASE_VERSION = 1;

 // Table name
 public static final String CD_TABLE = "CD";
 public static final String TRACK_TABLE = "Tracks";
 
 // CD Table columns
 public static final String CD_TITLE = "CDTitle";
 public static final String CD_ARTIST = "Artist";
 
 //Track table columns
 public static final String CD_ID="CdId";
 public static final String TRACK_TITLE = "TrackTitle";
 
 
 //required constructor
 public SQLHelper(Context context) {
  super(context, DATABASE_NAME, null, DATABASE_VERSION);
  // TODO Auto-generated constructor stub
 }

 @Override
 public void onCreate(SQLiteDatabase db) {
  // create the CD table
  String sql_CD = "create table " + CD_TABLE + "( " + 
  CD_ID + " integer primary key autoincrement, " +
  CD_TITLE + " text not null, " + 
  CD_ARTIST + " text not null, " + 
  "unique (" + CD_TITLE + "))";

db.execSQL(sql_CD); //add to the database

//create the Track table
String sql_Track = "create table " + TRACK_TABLE + "( " +  
CD_ID + " integer, " + 
TRACK_TITLE + " text not null, " + 
"foreign key (" + CD_ID+ ") references " + CD_TABLE + "(_id));";

db.execSQL(sql_Track);
  
 }

 @Override
 public void onUpgrade(SQLiteDatabase db, int oldVersion, int newVersion) {
  // this method is used to save data, drop and recreate tables when
  //the database software is upgraded
  
 }

}


The Android App

To work with the database, we create a CD class to store CD and track information. The tracks are stored in a listArray. the fields are entered at the constructor, and each has a get accessor. There is a method to add tracks to the arraylist, and a method that loops through the array list and writes all the tracks to the a string with line breaks after each track. I will not display that class here, but it is available in the zip file.

In the main activity, We make contact with the database and read all the data into a listarray of CDs. Then we display the titles on the screen. Here is the code to do that. It is a lot of code


 private void initPatientList()
 {
     //initialize the list view
  cdListView = (ListView) findViewById(R.id.CdListView);
  cds = new ArrayList<CD>();
  
  //link to the database
  SQLHelper sqlHelper = new SQLHelper(DatabaseTestActivity.this);
  SQLiteDatabase db = sqlHelper.getWritableDatabase();           
  
  //create a cursor to move through the data
        Cursor cdCursor = db.query(SQLHelper.CD_TABLE, 
          new String[] {"*"}, "", null, null, null, null);
        
        int cdId = -1;
        CD cd; //create an instance of the CD class
        
        //cycle through each row of data
  while(cdCursor.moveToNext())
  {
   cdId = cdCursor.getInt(0);
     
   if(cdId != -1)
   {
    //if there are cds add the title and artist to the object
    cd = new CD(cdId, cdCursor.getString(1), cdCursor.getString(2));
    
    //add the tracks
    Cursor trackCursor = db.query(SQLHelper.TRACK_TABLE, 
            new String[] {SQLHelper.TRACK_TITLE}, SQLHelper.CD_ID + " = " + cdId, 
            null, null, null, null);
    
          //cycle through each row
    while(trackCursor.moveToNext())
    {
     cd.AddTracks(trackCursor.getString(0));
    }
    
    cds.add(cd); //add the CD to a list of Cds
   }
  }
  
  if (cds.size() > 0) 
  {
   //add the cds to the list view
   CdAdapter cdAdapter = new CdAdapter(this, R.layout.cd_row, cds);
   cdListView.setAdapter(cdAdapter);
   
   //each time a cd row is clicked we will bring up the CDDetail activity
   //to see all of the CD data
   cdListView.setOnItemClickListener(new PatientItemClickListener());
  }
 }
     
 //set up the add record label to be underlined
    private void initAddRecordTextView()
    {
     String addRecordText = this.getString(R.string.add_record);
     SpannableString contentUnderline = new SpannableString(addRecordText);
     contentUnderline.setSpan(new UnderlineSpan(), 0, contentUnderline.length(), 0);
     
     TextView addRecordTV = (TextView)findViewById(R.id.txtView_addRecord);
     addRecordTV.setText(contentUnderline);
     
     addRecordTV.setOnClickListener(new AddRecordListener());
    }
    
    /*
     * when the Add Record link is clcked then go to the add patient screen
     */
    private class AddRecordListener implements View.OnClickListener
    {

  @Override
  public void onClick(View v)
  {
   startActivity(new Intent(DatabaseTestActivity.this, AddRecordActivity.class));
  }
     
    }
    
    /*
     * Adds each CD from the array of patients into the adapter. 
     * Applyng the Cd_row layout file to each of them
     */
    private class CdAdapter extends ArrayAdapter 
    {
     public CdAdapter(Context context, int textViewResourceId, ArrayList cds) 
     {
   super(context, textViewResourceId, cds);
  }
     
     @Override
  public View getView(int position, View convertView, ViewGroup parent) 
     {
      if (convertView == null) 
      {
    LayoutInflater mInflater = (LayoutInflater) getSystemService(Context.LAYOUT_INFLATER_SERVICE);
    convertView = mInflater.inflate(R.layout.cd_row, null);
   }
      
      final CD cd = getItem(position);
      
      if(cd != null)
      {
       TextView nameTV = (TextView) convertView.findViewById(R.id.TextView_Name);
       nameTV.setText(cd.getCdTitle());
      }
      
      return convertView;
     }
    }
    

In addition there is an ActionListener which bundles of all the content of cd that is clicked on and opens the detail view


private class PatientItemClickListener implements OnItemClickListener
    {

  @Override
  public void onItemClick(AdapterView adapter, View view, int position,long id)
  {
   CD cd = cds.get(position);
   Intent cdIntent = new Intent(DatabaseTestActivity.this, CDDetail.class);
   cdIntent.putExtra("cdId", cd.getID());
   cdIntent.putExtra("cdTitle", cd.getCdTitle());
   cdIntent.putExtra("cdArtist", cd.getCdArtist());
   cdIntent.putExtra("cdTracks", cd.getTracks());
   
   startActivity(cdIntent);
  }
     
    }

in the detail view we take the CD object that was sent across in the bundle and display the information


import android.app.Activity;
import android.os.Bundle;
import android.widget.TextView;

public class CDDetail extends Activity {
 /*
  * This class takes a cd sent from the main
  * activity and displays all its data
  */
 
 private int cdId;
 private String title;
 private String artist;
 private String tracks;
 @Override
 protected void onCreate(Bundle savedInstanceState) {
  // TODO Auto-generated method stub
  super.onCreate(savedInstanceState);
  setContentView(R.layout.cd_detail);
  
  Bundle extra = getIntent().getExtras();
  initFormData(extra);
 }
 private void initFormData(Bundle extra)
 {
  if (extra != null) 
  { 
   cdId = extra.getInt("cdId");
      title = extra.getString("cdTitle");
      artist = extra.getString("cdArtist");
      
      tracks = extra.getString("cdTracks");
   
   
      initView(title, R.id.textView_cdTitle);
   initView(artist, R.id.textView_cdArtist);
   initView(tracks, R.id.textView_cdTracks);
  }
 }
 
 /*
  * Initilaize a text view with the data
  */
 private void initView(String patientData, int textViewName)
 {
  TextView PatientDataTV = (TextView)findViewById(textViewName);
  PatientDataTV.setText(patientData);
 }

}

Finally we will look at the Input form. Here is the code that inserts into the database


package com.spconger.databasetest;


import android.app.Activity;
import android.content.ContentValues;
import android.database.sqlite.SQLiteDatabase;
import android.os.Bundle;
import android.view.View;
import android.widget.Button;
import android.widget.EditText;
import android.widget.TextView;
import android.widget.Toast;

public class AddRecordActivity extends Activity{

 @Override
 protected void onCreate(Bundle savedInstanceState) {
  // TODO Auto-generated method stub
  super.onCreate(savedInstanceState);
  setContentView(R.layout.add_record_layout);
  
  Button saveButton = (Button)findViewById(R.id.button1);
  saveButton.setOnClickListener(new SaveClickListener());
  
 }
 private class SaveClickListener implements View.OnClickListener
    {
     public void onClick(View v) 
     { 
      String cdTitle = showHideNameError(R.id.editTextTitle, R.id.title_error);
      String artist = showHideNameError(R.id.editTextArtist, R.id.artist_error);
      
         if( cdTitle == null || artist == null)
         {
          Toast errorEntry = Toast.makeText(AddRecordActivity.this, 
            "Settings were entered incorectly", Toast.LENGTH_LONG);
          errorEntry.show();
         }
         else
         {
          SQLHelper sqlHelper = new SQLHelper(AddRecordActivity.this);
          SQLiteDatabase db = sqlHelper.getWritableDatabase();
          
          long cdId = addCDToDB(sqlHelper, db, cdTitle, artist);
          
                if( cdId != -1)
                {
                 if(addAlergiesToDB(sqlHelper, db, cdId))
                 {
                  Toast successEntry = Toast.makeText(AddRecordActivity.this, 
              "CD successfully added", Toast.LENGTH_LONG);
            successEntry.show();
                 }
                }
               
         }
        }
    }
  
 /*
  * Will test if the entry is empty
  * if so it will display an error and if not it will clear the error
  */
 private String showHideNameError(int editTextId, int errorTextViewId)
    {
     EditText nameBox = (EditText)findViewById(editTextId);
     String name = nameBox.getText().toString().trim();
     
     TextView nameError = (TextView)findViewById(errorTextViewId);
     
     if(name.length() <= 0)
     {
      /* show error if the name isn't at least 3 characters */
      nameError.setText(R.string.error_blank);
      return null;
     }
     else
     {
      /* clear error if the name isn't at least 3 characters */
      nameError.setText("");
      return name;
     } 
    }
 
 
 /*
  * Adds the specified patient to the database
  * returns the patient id if the entry was entered correctly
  * returns -1 if the patient wasn't successfully entered into the db
  */
 private long addCDToDB(SQLHelper sqlHelper, SQLiteDatabase db, String title, String artist)
 {
  ContentValues values = new ContentValues();
        values.put(SQLHelper.CD_TITLE, title);
        values.put(SQLHelper.CD_ARTIST, artist);
        
        long cdId = db.insert(SQLHelper.CD_TABLE, null, values);
        
        if(cdId == -1)
        {   
         Toast toast = Toast.makeText(AddRecordActivity.this, "Error adding user to db" , Toast.LENGTH_LONG);
            toast.show();
            sqlHelper.close();
            return -1;
        }
        
        return cdId;
 }
 
 /*
  * Splits up the Tracs each one having it's own line,
  * then adds each entry to the db
  * returns true if they were successfully entered and false otherwise
  */
 private boolean addAlergiesToDB(SQLHelper sqlHelper, SQLiteDatabase db, long cdId)
 {
  ContentValues values = new ContentValues();
  
  EditText trackBox = (EditText)findViewById(R.id.editTextTracks);
  String trackText = trackBox.getText().toString().trim();
  
  if(trackText == "")
  {
   return true; //successfully added nothing
  }
  
  String[] trackItems = trackText.split("\n");
  
  for(int i= 0 ; i<trackItems.length; i++)
  {
   values.put(SQLHelper.CD_ID, cdId);
         values.put(SQLHelper.TRACK_TITLE, trackItems[i]);
         long id = db.insert(SQLHelper.TRACK_TABLE, null, values);
         
         if(id == -1)
         {
          Toast toast = Toast.makeText(AddRecordActivity.this, "Failure during insert", Toast.LENGTH_LONG);
             toast.show();
             return false;
         }
  }
  
  return true;
 }
}

Sunday, May 13, 2012

File reading example

This example shows how to read text and xml resource files. It has 3 activities, a main one that has two buttons, a second one that reads a text file into a TextView control and a third one that reads an XML file into a TableLayout. The app provides a brief overview of the Doctor Who show and a list of all the doctors.

I am not going to show all the code, but you can download a zip file of the whole project here.

The text file is stored in a new folder under res called "raw". For the xml file I added a new folder called "xml" also under res.

Here is a complete expanded view of the project directory


First we will look at the text file. The Activity consists of just a TextView nested in a ScrollView

<?xml version="1.0" encoding="utf-8"?>

  
    <ScrollView xmlns:android="http://schemas.android.com/apk/res/android"
        android:layout_width="fill_parent"
        android:layout_height="fill_parent"
        android:scrollbars="vertical">

    <TextView
        android:id="@+id/txtContent"
        android:layout_width="wrap_content"
        android:layout_height="wrap_content"
        android:textAppearance="?android:attr/textAppearanceMedium" />
    
    </ScrollView>

Here is the Java code for the activity that reads the text file named overview.txt

package com.spconger.doctorwho;

import java.io.DataInputStream;
import java.io.IOException;
import java.io.InputStream;
import android.util.*;
import android.app.Activity;
import android.os.Bundle;
import android.widget.TextView;

public class OverViewActivity extends Activity{

 @Override
 protected void onCreate(Bundle savedInstanceState) {
  // TODO Auto-generated method stub
  super.onCreate(savedInstanceState);
  setContentView(R.layout.overview);
  
  fillOverView();


 }
 
 private void fillOverView(){
  
  try{
   //create an Input stream to read the file
  InputStream overviewFile = getResources().openRawResource(R.raw.overview);
  //assign it to a string the method is down below
  String overviewData=inputStreamToString(overviewFile);
  
  //get the TextView
  TextView txtOverview=(TextView)findViewById(R.id.txtContent);
  //set the text
  txtOverview.setText(overviewData);
  
  }
  catch(IOException e)
  {
   Log.e("DEBUG","InputStreamToString failure");
  }


 }
 
 private String inputStreamToString(InputStream is) throws IOException{
  //create a buffer
  StringBuffer sBuffer = new StringBuffer();
  DataInputStream dataIO = new DataInputStream(is);
  String strLine=null;
  
  while((strLine=dataIO.readLine()) != null){
   sBuffer.append(strLine + "\n");
   
  }
  dataIO.close();
  is.close();
  return sBuffer.toString();
 }

}

The xml file is called "doctorlist.xml" and follows this pattern:

\
<?xml version="1.0" encoding="UTF-8"?>
<doctors>
<doctor
 number="First"
 name="William Hartnell"
 tenure="1963-1966" />

...

</doctors>

The xml is read into a TableLayout. Here is the xml of the Activity

<?xml version="1.0" encoding="utf-8"?>

    
   <ScrollView xmlns:android="http://schemas.android.com/apk/res/android"
        android:layout_width="fill_parent"
        android:layout_height="fill_parent"
        android:scrollbars="vertical">
        
       <TableLayout
           android:id="@+id/tableLayout_doctors"
           android:layout_width="fill_parent"
           android:layout_height="wrap_content"
           android:stretchColumns="*" />
      
       
   </ScrollView>

here is the java code for the activity that reads the xml

package com.spconger.doctorwho;

import android.app.Activity;
import android.os.Bundle;
import android.util.*;
import android.widget.TableLayout;
import android.widget.TableRow;
import android.widget.TextView;
import android.content.Intent;
import android.content.res.XmlResourceParser;
import org.xmlpull.v1.XmlPullParserException;
import java.io.*;

public class DoctorActivity extends Activity {
 
 @Override
 protected void onCreate(Bundle savedInstanceState) {
  // TODO Auto-generated method stub
  super.onCreate(savedInstanceState);
  setContentView(R.layout.doctors);
  try
  {
   getDoctors();
  }
  catch(Exception e){
   Log.e("DEBUG", "Failed to load Doctors",e);
  }
 }

 private void getDoctors()throws XmlPullParserException, IOException{
  TableLayout doctorTable=(TableLayout)findViewById(R.id.tableLayout_doctors);
  
  XmlResourceParser doctorsXML=getResources().getXml(R.xml.doctorlist);
  
  int eventType=-1;
  
  while (eventType != XmlResourceParser.END_DOCUMENT){
   if (eventType==XmlResourceParser.START_TAG){
    String strName=doctorsXML.getName();
    
    if (strName.equals("doctor")){
     String doctorNumber=doctorsXML.getAttributeValue(null,"number");
     String doctorName=doctorsXML.getAttributeValue(null,"name");
     String doctorTenure=doctorsXML.getAttributeValue(null,"tenure");
     insertDoctorRow(doctorTable, doctorNumber, doctorName, doctorTenure);
    }
   }
   eventType=doctorsXML.next();
  }
  
 }
 
 private void insertDoctorRow(final TableLayout doctorTable, 
               String doctorNumber, String doctorName, String doctorTenure){
     
  final TableRow newRow=new TableRow(this);
  addTextToRowWithValues(newRow, doctorNumber);
  addTextToRowWithValues(newRow, doctorName);
  addTextToRowWithValues(newRow, doctorTenure);
  
  doctorTable.addView(newRow);
 }
 
 private void addTextToRowWithValues(final TableRow tableRow, String text){
  TextView textView = new TextView(this);
  textView.setText(text);
  tableRow.addView(textView);
 }
 
 @Override
 public void onStop(){
  super.onStop();
 }
}


Here are pictures of the activities when executed

Assignment five

For this assignment we are going to create a little promotional app for a coffee shop. The assignment will cover using multiple activities and reading text and XML files.

The first activity will be an introduction, it might have a picture or a logo. How you design it is up to you. One thing it should have is two buttons, one that opens an activity that describes the coffee shop. This description should be in the form of a text file. This file should be stored in a folder under res called raw. You can use your imagination for the content of the file.

The other activity should contain a list of coffee products, sizes and products. These should be read from a file called coffee.xml stored in a folder under res called xml.
The XML file should have a structure like this:


<?xml version="1.0" encoding="utf-8"?>
<coffees>
<coffee
name="expresso"
size="2 ounces"
Price="1.50"/>


</coffees>


You can add as many drinks as you like, but should have at least five.

A sample resembling this will be posted soon.


Sunday, April 29, 2012

Android: Passing Values Between Activities with Bundle

This example uses the same layout as the previous example which shows how to open a second activity. There only difference in the layout is that I added two TextView controls to the Confirm.xml.

I am not going to repeat all the code and layout of the previous example. I am only going to focus on the code where it changes.

To transfer the values from the EditText controls on the first activity, I added a Bundle object. A Bundle object is essentially a hash control that stores key value pairs. I create the bundle in the first Activity, in the private class which implements the onClick event. I create the bundle, then add the values using the putString() method. Finally, I must declare and instantiate the new Activity differently than I did before in order to add the bundle with the putExtras() method

Here is the modified code:


 private class ConfirmClickListener implements View.OnClickListener{
     
     public void onClick(View v){
      //get the Edit text controls and their text value
      EditText nameText=(EditText)findViewById(R.id.editTextName);
      String fullName=nameText.getText().toString();
      
      EditText emailText=(EditText)findViewById(R.id.editTextEmail);
      String email=emailText.getText().toString();
      
      //create a bundle object to store the values
      Bundle bundle = new Bundle();
      //assign the values (key, value pairs)
      bundle.putString("name", fullName);
      bundle.putString("email", email);
      
      //create the intent
      //this is different than we did it before
      Intent i = new Intent(MultiActivityExampleActivity.this, Confirmation.class);
      //assign the bundle to the intent
      i.putExtras(bundle);
      //start the new activity
      startActivity(i);
     }
    }

Now here is the code on the Confirmation side. It declares a Bundle object and assigns its value from the getExtras() method. It extracts the values using the keys and then assigns them the TextView.


 public void onCreate(Bundle savedInstanceState){
  super.onCreate(savedInstanceState);
  setContentView(R.layout.confirm);
  
  //create a bundle object to store
  //the bundle we added to the intent
  Bundle bundle=getIntent().getExtras();
  
  //get the values out by key
  String name=bundle.getString("name");
  String email=bundle.getString("email");
  
  //get the textview controls
  TextView txtName=(TextView)findViewById(R.id.textView2);
  TextView txtEmail=(TextView)findViewById(R.id.textView3);
  
  //set the text values of the text controls
  txtName.setText(name);
  txtEmail.setText(email);
  
 }

Now when you click on the comfirm button it passes the values from the first Activity to the second

Saturday, April 28, 2012

Android Multi-Activities One

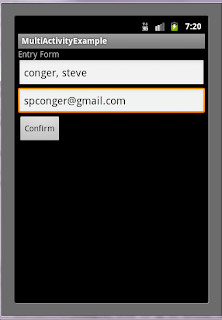
Start a new Android project. For this demonstration we will use simple activities. The first one just takes a name and an email address in EditText boxes and a button. The second one for now will just have a ViewText that says "Thank you."

Here is the XML for first Activity


Main.xml

<?xml version="1.0" encoding="utf-8"?>
<LinearLayout xmlns:android=
     "http://schemas.android.com/apk/res/android"
    android:layout_width="fill_parent"
    android:layout_height="fill_parent"
    android:orientation="vertical" >

    <TextView
        android:layout_width="fill_parent"
        android:layout_height="wrap_content"
        android:text="@string/hello" />

    <EditText
        android:id="@+id/editTextName"
        android:layout_width="match_parent"
        android:layout_height="wrap_content"
        android:inputType="textPersonName" 
        android:hint="Last Name, First Name">

        <requestFocus />

    </EditText>

    <EditText
        android:id="@+id/editTextEmail"
        android:layout_width="match_parent"
        android:layout_height="wrap_content"
        android:inputType="textEmailAddress" 
        android:hint="Email"/>

    <Button
        android:id="@+id/button1"
        android:layout_width="wrap_content"
        android:layout_height="wrap_content"
        android:text="@string/buttonText" />

</LinearLayout>

here is the code for the strings resource

<?xml version="1.0" encoding="utf-8"?>
<resources>

    <string name="hello">Entry Form</string>
    <string name="app_name">MultiActivityExample</string>
    <string name="buttonText">Confirm</string>
    <string name="thankyou">Thank You</string>

</resources>

Here is the code for the main activity MultiActivityExampleActivity.java

package com.spconger.multiactivityexample;

import android.app.Activity;
import android.content.Intent;
import android.os.Bundle;
import android.view.View;


public class MultiActivityExampleActivity extends Activity {
    /** Called when the activity is first created. */
    @Override
    public void onCreate(Bundle savedInstanceState) {
        super.onCreate(savedInstanceState);
        setContentView(R.layout.main);
        
        
    }
}

Here is the first activity running

Now that we have the first activity set up, we will add another. Here is the XML for the second activity.

Confirm.xml

<?xml version="1.0" encoding="utf-8"?>
<LinearLayout xmlns:android="http://schemas.android.com/apk/res/android"
    android:layout_width="match_parent"
    android:layout_height="match_parent"
    android:orientation="vertical" >

    <TextView
        android:id="@+id/textView1"
        android:layout_width="wrap_content"
        android:layout_height="wrap_content"
        android:text="@string/thankyou"
        android:textAppearance="?android:attr/textAppearanceMedium" />

    <TextView
        android:id="@+id/textView2"
        android:layout_width="wrap_content"
        android:layout_height="wrap_content"
        android:textAppearance="?android:attr/textAppearanceMedium" />

</LinearLayout>

Now we will add a new class. It should have a superclass of android.app.Activity and it should inherit abstract methods

here is the code for the new Activity


package com.spconger.multiactivityexample;

import android.app.Activity;
import android.os.Bundle;

public class Confirmation extends Activity {
 
 @Override
 public void onCreate(Bundle savedInstanceState){
  super.onCreate(savedInstanceState);
  setContentView(R.layout.confirm);

}


Now we have to modify the Manifest file. Modify the xml so it looks like this:

<?xml version="1.0" encoding="utf-8"?>
<manifest xmlns:android="http://schemas.android.com/apk/res/android"
    package="com.spconger.multiactivityexample"
    android:versionCode="1"
    android:versionName="1.0" >

    <uses-sdk android:minSdkVersion="8" />

    <application
        android:icon="@drawable/ic_launcher"
        android:label="@string/app_name" >
        <activity
            android:name=".MultiActivityExampleActivity"
            android:label="@string/app_name" >
            <intent-filter>
                <action android:name="android.intent.action.MAIN" />

                <category android:name="android.intent.category.LAUNCHER" />
            </intent-filter>
        </activity>
        <!-- add this for new activity -->
        <activity android:name="Confirmation"></activity>
    </application>

</manifest>

Now when you press the button you should get the second activity


Monday, April 23, 2012

Android Object Model

This image comes from the Android development web site( http://www.android.org ). It depicts the basic Android Object model.


Android runs on a Linux kernel. Android is Java and runs on a specially taylored Java run time virtual machine called "Dalvik"

Above that are the basic Android libraries that tie into graphics libraries and sql lite among other things.

Next is the application Framework which provides the APIs for Android application development

Android applications ride on the top most layer

Wednesday, April 18, 2012

Refactoring Example Class

Refactoring

Refactoring refers to the process of rearranging code to make it more elegant and efficient. These rearrangements do not affect the function of the code, but make it more readable and maintainable

Refactoring can involve any of the following activities

1. Renaming variables
2. Encapsulating Fields in sets and gets
3. Extracting methods (taking repeating code putting it in its own method)
4. Extracting an interface
5. Extracting classes (breaking code into new separate classes)
6. Extracting super classes<

Here is a picture of the class diagram for the class


here is the code for a class we will practice refactoring in class


public class Tip {
/*
 * Assume the programmer wanted to expand the tip class
 * to handle tips for things other than a meal 
 * such as taxis and valet parking
 * For taxis the suggested tip is a percent of the
 * meter cost plus a dollar per bag
 * For the valet parking it is a little looser
 * based on the expense or quality of the venue and the
 * expensiveness of your car
 * The programmer has adapted the one class to handle the 
 * different types of tips
 */
 
 private double mealAmount;
 private double tipPercent;
 private double taxPercent;
 private double cabFare;
 private int bags;
 private int eventRating; //1 to 5 five most expensive
 private int vehicleValue; //(1 to 5);
 private final double CABPERCENT =.07;
 //*************************************************
 //Constructors for the various uses
 //**************************************************
 //empty constructor
 public Tip(){
  
 }
 //Meal tip constructor
 public Tip(double meal, double tipPerc, double tax){
  setMealAmount(meal);
  setTipPercent(tipPerc);
  setTaxPercent(tax);
 }
 
 //constructor for taxis
 public Tip(double fare, int bags){
  setCabFare(fare);
  setBags(bags);
 }
 
 //constructor for Valet
 public Tip(int event, int vehicle){
  setEventRating(event);
  setVehicleValue(vehicle);
 }
 
 //*********************************************
 //gets and sets
 //*********************************************
 public double getMealAmount() {
  return mealAmount;
 }
 public void setMealAmount(double mealAmount) {
  this.mealAmount = mealAmount;
 }
 public double getTipPercent() {
  return tipPercent;
 }
 public void setTipPercent(double tipPercent) {
  if(tipPercent >=1){
   tipPercent /= 100;
  }
  this.tipPercent = tipPercent;
 }
 public double getTaxPercent() {
  
  return taxPercent;
 }
 public void setTaxPercent(double taxPercent) {
  if(taxPercent >=1){
   taxPercent /= 100;
  }
  this.taxPercent = taxPercent;
 }
 public double getCabFare() {
  return cabFare;
 }
 public void setCabFare(double cabFare) {
  this.cabFare = cabFare;
 }
 public int getBags() {
  return bags;
 }
 public void setBags(int bags) {
  this.bags = bags;
 }
 private int getEventRating() {
  return eventRating;
 }
 private void setEventRating(int eventRating) {
  if (eventRating < 1 )
   eventRating = 1;
  else if (eventRating > 5)
   eventRating=5;
  
  this.eventRating = eventRating;
 }
 public int getVehicleValue() {
  if (vehicleValue< 1 )
   vehicleValue = 1;
  else if (vehicleValue > 5)
   vehicleValue=5;
  return vehicleValue;
 }
 public void setVehicleValue(int vehicleValue) {
  this.vehicleValue = vehicleValue;
 }
 
 //**************************************
 //public methods
 //*************************************
 //calculate tip percent
 
 public double calculateMealTip(){
  return getMealAmount() * getTipPercent();
 }

 //calculate Taxi Tip
 public double calculateTaxiTip(){
  return getCabFare() * CABPERCENT + getBags();
 }
 
 public double calculateValetTip(){
  int weight=getVehicleValue() + getEventRating();
  double tipAmount=0;
  switch (weight){
  case 1: 
  case 2:
  case 3:
   tipAmount=5;
   break;
  case 4:
  case 5:
  case 6:
   tipAmount=10;
   break;
  case 7:
  case 8:
   tipAmount=15;
  case 9:
  case 10:
   tipAmount=20;
   break;
  default:
   tipAmount=10;
   break;
  }
  
  return tipAmount;
    
 
 }
 
 public double calculateTax(){
  
  return getMealAmount()*getTaxPercent();
 }
 
 public double CalculateMealTotal(){
  return getMealAmount() + calculateTax() + calculateMealTip();
 }
 
 public double CalculateTaxiTotal(){
  return getCabFare()+calculateTaxiTip();
 }
 
 public double CalculateValetTotal(){
  return calculateValetTip();
 }
}

Monday, April 16, 2012

ArrayList Sample

These classes show a Sale class that contains an ArrayList of items. Item is a separate class that acts as a container for a set of fields.

Here is the code

Here is Item.java


public class Item {
 private String itemNumber;
 private String itemName;
 private double ItemPrice;
 
 public String getItemNumber() {
  return itemNumber;
 }
 public void setItemNumber(String itemNumber) {
  this.itemNumber = itemNumber;
 }
 String getItemName() {
  return itemName;
 }
 void setItemName(String itemName) {
  this.itemName = itemName;
 }
 double getItemPrice() {
  return ItemPrice;
 }
 void setItemPrice(double itemPrice) {
  ItemPrice = itemPrice;
 }
}


Sale.java

import java.util.*;
public class Sale {

 String saleNumber;
 String saleDate;
 ArrayList<Item> items;
 
 public Sale(String saleNumber, String saleDate){
  this.saleNumber=saleNumber;
  this.saleDate=saleDate;
  items=new ArrayList<Item>();
 }
 
 public void addItem(Item i){
  items.add(i);
 }
 
 public ArrayList<Item> getItems(){
  return items;
 }
 
 public double calculateTotalSale(){
  double total=0;
  for(Item i : items){
   total+=i.getItemPrice();
  }
  return total;
 }
}


Main.java

import java.util.*;

public class Main {

 /**
  * @param args
  */
 
 Sale s;
 
 public static void main(String[] args) {
  
  Main m = new Main();
  m.CreateSale();
  m.ReadSale();
 
  
 }
 
 private void CreateSale()
 {
  s = new Sale("2221", "4/16/2012");
  Item i = new Item();
  i.setItemName("Apple");
  i.setItemNumber("1");
  i.setItemPrice(1000000.00);
  s.addItem(i);
  
  Item i2 = new Item();
  i2.setItemName("IBM");
  i2.setItemNumber("2");
  i2.setItemPrice(100000.00);
  s.addItem(i2);
 }
 
 private void ReadSale(){
  ArrayList<Item>items=s.getItems(); 
  for(Item item : items ){
   System.out.println(item.getItemName());
   System.out.println(item.getItemPrice());
  }
  
  System.out.println(s.calculateTotalSale());
 }

}

Sunday, April 15, 2012

Swing Menus

This code represents a simple example of how to use and implement Swing Menus to open additional forms. An alternate way, that doesn't use multiple forms but rather switches out JPanels in a single frame is the CardLayout. You may want to explore this in the documentation and with on-line examples.

Here are pictures of the programs menus and forms running.

File Menu


Edit Menu


After clicking the Form 1 menu


Here is the code for MainWindow.java which includes the menus.


import javax.swing.*;

import java.awt.FlowLayout;
import java.awt.event.*;

public class MainWindow extends JFrame implements ActionListener {
 
 /**
  * this form creates a simple menu
  * under File there is only one menu item, Exit
  * under Edit you have option to open Form1 
  * and Form2
  */
 private static final long serialVersionUID = 1L;
 JFrame frame;
 JPanel panel;
 JMenu menuFile;
 JMenu menuEdit;
 JMenuBar menuBar;
 JMenuItem menuItem1;
 JMenuItem menuItem2;
 JMenuItem menuItem3;
 
 public MainWindow(){
  createMenu();
  frame = new JFrame();
  frame.setDefaultCloseOperation(JFrame.EXIT_ON_CLOSE);
  
  this.setJMenuBar(menuBar);
  createPanel();
  
  this.add(panel);
 
  
 }

 private void createMenu(){
  
  //Declare a new menu bar
  menuBar = new JMenuBar();
  
  //create a Menu on that menu bar
  menuFile = new JMenu("File");
  //this sets a keyboard equivalent 
  //on PCs ALT F
  menuFile.setMnemonic(KeyEvent.VK_F);
  
  //Define the menu items
  menuItem1 = new JMenuItem("Exit");
  menuItem1.setMnemonic(KeyEvent.VK_X);
  menuItem1.addActionListener(this);
  
  menuEdit = new JMenu("Edit");
  menuEdit.setMnemonic(KeyEvent.VK_E);
  
  menuItem2=new JMenuItem("Form1");
  menuItem2.setMnemonic(KeyEvent.VK_1);
  menuItem2.addActionListener(this);
 
  menuItem3 = new JMenuItem("Form2");
  menuItem3.setMnemonic(KeyEvent.VK_2);
  menuItem3.addActionListener(this);
  
  //Add the menu items to the menus
  menuFile.add(menuItem1);
  menuEdit.add(menuItem2);
  menuEdit.add(menuItem3);
  
  //add the menus to the menu bar
  menuBar.add(menuFile);
  menuBar.add(menuEdit);


 }


 private void createPanel(){
  panel = new JPanel(new FlowLayout(FlowLayout.RIGHT));
  JLabel label=new JLabel("Main Form");
  panel.add(label);
  //frame.add(panel);
 }

 @Override
 public void actionPerformed(ActionEvent arg0) {
  Object source = arg0.getSource();
  if(source==menuItem1)
   System.exit(0);
  if(source==menuItem2){
   JFrame frame = new Form1();
   frame.setBounds(200,200,350,120);
   frame.setVisible(true);
   
  }
  if(source==menuItem3){
   JFrame frame = new Form2();
   frame.setBounds(200,200,350,120);
   frame.setVisible(true);
   
  }
  
 }

 
}


Here are the two forms

Form1.java

import javax.swing.*;
import java.awt.FlowLayout;

public class Form1 extends JFrame {
 
 public Form1(){
  JFrame frame=new JFrame();
  JPanel panel; 
  panel = new JPanel(new FlowLayout(FlowLayout.RIGHT));
  JLabel label=new JLabel("Form1");
  panel.add(label);
  this.add(panel);
 }
}


Form2.java

import javax.swing.*;

import java.awt.FlowLayout;

public class Form2 extends JFrame{
 
 public Form2(){
 JFrame frame=new JFrame();
 JPanel panel; 
 panel = new JPanel(new FlowLayout(FlowLayout.RIGHT));
 JLabel label=new JLabel("Form2");
 panel.add(label);
 this.add(panel);
 }
}


Here is the Main.java class

import javax.swing.*;

public class Main {

 /**
  * @param args
  */
 public static void main(String[] args) {
  JFrame m = new MainWindow();
  m.setBounds(100,100,350,120);
  m.setVisible(true);

 }

}

Thursday, March 29, 2012

ITC162 Assignment Six

Description

Recreate assignment one in Android


What I am looking for

Incorporating the classes 10 pts

The Android form 5 pts

Code for listeners 5 pts


To Turn in

copy all the files, including the xml files into Google docs and share with spconger@gmail.com

ITC162 Assignment Five (Group Assignment)

Overview

For this assignment work in groups of three or four people. We will use this same assignment as a group assignment for Android. If you have an idea for a group project other than this one, present it and I will consider it. It must have a similar complexity.


Description

The goal is to create a program that allows a user to choose a School Program like Programming, or Mobile Development of Web Development and load a program description and a list of the required courses.

Additionally a user should be able to track which courses they have completed and what courses remain to be done.

It should be possible to see which program courses are being offered in the upcoming quarter.

There is also an administrator part of this that allows an administrator to enter program information and course information

For now we will just use xml files for data storage

Here is a use case diagram with the general requirements

Everything should have a swing front end


What I am looking for

Each group should produce a class diagram of their domain classes 10 pts

Classes developed and integrated according to the relations in the diagram 15 pts

Reading and writing XML files 10 pts

Swing forms front end 10 pts

Working successfully in a group 5 pts

The whole is worth 50 pts


To Turn in

Make sure all group members names are in the doucments. Zip the project post it on goodle docs and share it with spconger@gmail.com

ITC162 Assignment Four

Overview

For this assignment take the classes you refactored and use them as a source for a banking application with a Swing front end.

You should create a window with a menu that lets you choose which account you wish to work with. When you select it should open a window with options for entering transaction information for that account and viewing the balances and transactions when done.


What I am looking for

Main form with menu 10 points

Account forms 5 points

working with the account classes 5 pts


To turn in

Zip the project and post the zipped file on google. Share it with spconger@gmail.com

ITC162 Assignment Three

Refractoring

Below are three classes for a banking application. There is a lot of repeated code and other redundancies.

The goal of the assignment is to restructure the classes to eliminate as much redundancy as possible. This can involve encapsulating elements into a new class. It can involve making super classes or interfaces.


To Do

Restructure the code in the classes so that they conform to good OOP principles.

Create a Class diagram to show the new structure of the classes and their relationships to each other


To turn in (what I am looking for)

The code for the classes 10 pts

The UML diagram 10 points


Code for Classes

Checking.java

import java.util.*;
public class Checking {
 /*
  * Class for refactoring:
  * This class tracks transactions in a 
  * checking account. At this point they 
  * are not stored to file, but just stored
  * in an ArrayList
  * 
  */
 
 //private fields
 private String customerName;
 private String accountNumber;
 private String customerAddress;
 private String customerPhone;
 private double balance;
 private final double OVERDRAFTFEE=25;
 ArrayList transactions;
 
 
 //constructors
 public Checking(){
  balance = 0;
  transactions = new ArrayList<Double>();
  
 }
 
 public Checking(double initialBalance){
  balance=initialBalance;
  transactions.add(initialBalance);
 }
 
 //assessors and mutators
 public void setCustomerName(String customerName) {
  this.customerName = customerName;
 }
 public String getCustomerName() {
  return customerName;
 }
 public void setAccountNumber(String accountNumber) {
  this.accountNumber = accountNumber;
 }
 public String getAccountNumber() {
  return accountNumber;
 }
 private void setCustomerAddress(String customerAddress) {
  this.customerAddress = customerAddress;
 }
 private String getCustomerAddress() {
  return customerAddress;
 }
 public void setCustomerPhone(String customerPhone) {
  this.customerPhone = customerPhone;
 }
 public String getCustomerPhone() {
  return customerPhone;
 }
 //balance has only a public get
 public double getBalance(){
  return balance;
 }
 
 //public methods
 public void credit(double amount){
  balance += amount;
  transactions.add(amount);
 }
 
 public void debit(double amount){
  balance -= amount;
  transactions.add(amount*-1);
  if (balance < 0)
  { 
   balance -= OVERDRAFTFEE;
   transactions.add(OVERDRAFTFEE * -1);
  }
 }
 
 public ArrayList<Double> getTransactions(){
  return transactions;
 }
 

}


Savings.java

import java.util.*;

public class Savings {
 
 /*
  * Class for refractoring
  * This class handles the savings account
  * the interest calculations are 
  * extremely simplistic
  */
 
 //private fields
 private String customerName;
 private String accountNumber;
 private String customerAddress;
 private String customerPhone;
 private double balance;
 ArrayList transactions;
 private final double IRATE = .03;
 
 //constructors
 public Savings(){
  balance=0;
 }
 
 public Savings(double initialBal){
  balance=initialBal;
 }
 
 public void setCustomerName(String customerName) {
  this.customerName = customerName;
 }
 public String getCustomerName() {
  return customerName;
 }
 public void setAccountNumber(String accountNumber) {
  this.accountNumber = accountNumber;
 }
 public String getAccountNumber() {
  return accountNumber;
 }
 private void setCustomerAddress(String customerAddress) {
  this.customerAddress = customerAddress;
 }
 private String getCustomerAddress() {
  return customerAddress;
 }
 public void setCustomerPhone(String customerPhone) {
  this.customerPhone = customerPhone;
 }
 public String getCustomerPhone() {
  return customerPhone;
 }
 //balance has only a public get
 public double getBalance(){
  return balance;
 }
 
 public void credit(double amount){
  balance += amount;
  transactions.add(amount);
 }
 
 public void debit(double amount){
  balance -= amount;
  transactions.add(amount*-1);
  
 }
 
 public ArrayList<Double> getTransactions(){
  return transactions;
 }
 
 public double CalculateInterest()
 {
  //much too simple but will do 
  //for now
  return balance * IRATE;
  
 
 }

}


CreditCard.java

import java.util.ArrayList;


public class CreditCard {
 /*
  * Class for Refractoring
  * This class handles credit card
  * transactions
  * again many of the calculations
  * are very simple
  */
 
 private String customerName;
 private String accountNumber;
 private String customerAddress;
 private String customerPhone;
 private double creditLimit;
 private double balance;
 ArrayList<Double> transactions;
 private final double IRATE = .22;
 
 public CreditCard(){
  creditLimit=1000;
 }
 
 public CreditCard(double creditLimit){
  this.creditLimit=creditLimit;
 }
 
 public void setCustomerName(String customerName) {
  this.customerName = customerName;
 }
 public String getCustomerName() {
  return customerName;
 }
 public void setAccountNumber(String accountNumber) {
  this.accountNumber = accountNumber;
 }
 public String getAccountNumber() {
  return accountNumber;
 }
 private void setCustomerAddress(String customerAddress) {
  this.customerAddress = customerAddress;
 }
 private String getCustomerAddress() {
  return customerAddress;
 }
 public void setCustomerPhone(String customerPhone) {
  this.customerPhone = customerPhone;
 }
 public String getCustomerPhone() {
  return customerPhone;
 }
 
 //credit limit and balance read only
 public double getCreditLimit(){
  return creditLimit;
 }

 public double getBalance(){
  return balance;
 }
 
 public void credit(double amount){
  //simplistic way to calculate interest
  //doing it on a daily scale
  balance += amount - (amount *(IRATE/365));
  transactions.add(amount);
 }
 
 public void debit(double amount){
  balance -= amount + (amount *(IRATE/365));
  transactions.add(amount*-1);
  
 }
 
 public ArrayList<Double> getTransactions(){
  return transactions;
 }
 
 public double CalculateInterest()
 {
  //much too simple but will do 
  //for now
  return balance * IRATE;
  
 
 }

}

Assignment Two

Description

For this assignment, simply reconfigure assignment one into a model view control pattern


What I am looking for

Setting up the model with existing classes 5 pts

Setting up the controller 10 pts

Modifying the view 5 pts

Wednesday, March 28, 2012

ITC 162 Assignment One

Overview


The first assignment is a grade calculator.


Create a swing form. It should have text boxes for entering course number, number of credits and grade, then a check box to mark if it is a non-numerical grade. If checked, one must select the non numerical grade W, I, NC, A from radio buttons.


When the submit button is clicked it should encapsulate all the fields into an object called grade and pass it to a class called gpaCalculator which adds it to an array list. The gpaCalculator should have a method that loops through the grades, ignoring those with non numerical grades and returns a gpa. (Gpas are calculated by multiplying the grade times the number of credits to get the weight. Then the sum of the weight is divided by the sum of the credits.)


There should be a second button on the swing form to get the GPA. Display the Gpa on the form.


What I am Looking for


The swing form with all it's controls 5 pts

The grade on gpaCalculate classes 5 pts

The swing event handlers 5 pts

Correct GPA calculation and display 5 pts


What To Turn in


zip all the project files and post them on Google docs. Share it with spconger@gmail.com


Sunday, March 18, 2012

Model View Control version of Tip Calculator

The model view control pattern is basic to object oriented programming. It has the advantage of separating out functionality

The Model

The model handles all the data processing. In our case this means the tip class itself with its methods for calculating the tip, the tax and the total. But it can also mean classes that access files or databases

The View

The view is the display part of the program. It could be console, or web, Android xml or in our case Swing. The view is only concerned with getting user input and displaying results. No calculations are performed in the view

The Controller

The controller's responsibility is to transfer the data from the model to the view.

In this example, the main, located in the class program, instantiates the view, the model and the controller and passes the view and model to the controller for processing.

Classes are fairly loosely coupled. The view is unaware of either the model or the controller. The model is unaware of the controller or the view. Only the controller needs to be aware of the other components and they are passed as objects to it through its constructor.

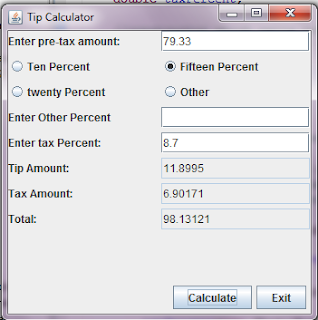
The program behaves exactly like the other examples.


Here is the UML class diagrams for the Model View Control version of this project


Here is the code for the various classes


program.java

import javax.swing.*;

public class program {

 /*******************************
  * this class has the main method.
  *It instantiates the view, the model and 
  *the controller. It passes the view
  *and the model to the controller
  */
 public static void main(String[] args) {
  TipModel model = new TipModel();
  JFrameView view = new JFrameView();
  
  TipController  controller = new TipController(view, model);
  view.setBounds(100,100,500,300);
  view.setTitle("Tip Calculator MVC");
  view.setVisible(true);
  
 }

}

JFrameView.java

import javax.swing.ButtonGroup;
import javax.swing.JButton;
import javax.swing.JFrame;
import javax.swing.JLabel;
import javax.swing.JPanel;
import javax.swing.JRadioButton;
import javax.swing.JTextField;

import java.awt.*;
import java.awt.event.ActionListener;


public class JFrameView extends JFrame{
 
 /**
  * this method creates the JFrame
  * and adds the Panel
  * the panel is actually the main part of the view
  * I have combined the two into one class
  * to make it simpler, so we just have one
  * view class
  * the view is unaware of the model or the 
  * controller, although it knows its listener
  * methods must be sent in from somewhere else
  */
 private JPanel panel;
 
 JPanel buttonPanel;
 JLabel lblAmount;
 JRadioButton tenPercent;
 JLabel choosePercent;
 JRadioButton fifteenPercent;
 JRadioButton twentyPercent;
 JRadioButton rbother;
 JTextField txtOther;
 JLabel lbltax;
 JLabel lblTip;
 JLabel lblTaxPercent;
 JLabel lblTaxAmt;
 JLabel lblTotal;
 JTextField txtAmount;
 JTextField txtTaxPercent;
 JTextField txtTipAmount;
 JTextField txtTaxAmount;
 JTextField txtTotal;
 JLabel lblOther;
 
 JButton calculate;
 JButton exit; 


 double tipPercent;
 double amount;
 double taxPercent;
 
 private static final long serialVersionUID = 1L;

 //constructor
 public JFrameView(){
  JFrame frame=new JFrame();
  frame.setDefaultCloseOperation(EXIT_ON_CLOSE);
  //call the method that builds the panel
  buildPanel();


 }
 
 public void buildPanel(){
  
  //instantiate all the objects
  //and set their properties
  panel=new JPanel();
  panel.setLayout(new GridLayout(10,2,5,5));
  
  lblAmount = new JLabel("Enter pre-tax amount:");
  
  txtAmount=new JTextField(10);
  
  tenPercent=new JRadioButton("Ten Percent");
    
  fifteenPercent=new JRadioButton("Fifteen Percent");
  fifteenPercent.setSelected(true);
    
  twentyPercent = new JRadioButton("twenty Percent");
    
  rbother =new JRadioButton("Other");
 
  //add radiobuttons to a button group
  ButtonGroup group = new ButtonGroup();
  group.add(tenPercent);
  group.add(fifteenPercent);
  group.add(twentyPercent);
  group.add(rbother);
  
  lblOther=new JLabel("Enter Other Percent");
  
  txtOther = new JTextField(10);
  
  lblTaxPercent=new JLabel("Enter tax Percent:");
  
  txtTaxPercent=new JTextField(10);
  
  lblTip = new JLabel("Tip Amount:");
  
  txtTipAmount = new JTextField(10);
  txtTipAmount.setEditable(false);
  
  lblTaxAmt = new JLabel("Tax Amount:");
  
  txtTaxAmount =new JTextField(10);
  txtTaxAmount.setEditable(false);
  
  lblTotal = new JLabel("Total:");
  
  txtTotal = new JTextField(10);
  txtTotal.setEditable(false);
  //add all the components 
  //except the buttons to the panel
  
  panel.add(lblAmount);
  panel.add(txtAmount);
  
  panel.add(tenPercent);
  panel.add(fifteenPercent);
  panel.add(twentyPercent);
  panel.add(rbother);
  panel.add(lblOther);
  panel.add(txtOther);
  panel.add(lblTaxPercent);
  panel.add(txtTaxPercent);
  panel.add(lblTip);
  panel.add(txtTipAmount);
  panel.add(lblTaxAmt);
  panel.add(txtTaxAmount);
  panel.add(lblTotal);
  panel.add(txtTotal);


  //add a second panel
  //this one uses flow layout
  buttonPanel = new JPanel();
  buttonPanel.setLayout(new FlowLayout(FlowLayout.RIGHT));
  
  //instantiate the buttons and add 
  //them to the panel
  //also add a listener
  calculate = new JButton("Calculate");
  //calculate.addActionListener(this);
  buttonPanel.add(calculate);
  
  exit = new JButton("Exit");
  //exit.addActionListener(this);
  buttonPanel.add(exit);
  
  //this, in this case the window
  //we add the two panels to a border
  //layout the main one is in the center
  //the button panel is below (SOUTH)
  this.setLayout(new BorderLayout());
  this.add(panel, BorderLayout.CENTER);
  this.add(buttonPanel, BorderLayout.SOUTH);

}
 
public double GetAmount(){
 //get the strings from the text boxes
 double amount=0;
 try{
 String strAmount=txtAmount.getText();
  amount= Double.parseDouble(strAmount);
 
 }
 catch (Exception e){
  lblTotal.setText(e.getMessage());
 }
 return amount;
}

public double getTipPercent(){
 tipPercent=0;
 
 //check which radio button is selected
 if(tenPercent.isSelected())
  tipPercent=.1;
 else if(fifteenPercent.isSelected())
  tipPercent=.15;
 else if (twentyPercent.isSelected())
  tipPercent=.2;
 else if (rbother.isSelected()){
  String percent=txtOther.getText();
  //there is a chance the parse can fail
  try{
  tipPercent=Double.parseDouble(percent);
  }
  catch(Exception e){
   lblTotal.setText(e.getMessage());
  }
 }
 else
  tipPercent=0;
 return tipPercent;
}

public double getTaxPercent(){
 String taxPerc = txtTaxPercent.getText();
 try{
 taxPercent=Double.parseDouble(taxPerc);
 }
 catch(Exception e){
  lblTotal.setText(e.getMessage());
 }
 return taxPercent;
}

public void setTotal(String total){
 lblTotal.setText(total);
}

public void setTip(String tip){
 lblTip.setText(tip);
}

public void setTax(String tax){
 lblTaxAmt.setText(tax);
}

//these are different rather than implement
//the listeners here the controller will return the 
//listener to the view
public void addCalculateListener(ActionListener cal){
 calculate.addActionListener(cal);
}

public void addExitListener(ActionListener el){
 exit.addActionListener(el);
}
}

TipController.java

import java.awt.event.*;
import javax.swing.*;

public class TipController {
 
 /******************************
  * So this is the controller. It gets both
  * the model and the view from the program
  * class which contains the main() method
  * It implements two internal classes
  * as listeners
  */
 private JFrameView m_view;
 private TipModel m_model;
 
 public TipController (JFrameView view, TipModel model){
  m_view=view;
  m_model=model;
  
  //here it returns the listeners to the view
  view.addCalculateListener(new CalculateListener());
  view.addExitListener(new ExitListener());
 }
 
 class CalculateListener implements ActionListener{
  
  public void actionPerformed(ActionEvent e){
   //get the user's input values from the view's form
   double amt=m_view.GetAmount();
   double tPercent=m_view.getTipPercent();
   double taxPerc=m_view.getTaxPercent();
   
   //set the values in the model
   m_model.setPreTaxAmount(amt);
   m_model.setTipPercent(tPercent);
   m_model.setTaxPercent(taxPerc);
   
   //do the calculations and pass them back to the view
   //I did both in single statements
   m_view.setTip(Double.toString(m_model.CalculateTip()));
   m_view.setTax(Double.toString(m_model.CalculateTax()));
   m_view.setTotal(Double.toString(m_model.CalculateTotal()));
   
  }
 }
 
 class ExitListener implements ActionListener{
  
  public void actionPerformed(ActionEvent e){
   System.exit(0);
  }
 }
}


TipModel.java


public class TipModel {
/*************************
 * this is the model class. It handles the data
 * and does all the calculations. It is totally
 * independent of the controller and the view
 * it is identical to the tip class in the 
 * former version
 */
 //private fields
 private double preTaxAmount;
 private double tipPercent;
 private double taxPercent;
 
 //constructors
 public TipModel(){
  preTaxAmount=0;
  tipPercent=0;
  taxPercent=0;
 }
 
 public TipModel(double preTaxAmount, double tipPercent, double taxPercent){
  this.setPreTaxAmount(preTaxAmount);
  this.setTipPercent(tipPercent);
  this.setTaxPercent(taxPercent);
 }
 
 
 //assessors/mutators
 public void setPreTaxAmount(double preTaxAmount) {
  this.preTaxAmount = preTaxAmount;
 }
 public double getPreTaxAmount() {
  return preTaxAmount;
 }
 public void setTipPercent(double tipPercent) {
  //make sure the tip is a decimal
  //or zero
  if (tipPercent >=1)
   tipPercent /= 100;
  this.tipPercent = tipPercent;
 }
 public double getTipPercent() {
  return tipPercent;
 }
 public void setTaxPercent(double taxPercent) {
  if(taxPercent >=1)
   taxPercent /=100;
  this.taxPercent = taxPercent;
 }
 public double getTaxPercent() {
  return taxPercent;
 }
 
 //public methods
 public double CalculateTip(){
  return preTaxAmount * tipPercent;
 }
 
 public double CalculateTax(){
  return preTaxAmount * taxPercent;
 }
 
 public double CalculateTotal(){
  return preTaxAmount + (preTaxAmount * tipPercent)
    + (preTaxAmount * taxPercent);
 }


}

Thursday, March 15, 2012

Inner Classes for Handling Listeners

It is a common practice in Java to use Inner classes to handle Listener events. An inner class is a private class contained in another class. As a private class it has access to all the fields and values of the containing class.

To me this is a violation of many OOP principles, such as encapsulation and the idea that classes should be as loosely coupled as possible. But, practically speaking, it is probably the best way to handle multiple events in a JPanel class.

Another practice is to use anonymous classes, which are inner classes that are not explicitly declared as such. I would discourage their use, even though they are also a common Java practice

Here is the code for a class that extends JPanel. It has two inner classes to handle the Listeners for two different buttons. This class, of course, would be called by a class extending JFrame.


import java.awt.GridLayout;
import javax.swing.*;
import java.awt.event.*;


public class PercentFormPanel extends JPanel{
 
 JPanel panel;
 JLabel lblAmount;
 JTextField txtAmount;
 JRadioButton tenPercent;
 JRadioButton fifteenPercent;
 JRadioButton twentyPercent;
 JLabel lblResult;
 JButton btnCalculate;
 JButton btnExit;
 
 public PercentFormPanel(){
 
  panel = new JPanel(new GridLayout(5,2,5,5));
  BuildPanel();
  this.add(panel);
  
 }
 private void BuildPanel(){
  lblAmount = new JLabel("Enter a Number and choose a percent");
  txtAmount= new JTextField(10);
  tenPercent=new JRadioButton("Ten Percent");
  fifteenPercent=new JRadioButton("Fifteen Percent");
  twentyPercent=new JRadioButton("Twenty Percent");
  
  ButtonGroup group = new ButtonGroup();
  group.add(tenPercent);
  group.add(fifteenPercent);
  group.add(twentyPercent);
  
  btnCalculate = new JButton("Calculate");
  //calls the internal class and its listener
  btnCalculate.addActionListener(new CalculateListener());
  
  lblResult = new JLabel();
  
  btnExit = new JButton("Exit");
  //calls internal class
  btnExit.addActionListener(new ExitListener());
  
  panel.add(lblAmount);
  panel.add(txtAmount);
  panel.add(tenPercent);
  panel.add(fifteenPercent);
  panel.add(twentyPercent);
  
  panel.add(lblResult);
  panel.add(btnCalculate);
  panel.add(btnExit);
 }
 
 //begin first internal class
 class CalculateListener implements ActionListener{
  public void actionPerformed(ActionEvent e){
   double percent;
   String amt = txtAmount.getText();
   if (amt.isEmpty())
    return;
   double amount=Double.parseDouble(amt);
   if (tenPercent.isSelected())
    percent=amount * .1;
   else if (fifteenPercent.isSelected())
    percent=amount *.15;
   else if (twentyPercent.isSelected())
    percent=amount * .2;
   else
    percent=amount;
   
   lblResult.setText(Double.toString(percent));
  }
  
 }
 
 //second internal class
 class ExitListener implements ActionListener{
  public void actionPerformed(ActionEvent e){
  
   System.exit(0);
  }
 }


}