Overview
Assume that the Automart Web site records new registered customers into an xml file and each day they need to import the new customers into the database. (Unlikely for a company but not unusual for a non-profit or home run operation.)
We are going to make an integration Services package in SQL Server so that we can import the data automatically each day.
We must take the data from the XML file and import it into three tables, PERSON, CUSTOMER.VEHICLE, and CUSTOMER.REGISTEREDUSTOMER.
Here is the XML file and its Schema.
newcustomer.xml
<?xml version="1.0" encoding="utf-8"?>
<newcustomer>
  <customer>
    <firstname>Sally</firstname>
    <lastname>King</lastname>
    <email>sking@msn.com</email>
    <password>royalpass</password>
    <license>FMN2033</license>
    <make>Toyota corolla</make>
    <year>2011</year>
  </customer>
  <customer>
    <firstname>Edwin</firstname>
    <lastname>Laurence</lastname>
    <email>elaurence@gmail.com</email>
    <password>edpass</password>
    <license>WEB3445</license>
    <make>Volkswagen Beetle</make>
    <year>2012</year>
  </customer>
  <customer>
    <firstname>Sharon</firstname>
    <lastname>Malin</lastname>
    <email>sandm@gmail.com</email>
    <password>smpass</password>
    <license>TEN6545</license>
    <make>Nisson Leaf</make>
    <year>2013</year>
  </customer>
  <customer>
    <firstname>Bob</firstname>
    <lastname>Brown</lastname>
    <email>bbrown@gmail.com</email>
    <password>bbpass</password>
    <license>LTE0034</license>
    <make>Ford Mustang</make>
    <year>2002</year>
  </customer>
  <customer>
    <firstname>Melissa</firstname>
    <lastname>Bee</lastname>
    <email>melissa@gmail.com</email>
    <password>beepass</password>
    <license>MLN9007</license>
    <make>Kia Rio</make>
    <year>2010</year>
  </customer>
</newcustomer>
Copy this file into Notepad. Choose SAVE AS. Set the type to All Files(*.*) and change the encoding to UTF-8

Here is the schema for the above XML
newcustomer.xsd
<?xml version="1.0" encoding="utf-8"?>
<xs:schema attributeFormDefault="unqualified" elementFormDefault="qualified" xmlns:xs="http://www.w3.org/2001/XMLSchema">
  <xs:element name="newcustomer">
    <xs:complexType>
      <xs:sequence>
        <xs:element maxOccurs="unbounded" name="customer">
          <xs:complexType>
            <xs:sequence>
              <xs:element name="firstname" type="xs:string" />
              <xs:element name="lastname" type="xs:string" />
              <xs:element name="email" type="xs:string" />
              <xs:element name="password" type="xs:string" />
              <xs:element name="license" type="xs:string" />
              <xs:element name="make" type="xs:string" />
              <xs:element name="year" type="xs:string" />
            </xs:sequence>
          </xs:complexType>
        </xs:element>
      </xs:sequence>
    </xs:complexType>
  </xs:element>
</xs:schema>
Save this as newcustomer.xsd with the UTF-8 encoding
Creating the Integration Package
1. Open SQL Services Data Tools as Administrator. If you do not open it as administrator it will fail when you try to run it.
2. Start a new Project
3. Choose Integration Services Project
4. Name it AutomartNewCustomer

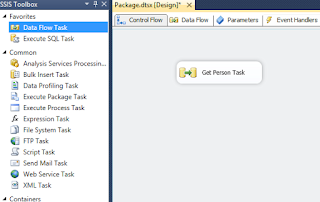
5. In the Designer's Control Flow tab add a new DataFlow Task and name it "Get Person Task"

6. Double click the DataFlow task to open the Data Flow tab
7. Add a new XML Source control. Rename it "Person Source" and double click it to set the file and schema properties

8.Click on COLUMNS, click through the warnings and view the columns

9. Click OK
10. Now we will add a Data Conversion control. This control lets us change the properties of the data to make it conform more with the database
11. Connect the arrow from the source to the Conversion

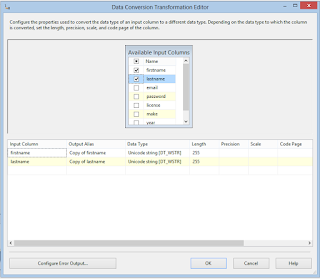
12. Double Click the Data Conversion control to open the properties dialog.
13. For now you can just select firstname, lastName

14. Click ok.
15. Now we will add a Destination control
16. Select a SQL Server Destination name it "Person Destination" and connect it to the Data Conversion Control

17. Double Click the Person Destination control to open the properties
18. First we add a new Connection manager and a new connection. We connect to the server and the automart database

19. Then we select the person table

20. Next we go to the table mappings and match our columns. Use the copy of the xml fields for the match

21. Return to the Control Flow tab
22. Add another Data Task control and name it "Get Vehicle Task".
23. Hook it to the Person Task Control

24. Double Click the data flow task to get the data flow designer
25. We will start with an xml source. It is configured exactly the same as the last one.
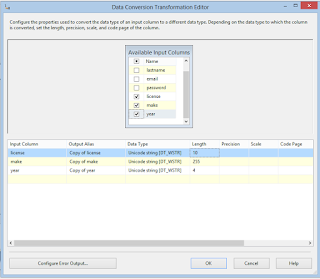
26. Next we will add another Data configuration Control and configure the fields as in the picture below

27. It might also be a good idea to turn off the error controls

28. Now we are going to add a lookup control. We need to look up the person keys from our previous inserts

29. In the connection tab of the dialog select the Person table

30. Now in the mapping tab. Drag firstname to firstname and lastname to lastname and check the PersonKey box. this will enable the program to look up the person key that matches the first and last names

31. Next add a SQL Server Destination. When you connect it to the lookup this dialog will pop up

32. Select "Lookup Match Output" and OK
33. In the connection manager use the same manager and choose the table Vehicle
34. then go to mappings and set the mappings as in the picture below

35. No go back to the Control Flow Tab
36. We are going to add one more Data Flow task to populate the RegisteredCustomer table

37. Double click it
38. We will need an xml source configured just like the other two.
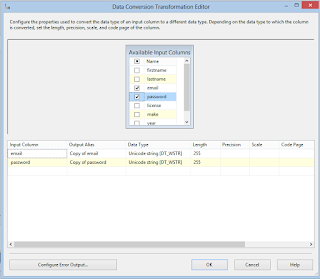
39. We will need a Data Conversion object in which we select email and password

40. And we will also need a lookup control configured exactly like the last one.
41. Finally we will need a SQL Server Destination Control, using the Customer.RegisteredCustomer table.

Running and Debugging
With luck now we can run the package. Just click the Green triangle to start the package. If all goes well the controls should turn green

If they fail. Check in the Data Flow for where the error occurred. Try turning off all the errors in the various controls. Make sure you are running as admin.
No comments:
Post a Comment