Preliminary Logic
This web site is going to allow a new user to register and then log in. Before beginning to code it is a good idea to get a sense of what needs to be done--the logic of it. This is always a good idea. You should be clear about what needs to be done before worrying how to do it.
To register as a reviewer the user must enter their first name, last name, a username, their email and a password.
The program will need to generate a random integer and pass the password and the integer (as a string) to the password hash class where the two will be combined and hashed. This is considered the safest way to create a password. It helps protect against dictionary attacks and other hacking methods which search for words and word combinations.
After the password is hashed, the username, first name, last name, email, seed and hashed password need to be written to the database. We will also save the plain text password. In real life you would never do this, but it will help us test the log ins.
Here is a UML Activity diagram showing the steps

The next part is to allow the new user--or any user to log in. This is also more complicated than you might think. First the user enters their user name and password.
Using the username we check the database and retrieve the user key, seed number and hashed password for that user.
Then we pass the seed and password to the hash class to hash them. We compare the current hash to the one we got from the database. If they match we store the user Key in a session variable so that we can refer to it throughout the user's session. If they do not match we provide an error message and tell the user to try again.
Here is an Activity diagram for the log in

There are a couple of other things we will want to do to tidy up. We will want to validate the text boxes and make sure the password and the password confirmation match
Setting up the Environment
Create a new empty Web Site. Name it "ReviewerRegistration."

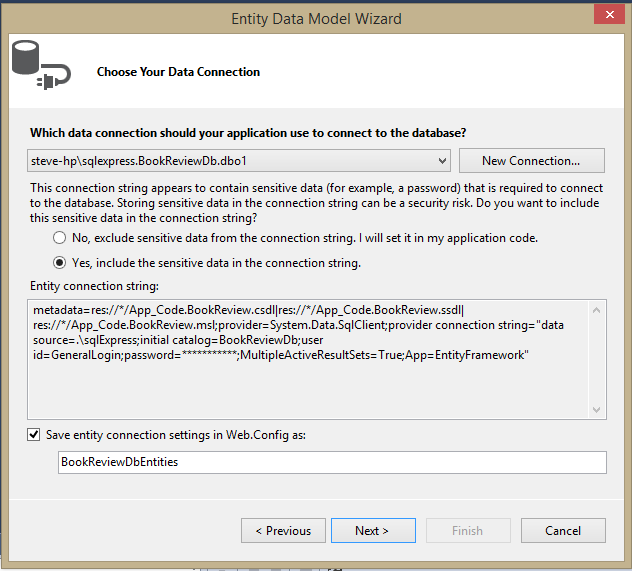
First we will add the ADO Entities. Make a new connection even if one exists. We want to use the ReviewerLogin. The password is "P@ssw0rd2".

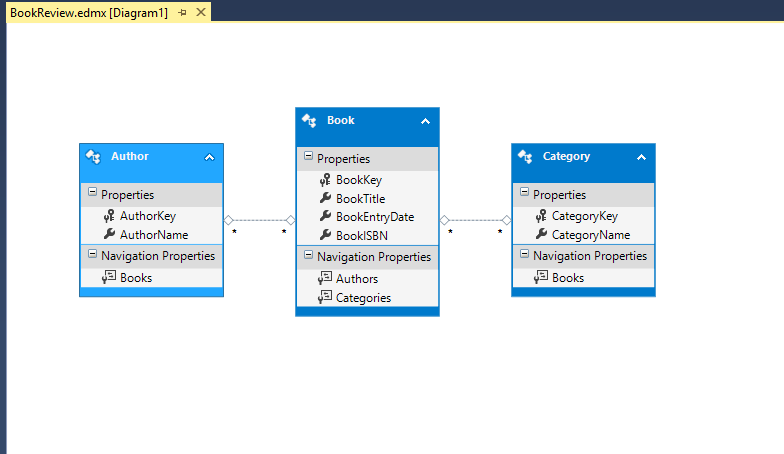
We only really need to see the reviewer table and the check-in log tables for this exercise.

Finish. You should get a diagram like the one below.

Save everything.
Now we want to add another class. Right click on the App_Code folder and select ADD NEW Class. Name it "PasswordHash. " There is a version of this class stored as a text file in Canvas Files. You can also access it at https://github.com/spconger/PasswordHashExample/blob/master/PasswordHash.cs, though it you use the one from Github, you will need to remove the namespace. Copy the file and paste it over the code in your new class. Here is the code:

This class takes the password and the passkey or random seed as strings. It joins them and then converts them to a byte array. Once they are in a byte array it applies the SHA512 hashing algorithm to the array to create the new password. We will use this same class for all our password hashing.
Next let's add three web forms. The first will be named "Default" and will have the login and a link to register. The second will be the registration form. Name it "Registration.aspx." The third will be a welcome page that greets someone who has successfully logged in. Name it "Welcome.aspx:.
Here is the source for the Default Page:

Here is the Design view of Default
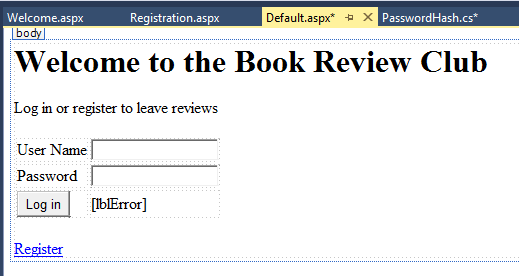
Let's make one little change to the linkbutton in the form. We will add an attribute PostBackUrl="Registration.aspx." This will make it so that when we click the link it will redirect the user to the Registration page. We are going to focus on it next. We will return to the login after we have completed the registration form.

Here is the source code for the Registration page.
<%@ Page Language="C#" AutoEventWireup="true" CodeFile="Registration.aspx.cs" Inherits="Registration" %>

<!DOCTYPE html>

<html xmlns="http://www.w3.org/1999/xhtml">
<head runat="server">
    <title></title>
</head>
<body>
    <form id="form1" runat="server">
    <div>
    <table>
        <tr>
            <td>First Name</td>
            <td><asp:TextBox ID="txtFirstName" runat="server"></asp:TextBox></td>
        </tr>
         <tr>
            <td>Last Name</td>
            <td><asp:TextBox ID="txtLastName" runat="server"></asp:TextBox></td>
        </tr>
         <tr>
            <td>Email</td>
            <td><asp:TextBox ID="txtEmail" runat="server"></asp:TextBox></td>
        </tr>
         <tr>
            <td>User Name</td>
            <td><asp:TextBox ID="txtUserName" runat="server"></asp:TextBox></td>
        </tr>
         <tr>
            <td>Password</td>
            <td><asp:TextBox ID="txtPassword" runat="server"  TextMode="Password"></asp:TextBox></td>
        </tr>
         <tr>
            <td>Confirm Password</td>
            <td><asp:TextBox ID="txtConfirm" runat="server" TextMode="Password"></asp:TextBox></td>
        </tr>
         <tr>
            <td>
                <asp:Button ID="btnRegister" runat="server" Text="Register" /></td>
            <td>
                <asp:Label ID="lblErrorSuccess" runat="server" Text=""></asp:Label></td>
        </tr>

    </table>
        <asp:LinkButton ID="LbLogin" runat="server"
PostBackUrl="~/Default.aspx">Log in</asp:LinkButton>
    </div>
    </form>
</body>
</html>
Notice the pattern. A prompt and then a text box to take the entry. The table is just to give the entry form a more uniform look and structure. Notice also the password text mode. This keeps the letters of the password from showing in the text box. Here is how the page looks in the Design view.

Validating the Text Boxes
One thing you should never allow in a web page is open text boxes without any kind of validation. Open text boxes can be the source of errors, misinfomation, and even attack. You also need to make sure that all the required fields are filled out. There are several ways you can validate text boxe. You can write your own JavaScript functions to validate the boxes. You can write server side validation code in C#. Or you can use Microsoft's built in validation controls. These controls use JQuery to do the validation. To use them we need to download the JQuery libraries. Microsoft has a tool for this called Nuget. You can get it by right clicking your project in the Solution Explorer

Search for ASP.Net JQuery and Install the ASP.Net.ScriptManager.Jquery.

Once it has installed, you can close.
In your toolbox, under Validation, there are six controls and a pointer.
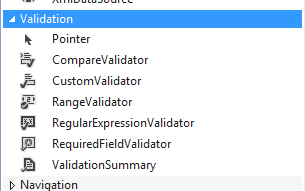
The Compare validator, allows you to compare the values in two different text boxes. It also has a method for checking the data type of the value in a text box. The Range Validator lets you set a range of acceptable values. The regular expression validator lets you apply a regular expression to a text box. The required field validator lets you set a field as required. The Validation Summary lets you place all the messages in one place.
For our little entry form we want to Require Last Name, Email, User Name, Password and confirm. We want to make sure that the email is structured as a valid email using regular expressions and we want to make sure the confirm password text matches the password text. We will display all the error messages below with the ValidationSummary control. Here is the source for the first required field control.

Note Three things. One: make sure to change the ErrorMessage field to reflect the control's purpose. Two: you must include the attribute "ControlToValidate." Third: I set the display to none. This is because I want to display it in the ValidationSummary control. Here are all the required field valdiations

Now we need to make sure the email is validly constructed. Add the Regular expression validator. Change its ID to "EmailRegularExpression," its ErrorMessage to "Enter a valid Email" and set its control to Validate as "txtEmail", then switch to design view. Select the text "Enter a Valid Email" and look in the Properties pane. (if you don't have properties, go to VIEW menu and choose Properties.) Find the property "ValidationExpression"
Click into the box beside it and you should see three dots.

Click the three dots and it will open a regular expression dialog. Select Internet-e-email-address and click OK. The regular express will be added to the source code.

The final validation we need to add is the one that compares the confirm password with the password. In the source add the Compare validator. In this control the Control to validate is txtConfirm, the control to compare is txtPassword. Give the control a name and an appropriate error message. Now add the validation summary. You don't have to make any changes to it. Here is a picture of all the validation code.

Now run the program and see how the validation controls work.
The Registration Code
Now, at last, we are going to write some code. The first thing we need to make sure of is that we can hash their password when they enter it. We already have the hash class, but we also need to generate the random passkey or seed. I am going to write a small little class to do this. Add a new class to the project and name it "KeyCode." It isn't much of a class, but by making it a class I can reuse it wherever I need it.

Now we can register the new user. Double click on the Register button on the Register Web Form. This will open the click event. Here is the code for the Register button with some comments.
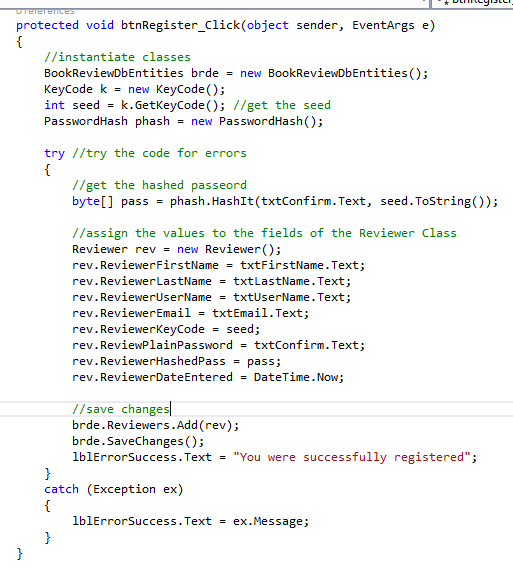
Run this and you should find you have successfully registered a new Reviewer.
Logging in
The final part of this is to allow the registered user to log in. To validate the login I am going to create a log in class called "LoginClass". Here is the Login class with comments.
using System; using System.Collections.Generic; using System.Linq; using System.Web; ////// This class takes in the user name and password /// retrieves information from the database /// and then hashes the password and key to /// see if it matches the database hash /// public class LoginClass { //class level variables-fields private string pass; private string username; private int seed; private byte[] dbhash; private int key; private byte[] newHash; //constructor takes in password and username public LoginClass(string pass, string username) { this.pass = pass; this.username = username; } //gets the user info from the database private void GetUserInfo() { //declare the ADO Entities BookReviewDbEntities brde = new BookReviewDbEntities(); //query the fields var info = from i in brde.Reviewers where i.ReviewerUserName.Equals(username) select new { i.ReviewerKey, i.ReviewerHashedPass, i.ReviewerKeyCode }; //loop through the results and assign the //values to the field variables foreach(var u in info) { seed = u.ReviewerKeyCode; dbhash = u.ReviewerHashedPass; key = u.ReviewerKey; } } private void GetNewHash() { //get the new hash PasswordHash h = new PasswordHash(); newHash = h.HashIt(pass, seed.ToString()); } private bool CompareHash() { //compare the hashes bool goodLogin = false; //if the hash doesn't exist //because not a valid user //the return will be false if (dbhash != null) { //if the hashes do match return true if (newHash.SequenceEqual(dbhash)) goodLogin = true; } return goodLogin; } public int ValidateLogin() { //call the methods GetUserInfo(); GetNewHash(); bool result = CompareHash(); //if the result is not true //set the key to 0 if (!result) key = 0; return key; } }
Here is the code for the login button also with comments

Try it. Register a user and then login with that user's username and password